Scratch Interceptor-like Original Design / Scratch Built
Scratch - Interceptor-like {Scratch}
Contributed by George Pike
| Construction Rating: | starstarstarstarstar_border |
| Flight Rating: | starstarstarstar_borderstar_border |
| Overall Rating: | starstarstarstarstar_border |
| Manufacturer: | Scratch |
 Brief:
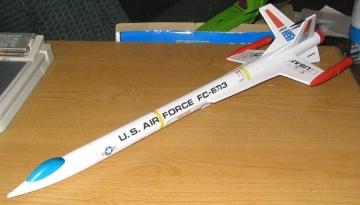
Technically, this isn't a clone because it's not an exact match of the classic Estes Interceptor, but who's counting? I had a leftover 18 inch length of BT-50 body tube and a "Nemesis"-style PNC50 nose cone (the kind with the cockpit and canards) and no idea what to do with them. Scouting around JimZ's Plans I came across the Interceptor, which was a favorite of my younger flying days (e.g. the 1970's). Even though the original plans called for a BT-55 tube, I decided this was the one to try.
Construction:
Although the plans call for a BT-55 airframe and nose cone, I used an Estes BT-50 and Estes "Nemesis" PNC50 nose cone that had come in packages at my local hobby shop. The "Nemesis" has a plastic cockpit like the original Interceptor, but also has two canards that were not part of the original. However, the grinder wheel on my drill was able to take care of the canards with no problem. The rocket features four fins, plus two "wings" in a slightly asymmetrical arrangement. The four fins are made with 1/8 inch balsa and the "wings" are made from 3/32 inch balsa. The original Interceptor also had several other plastic parts including pods on each of the two "wings" and an exhaust nacelle attached to the motor mount. As a replacement for the wing pods I used short lengths of BT5 tubing with nose cones fore and aft. The nacelle used small pieces of balsa to create a nozzle-like effect. A 2.75 inch length of BT-20, two 20-50 centering rings, motor hook and engine block were used for the motor mount. 1/8 inch launch lug, shock cord, parachute and other standard parts round out the components list.
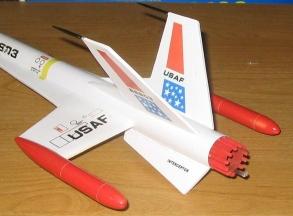 Like most Estes rockets, the plans are well detailed and pretty easy to follow. The motor mount was pretty standard with 2.75 inch length of BT-20, a motor mount block, and engine hook and two 2050 centering rings. On the original there would be a plastic engine nacelle attached to the back 3/4 inch of the motor mount, which sticks out the back end of the rocket. As a substitute I used 11 small balsa pieces, about 1/8 inch square and 3/4 inch long that were glued to the motor mount tube and spray painted red. An image is attached to provide the detail. It's not an exact match, but it is pretty close.
I used a BT-50 airframe and nose cone rather than the original BT-55, but kept the original 18 inch length. (I think the narrower airframe tube gives the rocket an overall leaner, more aggressive look.) Since the length of the rocket was the same, I decided to keep the fin and wings at their original size. One challenge was aligning the fins. As mentioned they are asymmetrical, not on even 60 degree marks. Fortunately the plans have an alignment cross section which I resized to meet the BT-50 airframe and was able to mark the body tube. The two main fins and two wings are both in two parts (main fin/wing and a forward fairing). I decide to attach the fairings to the fins/wings before mounting the fins/wings on the airframe. However, they were very fragile and one wing fairing was slightly off center. It might have been easier to mount the fins/wings on the airframe, then attach the fairings afterward.
The original Interceptor had plastic pods attached to the wings. I ended up using a 1.5 inch length of BT5 body tube, a 2.5 inch long BNC5W for the front and a stubby 0.75 inch BNC5V (both available from Balsa Machining Service) as substitutes. Again, not an exact match, but pretty close. These are glued to the outside edge of the wings, which needed some sanding to match the curved nose cone shape. Two squared toothpicks served as the fin antennas. Dual launch lugs, shock cord (I use Kevlar tied to the motor mount, attached to 1/4 inch elastic rather than Estes' standard tri-fold paper mount) and chute rounded out the construction.
 Finishing:
After filling the spirals and fins with diluted Elmer's Fill 'n' Finish and priming the whole rocket, I painted Interceptor a Krylon gloss white with Color Spray (a Wal-Mart brand) cherry red enamel for the pods and engine nacelle. For the decals I purchased clear decal paper from TangoPapa Decals and printed out the scanned decal images from the JimZ plans. I used many of the major decals, but there are 30 or 40 total decals available and I did not use them all. If you look very closely you can see some fuzziness from the scanned images, but on the whole they worked out very well. Last, I used some metallic blue Dupli-Color automotive spray paint for the cockpit, and covered the whole rocket with Krylon clear coat for a nice shine and to protect the decals.
Construction Rating: 4 out of 5
Flight:
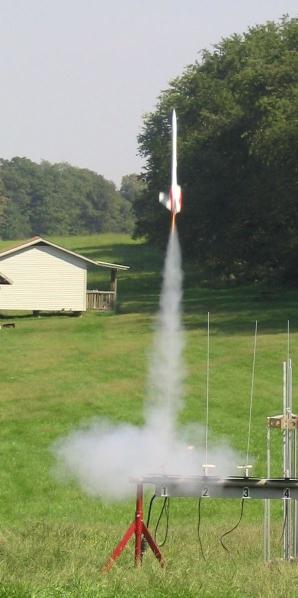
Interceptor has now flown six times, on B6-4 and C6-3 motors. She is a nice straight flier with less weathercocking than might be expected.
Recovery:
The only problem has been recovery when on three of the six flights the shock cord caught on either the wing pod or antenna resulting in a tangled chute, however, there was enough deployment and drag that she landed each time without damage.
Flight Rating: 3 out of 5
Summary:
This is a fun, but basic futuristic scale rocket and one of Estes classics that was nice to 'return' to my collection after a nearly 30 year hiatus. It really needs the decals to bring out the classic look. The only con is the recovery tangling problem. Shortening the shock cord might help, but possibly at the cost of dented body tubes or zippers. But since none of the tangled recoveries has resulted in damage, I'm not going to worry about. All in all, it was nice use of those leftover parts.
Overall Rating: 4 out of 5
Related Products
 |
 |