| Construction Rating: | starstarstarstar_borderstar_border |
| Flight Rating: | starstarstarstarstar_border |
| Overall Rating: | starstarstarstarstar_border |
| Diameter: | 1.64 inches |
| Length: | 30.50 inches |
| Manufacturer: | Semroc  |
| Skill Level: | 2 |
| Style: | Cluster, Futuristic/Exotic |
Brief:
Semroc Hydra-VII is a 7 motor cluster rocket with a futuristic design.
Construction:
The kit included every part that was described in the long list. There is a very nice exploded view of the rocket in the instruction sheet that helps in identifying the wide array of parts, along with 3 sheets of very nice laser-cut balsa fins and a host of tubes and several nosecones. The kit comes with some plastic parachutes that require assembly. All of the hardware seemed to be complete and adequate. The step-by-step instructions are clearly illustrated and complete.
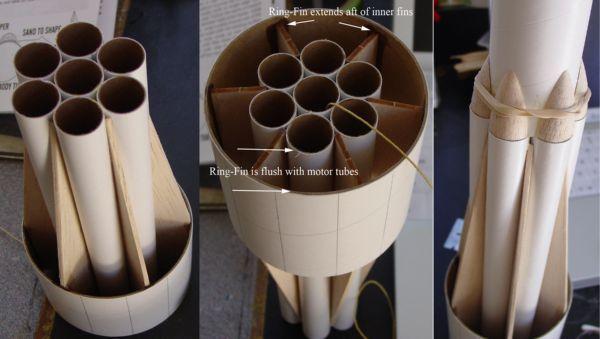
I built the rocket according to instructions, using all shock cord, screw eyes, etc. that came with it. The construction process involves assembly of the big, complicated-looking rear section consisting of a big ring fin (referred to in the instructions as an augmenter shroud) with a host of small radial fins both at the interior and exterior of this ring. The fins were very easy to deal with. The instructions suggested sanding them to size at a couple of appropriate points. The instructions suggest appropriate fin-alignment markings and alignment techniques, making the fin assembly straightforward throughout. The instructions suggested yellow glue for the fins. I used medium CA to securely tack all fins in place and then added very limited yellow glue fillets throughout. In many places I had difficulty adding fillets because my fingers are too big to fit into many of the narrow inner fin spaces.
The instructions begin with an extensive description of the assembly of the 7 parallel motor tubes. The description is I think overly laborious but is clear and does a good job of insuring that the foundation of the rocket is secure and correct. The interior fins are slotted between the 6 motor tubes that surround a central motor tube (all motors are 18mm). The big ring fin fit over the inner fins like a charm after sanding the edges of the inner fins a bit. I made this fit too tight at first during a dry fit, resulting in some obviously bent, overstressed inner fins. I removed the big ring and performed the aforementioned sanding of the inner fins resulting in a tight but gentle fit. When gluing the big ring in place, I pressed it aft, onto the table, making the rear edge of the ring flush with the aft end of the motor tubes. I then realized that this was not according to the design. I noticed that the rear edge of the inner fins sweep forward about half and inch. This fine point was not easily seen in the otherwise very detailed drawings in the instruction manual but is something that an experienced builder should have picked up on. The ring was meant to be installed so that its rear edge is flush with the rear edge of the inner fins, not the rear end of the motor tubes. I could not reverse this step, so I continued on, reasoning that this flaw would not be detrimental to flight and that the rocket would look nearly as intended. Addition of all exterior fins was quickly done with CA and went without a hitch.
The 7 motor tubes all butt up forward to a large body tube. The 6 outer motor tubes each get half of a nose cone, creating the cool nubbly transition from the rear motor assembly to the single large body tube up front. The balsa nosecones must be cut in half and sanded to fit. I used my small belt sander to aid in this process and got a pretty good fit all around with the judicious addition of some masking tape here and there. I think that assembly of these nosecones pushes the skill level of this kit beyond the reach of a beginner but makes it suitable for someone wanting a significant challenge. Assembly of the long, beefy front tubes and nosecone is straightforward. The instructions suggest plugging all but the central motor tube. I left 3 additional tubes open to allow for motor ejection, in case all motors do not light. This needs to be considered carefully when preparing for flight.
During construction of the rocket, it occurred to me that finishing the rocket with anything close to the recommended color scheme was going to be extremely difficult due to the intricate nature of the rear assembly. I decided early on that I would have to dream up some simpler paint scheme especially since I don't like to spend much time painting my rockets. Masking off detailed areas of the rocket would obviously be very difficult. Sanding the details was going to be a challenge as well.
PROs: The instructions are detailed and well illustrated. The parts are all good quality, especially the fins.
CONs: I messed up the position of the augmenter shroud and the instructions might provide slightly more detail emphasizing the intended construction method here. In the end though, it was I who slipped up. Assembly of the plastic chutes is probably not worth the effort. I substituted some preassembled chutes that I had on hand.
Finishing:
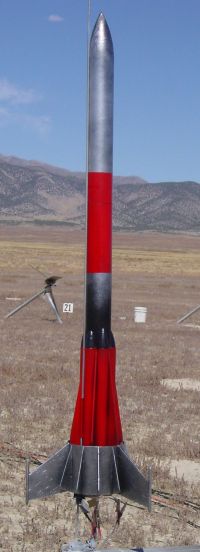
By the time I completed construction, it occurred to me that I am not particularly enamored with futuristic design model rockets. I admitted to myself that I chose this kit because of the 7 motor cluster flying challenge, not because of the futuristic design. Thus, I decided that I would not go to the trouble of carefully sanding details and hand painting all of the fins according to the manufacturer's recommendations. I wanted to be able to mask off large areas and spray the rocket, thus I proceeded to mask off things in a generally concentric fashion and sprayed it red, black, and silver. I decided not to apply the decals since I did not count this paint job among my best. If my son decides to repaint it, he can apply the decals at that time. My enthusiasm for the rocket was flagging considerably as I imagined the effort that it would take to do justice to the design with a perfect paint job.
PROs: The tubes and fins hold paint just fine and minimal sanding was required before I gave it a rather poor paint job.
CONs: I am not fond of the detailed painting required. If I were to redesign the instruction sheet for this rocket, I would suggest that all fins, tubes, and nosecones be painted before assembly. This would actually be very straightforward and would not interfere with assembly, providing even the most unenthusiastic painter the chance to finish the rocket in near-archetypal fashion.
Construction Rating: 3 out of 5
Flight:
For the first flight, I used 4 C6-5 motors. Rocksim puts this at about 1200 feet. It think that might be a bit higher than it actually flew. All 4 motors ignited and the boost was straight and nice. The boost was a bit slower than I expected, which gave it just a little bit of a majestic look to the takeoff. All motors fired their ejection charges. The upper section recovered fine on a 12-inch ASP mylar chute (a bit too much chute for the upper part), but the lower part had troubles. The rocket came down like a perfect inbound missile and lawn darted rather badly. The 18-inch plastic chute that I had intended to recover the heavy lower section of the rocket was melted into a blob, hence the poor recovery. Perhaps I forgot to install recovery wadding? I just cannot remember... I did not notice any wadding fly out at deployment, but I also might not have been paying that much attention either. The main body tube is a complete loss, but all of the small nosecones and all parts aft of the transition appear to be in perfect condition, so I think that I can rebuild it fairly easily. I suspect that upon rebuilding this rocket will take on a new character and may get bashed into something unusual--requiring a new paint job, of course.
Recovery:
I installed the recovery system as suggested and I think that it is adequate.
PROs: Nice boost, very stable flight (even when coming down without the front section). Clusters are cool.
CONs: None, other than the problems I caused myself. Also, I would prefer to recover the rocket in a single piece rather than according to its current two-part design.
Flight Rating: 4 out of 5
Summary:
The Semroc Hydra-VII has the look of a complex, futuristic design rocket that flies with a 7-motor cluster (7 x 18mm) and recovers in 2 pieces. I purchased the rocket in order to experience the cluster flights and only during construction and finishing did I admit to myself that the futuristic rocket design does not hold a special place in my heart despite having grown up around a variety of such groundbreaking designs (like the Mars Snooper). I just do not recall having ever been drawn to the sci-fi aspect of model building. I am thus not a good judge of Semroc's entry into the retro design and clone arena. I think that they have done a very good job assembling a kit from quality parts and they have simplified the assembly of this complex kit. I have a couple of other kits from Semroc, but I will skip building their other futuristic design kit, the Laser-X, since I probably would not do it justice.
Overall Rating: 4 out of 5
Other Reviews
- Semroc Hydra VII By Nick Esselman (August 9, 2008)
The Hydra VII is my second Semroc kit. My first one, Lil' Hercules , never got reviewed by me and only saw one flight as it vanished from the pad. My second impression of Semroc, which confirms my first, is that they run a very professional company. From 1969 to 1971, " Semroc produced a full line of rocket kits and engines. At its peak, Semroc had twenty-five full time employees working at ...
- Semroc Hydra VII By David Hash
Brief: The Hydra 7 is a currently the "newest" kit by Semroc Astronautics (originally released in 1969 and re-released on January 1st, 2004). The rocket is based around six 18mm motor tubes and is a great clustered, high altitude payloader, and retails for $23. The rocket can fly on anything from 1 C6-3 to 3 C6-5s to 7 C6-7s. With its largest motor setup (7 C6's) it is ...
 |
 |
Flights
|
|