| Construction Rating: | starstarstarstarstar |
| Flight Rating: | starstarstarstar_borderstar_border |
| Overall Rating: | starstarstarstarstar_border |
| Diameter: | 1.64 inches |
| Length: | 30.50 inches |
| Manufacturer: | Semroc  |
| Skill Level: | 2 |
| Style: | Cluster, Futuristic/Exotic |
The Hydra VII is my second Semroc kit. My first one, Lil' Hercules, never got reviewed by me and only saw one flight as it vanished from the pad. My second impression of Semroc, which confirms my first, is that they run a very professional company.
From 1969 to 1971, "Semroc produced a full line of rocket kits and engines. At its peak, Semroc had twenty-five full time employees working at two facilities." 31 years later, Semroc is back with updated kits. I say, welcome back... and when will those engines be produced again?
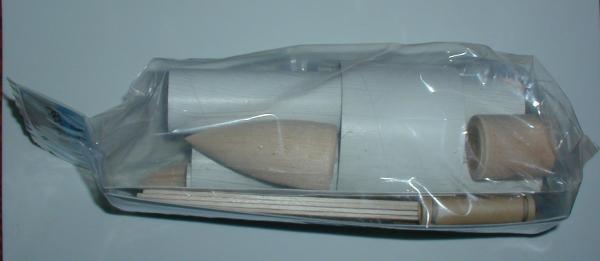
Anyhow, back to the Hydra VII. One has to say "wow" when this small package is opened up and explored. There are a lot of parts packed in this plastic bag. The rocket that is assembled from all these parts equally deserves a "wow".
There are simply too many parts to list, however, some key parts includes solid balsa nose cones and tube coupler. The fins are laser cut 1/8" balsa. The body tubes are standard tubing. For more details, follow along.
CONSTRUCTION:
 The instructions are printed on the front and back of six pages of 8½ x 11" paper. These are neatly attached and assembled into an instruction booklet with a cardstock cover. The instructions are full of excellent illustrations. Top quality and possibly even better than color photos. There is a tube marking (2D) template, finishing, and set/flying instructions included in the booklet. As I stated, very professional from the front color illustration and product specs to the last page listing the NAR Model Rocket Safety Code.
The build of the Hydra is typical of other rockets, however, there are some highlights that should be pointed out.
The laser-cut fins are awesome. And, interestingly these are worked on first. They are sanded and sealed right away. This is an important step, because once this bird is assembled you would not be able to reach all the fins to give them a nice finish.
Next, all the motor tubes are glued together to form a 7-motor cluster. A central 18mm tube, surrounded by six outer 18mm tubes. These motor tubes make up the the lower 1/3rd of the rocket. They also form the inner structure of this portion of the rocket.
Next, the six long fins are glued into the joints of the six outer 18mm motor tubes. These are the inner fins, the ones you will be glad you pre-sealed and sanded!
Next, the outer ring is marked and then attached to the six inner fins. I had to do just a tad bit of sanding on them to allow the tube to slide over the fins nicely.
The six outer motor tubes are then plugged using a laser-cut fiberboard disc that is glued to an 18mm thrust ring. These are then glued into the bottom of the six outer tubes by using a provided "Engine Spacing Tube" to ensure they are all even. There is a note highlighted in the instructions here. It says, "Some builders prefer to leave more engine mounts open to increase the odds that in case all engines do not ignite, there is a backup." Did I? Nope, so lets see what happens. Frank Whitby did according to his review below.
The central 18mm thrust ring, gets a Kevlar® shock tether tied to it, prior to being placed in the tube.
For the above two steps Semroc included a glue applicator (Q-Tip™) and a "Engine Spacing Tube" as tools. This again highlights Semroc's thoroughness (professionalism).
 What I found to be the most difficult part of the build is next. First, the 3 small balsa nose cones need to be cut in half and then sanded on a piece of sandpaper attached to the large body tube. This allows for a good formation of the balsa nose cone halves. These are then placed into the six outer motor tubes. The main body tube should slide down inside the circle formed by the six nose cone halves. I had to make several attempts, sanding more on the nose cone halves each time. When the fit was good, everything was glued into place.
Now come the 15 fins! First the three main fins are glued in place. I made a mistake here and had to cut two of them back off. To avoid the mistake I made, pay close attention to the marking of the out tube instructions. After the three main fins are in place, then four smaller fins are glued in-between each of the main fins. Yep, a total of 21 fins are on this rocket when complete with this step.
The rest of construction is quick. An elastic shock cord is attached to the Kevlar®. Two 12" parachutes are attached to this shock cord. An eye-screw is added to the bulkhead (coupler) and then it is glued in place to the upper body tube. To this another elastic shockcord and another 12" parachute is added. The nose cone is then added. I glued mine in place, even though it is designed to be a payloader.
I have to admit that I had a lot of trouble finishing this rocket. I used my typical method with Plasti-Kote Primer and worked it quite a bit. Even after that though, I still had grain showing in those hard to reach spaces between the fins and the balsa nose cone halves on the top of the motor tubes.
The rocket then sat for a long, long time. I finally got motivated to put some paint on it for NERRF4 and was determined to fly it. Well, the paint reacted and didn't look so good. Oh, well, I was still determined to fly it.
Overall, for CONSTRUCTION I would rate this kit 5 points. The instructions are descriptive and easy to follow. Laser-cut fins and the decals really add to the quality of the kit. Again, the most difficult part of the rocket is the finishing portion.
 FLIGHT/RECOVERY:
Unfortunately, the rocket didn't get put in the air at NERRF4 so I shipped it to Virginia to be flown at NARAM50.
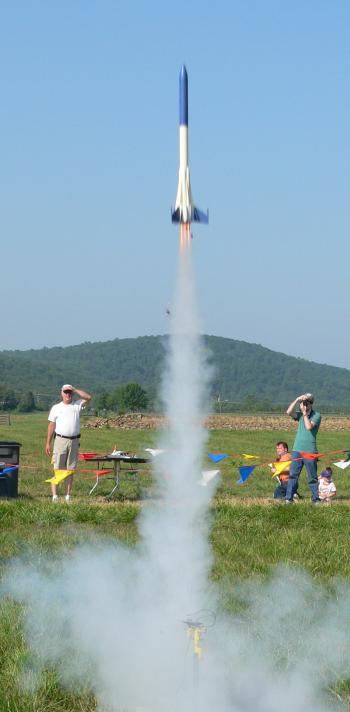
I decided to fly it for the first time 6x C6-0's and a C6-7 in the central motor. I used Estes ignitors and wired them all together with some copper wire. I then taped each wire joint.
The cluster launch was exciting and it is always nice to see the extra smoke and flame. People were saying, "I saw at least 4 light" and "I think they all lite". That is the case, you know, you never know until your recover the rocket.
Recovery?! Well, the upper section drifted and drifted and while I kept looking back and forth I was comfortable that I saw where the lower section landed (on the two chutes). The upper section though went way out of the field. I made one sweeping attempt in the very over grown section of swampy weeds and then said to myself, "oh, well." As the old saying goes, "If you don't want to lose it, don't fly it."
With that I doubled back and tried to go where the lower section landed. To my surprise I did not find it either. Later in the day, someone pointed out where it was. I went in after it and received two good scraps across the shin from thorny weeds and my Hydra VII lower section.
So, you must be wondering, "how many motor lite?" The answer is six. The most important one, the central motor and 5 of the C6-0's. Interestingly, all the C6-0's that lite pushed themselves out of the motor tubes and disappeared. No sure that is a good thing.
For FLIGHT/RECOVERY, I would rate this rocket 3 points. It is a complex looking rocket, however, if flown with a single motor it is very easy to set up. As a cluster, I'm concerned about the kicking motors and that should be addressed. I see from other's experiences that most like the flight of the rocket and I have to admit it brings a level of excitement to the model rocketry flying field. I decided to give it "average" which is a good rating due to the complexity of the cluster set up and no motor hooks.
I give the rocket an OVERALL rating of 4 points. If you are looking for a nice project and one that you could do a great job finishing, then the Hydra VII is the rocket for you. It has excellent quality of parts and instructions. Take your time though and think out your finishing plans. You may choose to finish some fins before gluing them in place. Semroc does put out quality kits.
Other Reviews
- Semroc Hydra VII By Frank G. Whitby
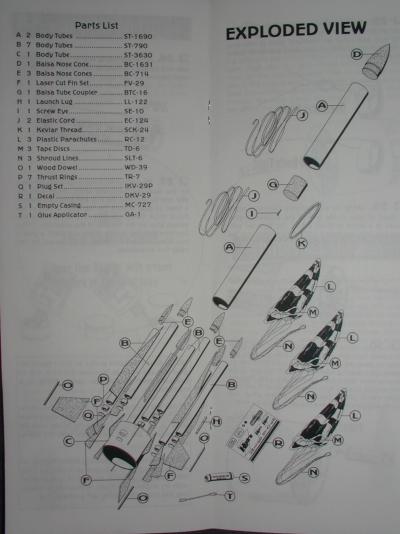
Semroc Hydra-VII is a 7 motor cluster rocket with a futuristic design. The kit included every part that was described in the long list. There is a very nice exploded view of the rocket in the instruction sheet that helps in identifying the wide array of parts, along with 3 sheets of very nice laser-cut balsa fins and a host of tubes and several nosecones. The kit comes with some plastic ...
- Semroc Hydra VII By David Hash
Brief: The Hydra 7 is a currently the "newest" kit by Semroc Astronautics (originally released in 1969 and re-released on January 1st, 2004). The rocket is based around six 18mm motor tubes and is a great clustered, high altitude payloader, and retails for $23. The rocket can fly on anything from 1 C6-3 to 3 C6-5s to 7 C6-7s. With its largest motor setup (7 C6's) it is ...
 |
 |
Flights
|
|