| Construction Rating: | starstarstarstarstar_border |
| Flight Rating: | starstarstarstarstar_border |
| Overall Rating: | starstarstarstarstar_border |
| Diameter: | 0.92 inches |
| Manufacturer: | Semroc  |
| Style: | Sport |
Brief:
Semroc "X kits" are reintroduced reproductions of classic kits from Estes, Centuri and FSI but in very affordable format as essentially parts kits. These kits include just the parts and a basic header card, pointing the modeler to detailed instructions available online in the public domain, typically through JimZ's archives. This helps keep the cost down on these to the $10-15 range versus their comparable products that run about $5 more. Given the increasing number of niche market vendors supplying instructions via CD instead of printed format, I think this is a trend that is likely to benefit us all by saving trees and a little money. For the modeler who doesn't have handy computer access, the lack of instructions are an inconvenience that can be resolved with a trip to the local library, but for the online crowd reading this review it's no big deal at all.
This specific kit was originally introduced by FSI in 1967 and was offered in different versions over the years. It started out as a 21mm kit but later included an 18mm conversion. It also initially had a streamer recovery but given the weight was quickly changed to parachute.
The Semroc reproduction sticks with the original plywood fins but loses the hardwood nose cone in favor of a much less expensive (and lighter) balsa cone. The body tube is a close cousin to the 21mm tube at 22.5mm ID and includes the necessary gear for 18mm motors.
Construction:
Your $13.50 (retail) gets you the following:
- Balsa nose cone
- 2 9" body tubes (0.921" OD)
- tube coupler
- Laser cut plywood fins (3)
- 18mm motor mount kit including block and metal hook
- Kevlar+elastic shock cords
- Waterslide decal
- 12" plastic chute
Instructions are available courtesy of Scott Hansen's archives.
This was one of my first FSI kits, reproduction or otherwise (the other was on my bench running parallel to this one), and while they were adequate instructions, they are definitely a step or two behind today's standards. Illustrations were hand drawn, construction notes were minimal and scanned from originals that were a bit hard to read. That said, this is not at all complex to build, and any modeler with a reasonable amount of experience can easily get this built and flying with only a couple hours' effort.
I began by pre-treating the balsa nose cone and body tubes with a light filler and sanding. I was having a big "retro weekend" working on 8 different models concurrently, so mixing up and applying a batch of filler all at once wound up being pretty efficient. The fins, being very nice plywood, did not need anything. I think this might be the first Semroc kit to use plywood (other than larger SLS kits), and while they were a bit heavier than balsa, I really like the strength these offer. Almost makes me wish the body tube could handle 24mm motors, as the worst stress I can put these fins through is a D21.
The motor mount is a standard 18mm tube with a pair of centering rings, metal hook, and CR-18/13 motor block. The centering rings are very small, as the ID of the body tube is only about 22.5mm, but everything fit fine.
The body tubes held to the original kit design of two 9" tubes connected via coupler. I know that's holding to the original design and makes packing/shipping easier, but I'd have loved a single 18" length and one less seam to deal with. However, that's a very minor beef from an overly anal-retentive modeler.
The shock cord favors a style called out on the original kit rather than the typical anchor-to-motor-mount method used in most other Semroc kits. For this kit, you thread the shock cord through a fairly strong adhesive label that has 3 holes punched in it, anchor one end via a knot, then attach to the inside of the tube. Essentially the same as the paper tri-fold technique we all know and hate, but this was easier to do and struck me as a little less likely to fail down the road. It was also the first time I'd run across this method, and I generally liked it (mainly due to the pre-punched aspect of it). The other FSI kit I was working on (a BMS clone) used a similar technique, however, it used a piece of thick-walled body tube instead of a heavy-duty label, which was even more rugged.
Finishing:
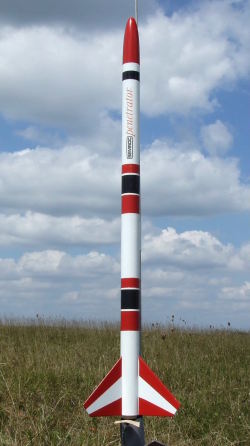
Finish for this would push the skill level north of 2.0 to maybe 2.5-3, as there are some slightly challenging masking requirements if you want to hold to the cover art scheme. In particular, the fins offer a 2-color/3-section pattern and the body tube includes very thin horizontal stripes that can cause masking headaches. All of these could have been avoided fairly easily via decals, so I'll ding this half a point for that (even though it would have driven up the cost a little bit). As it is, the one decal supplied is the basic model name with Semroc logo.
After applying white primer, I went with a base of Krylon white. Allowing a couple days to cure out (plus time to finish other models), I then masked off the fin area and body tube stripes that remain white and followed up with red on the fins, body tube, and nosecone. Lastly, I masked off the red areas and shot the last three body tube stripes with gloss black.
Construction Rating: 4 out of 5
Flight:
For the first flight, I wimped out a bit and went with a B6-4 as the winds were kicking up a bit at our field and I had a large number of flights I wanted to get in. It started off fine off the rod then weathercocked a bit into the 8-10 mph winds. The -4 delay would have been perfect, but due to the weathercock, it was a little past apogee maybe just as the nose turned down.
Recovery:
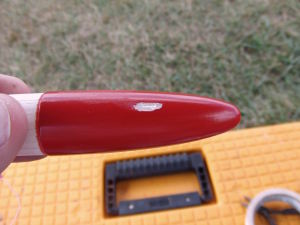
The 12" plastic chute deployed fully and brought everything back safely. Upon inspection when I picked it up, I noticed a small dent at the front of the body tube. Uh-oh... Sure enough, when I inspected the beautifully grain-free and shiny red nose cone, there was a decent gouge from the snap-back at ejection. Obviously the elastic-only shock cord is too short for today's ejection charges.
Flight Rating: 4 out of 5
Summary:
I'm not that big a fan of payloaders in general as I'm a bit old for the bug-flying experiments, but I do like the styling of this one. It was a little challenging to paint but looks nice when done.
I also think the cost factor of the xKit would have to be considered a big pro as well.
I would definitely supplement the shock cord with at least another 12-18 inches of elastic (or better yet, Kevlar) though. The amount supplied is barely the length of the body tube.
Overall Rating: 4 out of 5
Other Reviews
- Semroc Penetrator By Dale Marshall (December 13, 2010)
The Semroc "Penetrator" is an X-Kit. This kit is a reproduction of the Flight Systems Inc, kit first released in 1967. Construction The kit consists of: Balsa nose cone. 2 x 9" body tubes (0.921" OD). Tube coupler. Laser cut plywood fins (3). 18mm motor mount kit including block and metal hook. Kevlar+elastic shock cords. Waterslide decal. 12" plastic chute. ...
- Semroc Penetrator By Chan Stevens (September 6, 2008)
Semroc "X kits" are reintroduced reproductions of classic kits from Estes, Centuri and FSI but in very affordable format as essentially parts kits. These kits include just the parts and a basic header card, pointing the modeler to detailed instructions available online in the public domain, typically through JimZ's archives. This helps keep the cost down on these to the $10-15 range versus ...
 |
 |
Flights
|
|