| Construction Rating: | starstarstarstarstar_border |
| Flight Rating: | starstarstarstar_borderstar_border |
| Overall Rating: | starstarstarstarstar_border |
| Diameter: | 1.33 inches |
| Length: | 11.25 inches |
| Manufacturer: | Semroc  |
| Skill Level: | 2 |
| Style: | Scale |
 Brief:
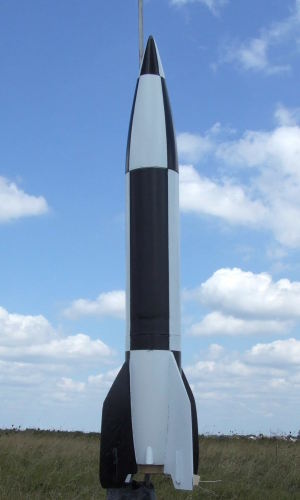
A "bag of parts" clone kit, in this case a reproduction of the K-22 V-2. For many modelers, this was their first introduction to scale model rocketry. The V-2 was a German developed missile, and as WWII drew to a conclusion, it was the most capable rocket in the world. When America brought Werner von Braun and his crew over from Germany, the V-2 knowledge gave us the much needed jump start to move towards the space age.
Construction:
This one retails for $16 but features some very nice quality custom parts:
- Balsa nose cone
- BT-55 body tube
- Balsa boat tail
- BT-20 motor tube
- laser cut fins (both scale and semi scale versions)
- plastic chute
- rubber shock cord
- 3 launch lugs
The xKits are just parts--instructions must be downloaded from online archives that store scans of the originals. In this case, the JimZ's site features both tiff format and PDF. URLs are provided in the kit as well as hyperlinked from Semroc's main site.
Construction starts simply: the motor tube is glued inside the boat tail. The fit was snug but fine so go light on the glue. The motor block is set via a dummy motor casing (provided with the kit).
You'll need to decide whether to go scale or semi-scale on the fins. Both sizes are provided. Scale fins will look more realistic, of course, but the smaller fins mean less stable, which means adding more nose weight. Semi-scale larger fins result in a rocket that's lighter overall. I went with scale.
Fin mounting on a boat tail is a bit of a challenge. Regular tube marking techniques won't work. The technique featured in this kit is a pair of jigs that are basically centering rings with a squared base. One fits the aft end of the boat tail and the other fits the forward end. Each has a series of tic marks for marking fin lines. Once marked, it's up to you to figure out how to draw a straight line along the curved boat tail. [Tip: Use the thick paper from the kit's header card.]
After the fins are mounted, the next step involves cutting 4 detail parts from launch lugs. You'll definitely want to print the original instructions for this step as they include a pattern sheet.
The last pieces of trim are servo pods, which are tiny balsa strips laser-cut, mounted to the fins. Again, print out the directions for a location marking template.
Shock cord mounting is a bit unusual but a faithful reproduction of the original technique. Instead of the tri-fold method, you tie a knot in one end of the rubber then glue it inside the body tube held in place with a piece of gauze. It strikes me as at least as reliable as the tri-fold, but I'd rather have Kevlar®/elastic any day.
Proper weighting of the nose cone is critical as the V-2 is a notoriously unstable design on its own. If you went with semi-scale fins, the provided nose weight is sufficient, The CG (loaded with motor) needs to be about 7.5" at of the nose tip. For scale fins, the CG needs to be about 6" from the tip, with motor loaded. In my case, this extra weight put me up to a relatively hefty overall weight of 2.44 ounces, well over the 1.6oz "standard" weight on the header card.
Finishing:
Finishing on this was a pain, but the end result is a very nice-looking mostly scale finish. You've basically got a checkerboard type of black and white so there's a lot of tricky masking involved.
I started by filling grains an spirals. Lately I've been using honest to goodness Elmer's Fill 'n' Finish (in tub form, from Lowe's) rather than the Elmer's Wood Filler. When I put a dab on my finger then wet the surface of a nose cone, I can quickly rub a light layer across it that sands off very easily after a couple hours. The result is a mirror smooth finish with very little effort.
The whole rocket got two coats of primer followed by two coats of Krylon gloss white. It's not as shiny as Rustoleum but dries much faster so I can mask and accent after about 24-30 hours.
For masking, I mostly used a new product I absolutely rave about: Frog tape. It's green (thus the name), has pretty good tack (stronger than blue tape, weaker than regular masking tape), but really grabs at the edges and is great at preventing bleed through.
Fin masking is straightforward--two opposing fins are masked off (remaining white). Just above the fin lines, extending to the end of the body tube, you divide into fourths, with opposing sections masked off/white. The header card illustrates this fine. Please note that these are not pure/straight lines, as they start on the sloped surface of the boat tail.
Now for the really hard part: the nose cone. There are a total of 8 sections on this nose, all sloped to some degree. I wound up taking a piece of paper and taping it around one side of the nose cone. Next, I took a piece of string and pinned one end to the tip of the nose, then pulled the other end taught where the nose intersected one of the white/black seams of the body tube. I then traced that string line (chalk line might have worked, but would have been too thick). I repeated this for the other "edge", running from the nose tip to the other end of the black/white seam from the section I'd lined up with on the first line. The result was a template that looks like 1/4 of the nose cone.
I then took this template, and traced the outline onto two pieces of masking tape, then cut out the shapes from the tape. Finally, since the black and white sections don't run all the way up the nose, I marked points roughly 3/4 of the way up on each tape silhouette and cut off the top sections of each. I then applied the "bottom" of each tape silhouette on opposite sides of the nose cone using the body tube patterns to align with. I then took the remaining top pieces of the tape silhouettes and applied them just above and between the taped bottom portions. The intersected perfectly, which meant I did a good job with the template.
Now with all that taping done, even using the excellent no-bleed Frog tape, which I've now seen available at that major home supply center with the orange banners for about half what I paid, I didn't want to risk black bleeding under onto the white so I shot the whole rocket with one very light coat of white primer. This way, the primer would penetrate (if anything could penetrate), and form a tight seal. The "bleed" would basically be the same white as the undercoat, so would not be noticed. After the primer, I shot two coats of gloss black. When I removed the tape, the seams were perfect.
Construction Rating: 4 out of 5
Flight:
First flight was with a C6-5, figuring with all my added weight an A would be grossly underpowered and a B6 in the moderate winds might get into trouble with less velocity off the rod. There was a little bit of a corkscrew action off the rod as it needed to fight for stability, but it quickly found a vertical path, even weathercocking a bit. The -5 was the right delay, deploying just past apogee.
Recovery:
Recovery on this was almost as much fun as finishing it--that rubber shock cord proved to be feeble, especially with my added nose weight for scale fin stability. It snapped right away, leaving my body to tumble down and the nose cone to ride the thermal in the 8-10 mph winds towards the edge of our park and almost into the nearby subdivision.
I was very fortunate to be flying with my club rather than solo. Two guys had spotted the body tumbling down and tracked it, while another buddy and I went after the nose cone/chute. I blinked for a split second as it went into the sun and lost it, but my buddy still had it. He gave me the line, while admitting that it was "way out there"--meaning about 350-450 yards and likely in 4-5 foot tall weeds and thorns.
I caught up with the two guys that tracked the body, and they had just found it. Coincidentally, one of them later managed to spot and track a CATO'd 24mm motor that ejected from a rocket and landed in 2-foot tall brush more than 50 yards from the pad so his vision was amazing that day.
I then started on the line to my cone. After walking for about 25 yards, I realized with the stiff breeze, it really wasn't tough to track much of anything, as all "lines" had to follow that breeze, and I aimed a degree or two left to better follow the wind. Sure enough, 5 minutes later I walked right up to the cone, which I'd have never been able to spot from even 5 feet away in either direction.
I was extremely lucky to have found both parts and am grateful to my fellow QUARKers who saved the day. All that prep and finishing work would have been a shame to waste on just one flight.
Flight Rating: 3 out of 5
Summary:
Needless to say, I'll be ditching that rubber shock cord for some good ol' modern Kevlar.
Other than the shock cord, I think this is a fine rocket and decent scale kit for anyone interested in starting to build "real" models rather than models of imaginary vehicles. The xKit value is also very appealing.
Overall Rating: 4 out of 5
Other Reviews
- Semroc V2 (xKit) By Dick Stafford (October 12, 2008)
This is the second Semroc V2 that I’ve built. You can see my earlier review elsewhere on this site along with (at least) one other opinion of this kit. I won’t repeat a bunch of background in this review and instead will focus on what I found and did differently. Most obviously, this build utilized scale fins whereas my previous V2 has the larger semi-scale fins (laser-cut ...
- Semroc V2 (xKit) By Dick Stafford (August 2, 2008)
The V2 xKit is a reproduction of Estes K-22, which was originally released in 1965. Like the original, it flies on 18mm motors and features balsa nose and tail cones. The xKits don't come with instructions but, since they are classics, copies of the original instructions are available on-line. This was my favorite rocket as a kid, and I couldn't resist grabbing one. The parts list: ...
 |
 |
Flights
|
|
|
|
D.S. (September 17, 2008)