| Construction Rating: | starstarstar_borderstar_borderstar_border |
| Flight Rating: | starstarstarstar_borderstar_border |
| Overall Rating: | starstarstarstar_borderstar_border |
| Diameter: | 1.33 inches |
| Length: | 11.25 inches |
| Manufacturer: | Semroc  |
| Skill Level: | 2 |
| Style: | Scale |
 Brief:
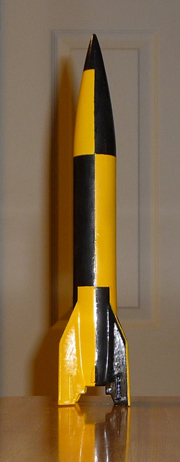
This is the second Semroc V2 that I’ve built. You can see my earlier review elsewhere on this site along with (at least) one other opinion of this kit. I won’t repeat a bunch of background in this review and instead will focus on what I found and did differently. Most obviously, this build utilized scale fins whereas my previous V2 has the larger semi-scale fins (laser-cut versions of both are provided).
Construction:
Parts included:
- One Semroc V2 xKit
- Lead shot
- 18” of Kevlar twine
- 3/16” launch lug
The first thing I noticed was that neither the nose or tail cones fit in the BT-55 tube. This is not uncommon and I easily sanded the shoulders down. But then I noticed that neither was flush with the tube. The base diameter of the cone and the top of the tail cone were too big. In addition, the tail cone looked like it got bigger in the middle before it tapered back down. I started merely sanding, but then I took a sharp hobby knife and ran it along the tube until it met the cone’s overhang and trimmed the excess off. I then went back to sanding and even had to backfill a few nicks that were too deep.
I decided to ditch the stock recovery components for a long piece of Kevlar twine. I tacked the twine to the motor mount with CA and then wrapped it in a loose spiral. I coated the inside of the tail cone with 5-minute epoxy and twisted the mount, wrapped with the twine into position. I used the provided dummy motor to support the mount during this process.
The fins and trim components all were installed in accordance with the original K-22 instructions downloaded from JimZ’s site. Nothing else to add here.
As noted in the brief instructions, the scale fin version requires additional nose weight. I referenced Semroc’s instructions, this thread on YORF and a RocSim model to determine how much nose weight was required. I used the scale file found in that thread and modified it for my design (including a tweak to the fin position). I drilled a 2.75” x 1/2” hole in the base of the cone using my drill press. I also carefully torque the cone while the press was running to expand the diameter a bit. I added enough lead shot (˜0.75oz, plus epoxy) so that it balanced the model at ˜5.2” from the tip without motor.
Finally, since I noticed some rod whip on my first V2 when powered with a C6-5, I swapped the provided 1/8” lug for a 3/16” lug.
Finishing:
Since I used the scale fins, I decided that I’d try a scale-style paint job. I’ve always liked the yellow/black patterns featured on the first few rounds fired at White Sands so I decided to pattern mine after round number two. I started with filling and sanding. When I went to grab the primer, I found I was out. Instead, I used silver XMetals basecoat as a uniform base color. I used Testors' yellow spray and coincidentally, silver was one of the recommended base colors. I masked the roll patterns with Frog Tape and used Rustoleum black, sprayed into a plastic cup to make it brush-on. The Frog Tape didn’t work all that well for me. In retrospect, I knew that I should have used a light overcoat of yellow to seal the edges, but hoped the Frog Tape would stand up to its claims. Bottom line - this is another ‘5-foot’ finish job.
I'm trying to keep down rating inflation in my reviews and just couldn't call this an average kit due to the nose and tail cone issues. I added half a point because of the residual memory of my first kit.
Construction Rating: 2 out of 5
 Flight:
The first and only flight (so far) was on a C6-5. I also used a 12” nylon 'chute in place of the stock plastic one. The boost was quite wobbly and it weathercocked a little.
Recovery:
It ejected close to apogee and recovered in good shape. I started with a below average rating for flight/recovery because of the amount of wobble on a recommended motor. I bumped it to average because it seems to be quite robust.
Flight Rating: 3 out of 5
Summary:
The scale fins on this kit make it look a little better, but the penalty is added weight. Even with the recommended amount of added mass it was marginal on the heavier C6. I’ll try a B6 next. The nose cone fit issue was easy to correct, but I don't expect to have to in this day and age. Based on my past experience with Semroc, I know the problems I had are not typical and I bet they'd even replace it if asked. I'll count this instance of this kit as average. I'd probably be more critical of these shortfalls in other 4FNC kits. However, there is an inherent coolness factor in this retro kit.
Overall Rating: 3 out of 5
Other Reviews
- Semroc V2 (xKit) By Chan Stevens (September 6, 2008)
A "bag of parts" clone kit, in this case a reproduction of the K-22 V-2. For many modelers, this was their first introduction to scale model rocketry. The V-2 was a German developed missile, and as WWII drew to a conclusion, it was the most capable rocket in the world. When America brought Werner von Braun and his crew over from Germany, the V-2 knowledge gave us the much needed jump start to ...
- Semroc V2 (xKit) By Dick Stafford (August 2, 2008)
The V2 xKit is a reproduction of Estes K-22, which was originally released in 1965. Like the original, it flies on 18mm motors and features balsa nose and tail cones. The xKits don't come with instructions but, since they are classics, copies of the original instructions are available on-line. This was my favorite rocket as a kid, and I couldn't resist grabbing one. The parts list: ...
 |
 |
Flights
|
|
|
|
D.S. (September 17, 2008)