| Manufacturer: | Scratch |
 BACKGROUND:
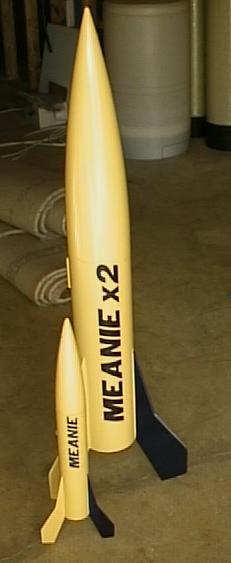
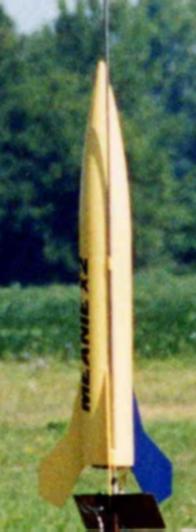
I have never made it a secret that I love the looks of Nordic Rocketry's Meanie. It is usually the first rocket I fly at every launch and I love it on D's to F's. Being the case, I decided that I would love a 2x version.
Coming up with a 2x version wasn't exactly possible since the original was 2.6" diameter airframe and the nearest to 2x tubing I could find was 5.5". So be it, I have a 2.11x version.
I decided on using Phexible Phenolic tubing which was purchased from Red Arrow Hobbies. I also decided to use 1/4" plywood for the fins and the LOC 5.5" Long Nose Cone (longer than the Minni-Mags).
In addition, it was going to be a 38mm motor mount and have an ejection baffle.
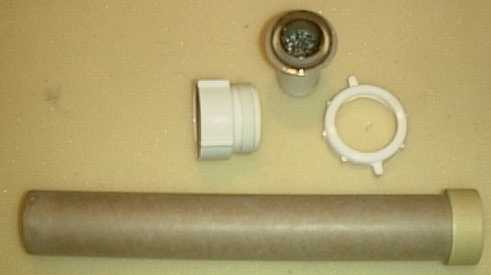
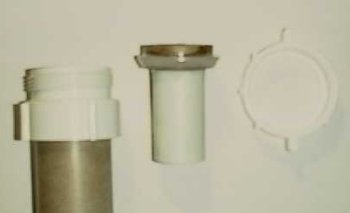
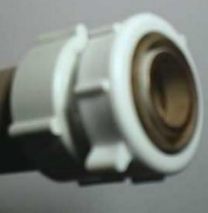
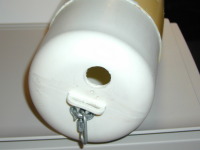
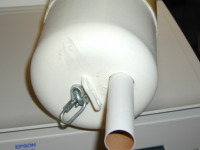
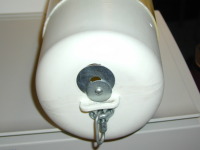
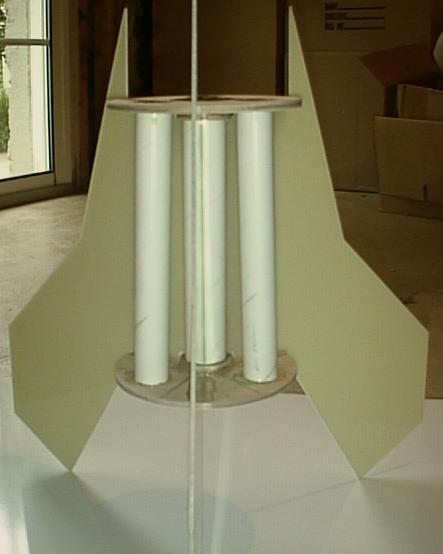
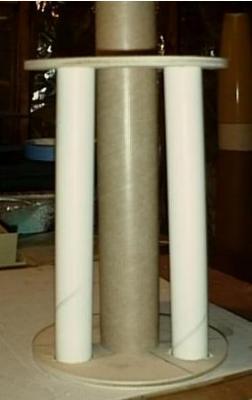
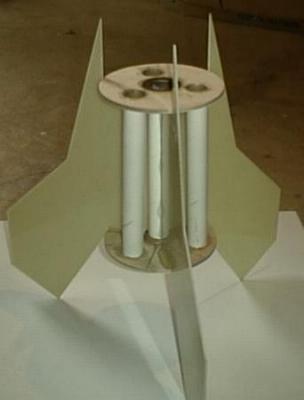
THE BAFFLE:
I heard about the troubles that people expressed with baffles getting clogged up and even on the LOC Baffle kit, I purchased, it said to clean it out with a pin every so many flights. This being the case, I decided to create a removable baffle unit.
The removable baffle unit was constructed using plastic plumbing components. The diameter of the 38mm tube was much too small to securely fit inside the plastic plumbing collar so I wrapped it with tape until it fit in loosely. Then using liberal amounts of epoxy I glued the motor tube in place. I then epoxied the plastic ferrule to the LOC baffle so that it slid inside of the 38mm tube and so that it was above the collar-nut. The pictures tell the story better.
THE NOSE CONE:
In order to get the Center of Gravity where it needed to be on the "stubby" rocket, I needed to get weight into the nose cone. I didn't want it permanent though. So I came up with a way to do it.
I first cut a 1" hole in the bottom of the nose cone. Then I used enough 24mm tubing so that when pushed into the hole it would reach all the way to the top (tip) of the nose cone. I then used a large and small washer to secure it. I then used bb's until I had enough weight to bring the CG to where I needed it. The bb's were epoxied in and then the rest of the 24mm tube was filled with foam. (Do this in small layers so it will dry) Using this method, I could use different 24mm tubes (weighted differently) as I changed motors . . . or at least that was the plan.
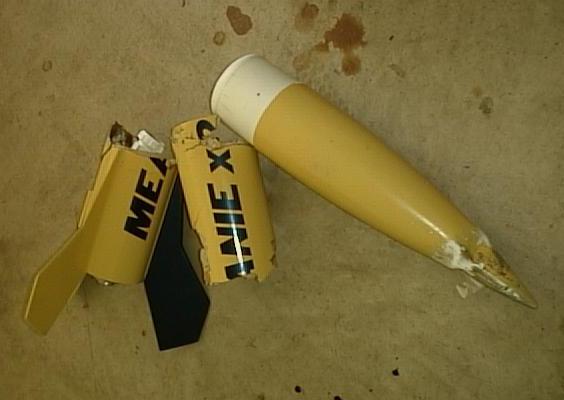
DID IT FLY?
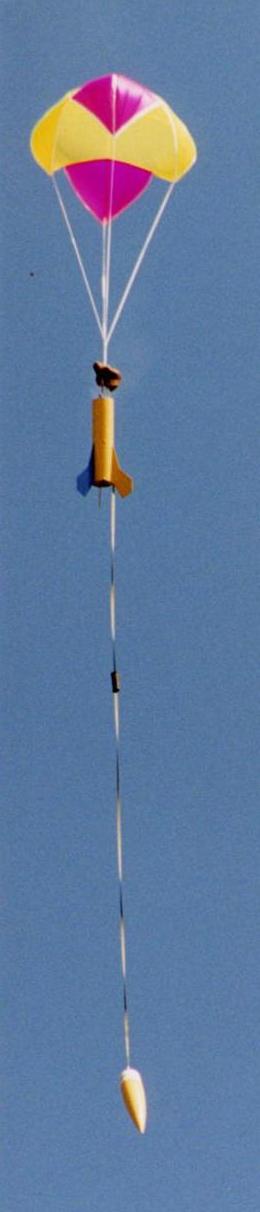
Yes. Weighing in at 6 1/2 pounds, utilizing two 43" JP parachutes with a 20 foot tubular nylon shock cord, and loaded with an H128 (using a 29mm motor adaptor), this bird looked great on the pad. A windy, windy day at Battle Park 1999, however, she was going to fly.
The countdown . . . ignition . . . lift off. It was beautiful! It reached about 500 feet and then started downward. NO EJECTION!
WILL IT FLY AGAIN?
Yes. I will rebuild it. I still have the other half of the 5.5" tubing but I need a new nose cone.
Below are the makings for the new motor mount. When finished it will be 1-29mm and 3-24mm. Notice how the 24mm are angled. These are aligned to have thrust in line with Center of Gravity. (I read about this canting in some publication)
In addition, I decided to do it right, so I paid Public Missiles to cut my new fins from G10.
 LESSONS LEARNED APPLIED:
I will not be using a baffle unit this time. Not that it wouldn't work, however, I have moved toward altimeter based ejection on this one.
In addition, with the 29mm motor, I have only made the length of the motor mounts long enough to handle my 29-180 casing. This has given me more room to pack the shock cord, altimeter and parachutes in the body. It was previously a very, very tight fit.
I will utilize the nose cone weight method again because I liked how that worked, however, I will be also need to consider the addition of a shock-cord tube in the nose cone. This will be used like a deployment bag for the shock cord.
SUMMARY:
The exterior design of the rocket is obviously not my own, however, the "guts" are. I learned a lot during the first-round and should have the second one ready to fly at the NSL in NY at the end of May. It is getting primed right now!
 NARAM-43 Update 8/01:
After sitting nearly 2 years in the "ready" state. I was able to bring her to NARAM-43 for the maiden voyage.
Weighing in at just over 6 pounds, I loaded my 29-180 case with an H238 and also three (3) 24mm E18's. It was set up for motor ejection off of the H238 using a "S"hort delay (6 seconds) and the 24mm motors used 10 second delays and then capped. According to RockSim, this should boost this rocket to just over 1000 feet and the delay time was perfect!
The "heads up" flight (first flight) was announced and the countdown began. The launch button was pushed and the H238 "punched" the rocket into the air. Six seconds of silence and a straight boost, boom, ejection and descent only 50 or so feet from the pad. Perfect looking flight and several people commented on it. One guy said (and I agree), "it doesn't have to be high to be a great flight, good job."
 But...upon inspection, only the H238 lit.
The next day, the rocket was prepped exactly the same way and actually turned in an identical performance on another H238 and 3 x E18 (same ones, didn't even remove them). Again, only the central H238 lit.
I was pleased to get both of these flights and at how the rocket performed. It was very stable and the big RocketMan 'chute did the job. Looks live Rev 2 was a good design.
3 Oaks, Michigan Update 11/01:
I really wanted to have a full perfect cluster launch, so I toted the Meanie x2 to Michigan. This time to fly on those same three (3) E18's and this time a central H165 Redline Motor. Well, I had very different results this time!
Everything was prepped and the launch button pressed. The rocket slowly lifted from the pad, cleared the rail, lifted ever so slowly to about 25 feet. Turned gracefully and dived into the soft mud. By now you've guessed it. ONLY the three (3) E18's lit!! I was actually surprised that they lifted the rocket.
Well, I collected the rocket, went right back to the inspection table and filled out another flight card. Returned to the pad and launched the rocket on the central H165. It gave a nice flight and perfect recovery.
I'll be trying again and trying to perfectly match the 4 ignitors to get all motors to fire, but in the meantime am very pleased about the performance of my Meanie x2, number 2.
LESSONS LEARNED:
I regret not building the motor with a central 38mm. I didn't own any 38mm hardware and really didn't have the intention when I built the rocket over 2 years ago (almost 4 years for the first version). Now, I really stuck with H128's, H238's and H165's. This is going to give me flights between 1000 and 1200 feet using 24mm RMS E's and F's. I can get to about 2400 feet with some 24mm G55's, but that is about peak. I'm okay with the altitude limitation, but with the 38mm hardware I could have tried many other motors.
#Related Reviews
- Modification Meanie w/Quick Change Motor Mount By Nick Esselman
I had the idea one day to make a switchable motor mount so that I could fly a rocket on various motor sizes and configurations. I searched the web and found I wasn't the first to have that idea (no surprise there). Then I connected with Mark over at True Modeler Rocket Kits . He is selling his ...
- Scratch Little Meanie By Nick Esselman
I have expressed and continue to express how much I enjoy flying my Nordic Rocketry Meanie kit. This kit has now logged 20 flights (as of 7/99) and is my traditional first flight at each launch. Well, liking this kit so much I first decided to build a 2x upscale. That venture was fun and very ...
Related Products
 |
 |