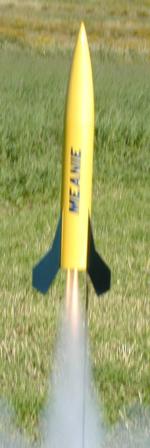
Modification Meanie w/Quick Change Motor Mount Modification
Modification - Meanie w/Quick Change Motor Mount
Contributed by Nick Esselman
| Manufacturer: | Modification |
 I had the idea one day to make a switchable motor mount so that I could fly a rocket on various motor sizes and configurations. I searched the web and found I wasn't the first to have that idea (no surprise there). Then I connected with Mark over at True Modeler Rocket Kits. He is selling his "Quick Change Motor Mount" which is designed for any rocket with a diameter of 2.6" or larger. Because I wanted to build a new Nordic Rocketry Meanie kit with this option I contacted Mark. The Nordic Meanie has a slightly narrower inner diameter because it has a thicker body tube than a standard 2.6" kit. But Mark customized the Motor Mount for me. This also only allowed me to get three (3) configurations; a 3 x18mm, a 1 x 24mm and a 1 x 29mm. The 1 x 29mm was special also due to the short space requirements, it is only designed to handle EconoJet F motors.
CONSTRUCTION:
Construction of the Nordic kit went as described in its instructions and builds nicely. You can see my previous review here. Nordic had changed two things since I had purchased my first kit. First they now add a piece of Kevlar to mount between the top centering ring and the shock cord. And second is their new LaserLine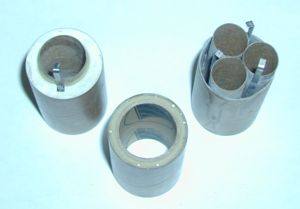 ™. Previous kits from Nordic utilize the technique of punching holes along the edge of the fin mounts to allow the glue to seep in creating a "glue rivet". Now Nordic is using their LaserLine™ which puts the holes in the tube for you. You can see a picture of this in my review on the Nordic Rocketry Phaze kit.
There were only two other construction items that needed consideration. First the installation of the Quick Change Motor Mount. This was extremely easy as the main motor mount housing is built inside a 2.6" coupler. This way it just slides into your airframe and glues in place. On my Meanie no consideration for thru-the-wall fins was needed as they are surface mount.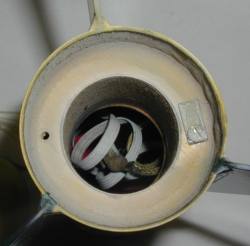 I installed the motor mount housing before the fins since the kit uses the glue "rivet" holes that may penetrate into the inside surface of the body tube and could have made it difficult to install afterward.
You'll notice that each of the 3 motor mount variations all mount in the main motor mount and then are held into place with a clip.
The second consideration for using the changeable motor mount is the Center of Gravity (CG) relationship. As different motors are used the CG moves around and to ensure it was always correctly positioned I had to make a variable nose weight configuration. I did that by drilling a 1" hole into the balsa nose cone to a depth of 2.75". Next, I built a 24mm motor mount, including a standard Estes' motor hook. I worked a groove into the nose cone where the motor hook would be and then glued the motor mount into the nose cone.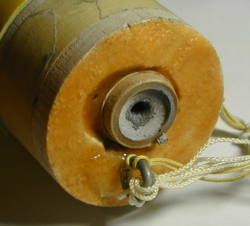
After finishing the rocket, I measured where the CG was on my standard Meanie with an F motor. I then compared that to my new changeable motor Meanie with 3 x 18mm C's, 1 x 24mm F, and a 1 x 29mm EconoJet F. I then was able to use spent Estes' D motor and filled them with various amounts of BB's and glue until the CG was the same as the standard Meanie. Each of these weighted 24mm motors can simply be installed in the 24mm mount that I glued into the nose cone.
I finished the rocket my normal way, with Plasti-Kote Primer and sanding between coats. Ya gotta love those balsa nose cones . . . which require multiple coats and sanding to get it right. I painted this Meanie my (now) traditional Meanie Yellow but instead of only a single dark blue fin, I painted two of its fins dark blue to set is apart from my other Meanie. I then applied the vinyl decal lettering.
FLIGHT/RECOVERY:
| 3 x 18mm Download RockSim file here! 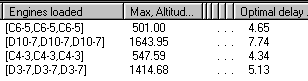 |
| 1 x 24mm Download RockSim file here! 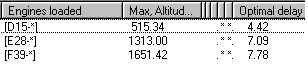 |
| 1 x 29mm Download RockSim file here! |
My first flight was using the 1 x 24mm mount on a AT RMS D15-4. The flight was perfect with deployment at perfect apogee. Because is was a little windy, I used a smaller (14") parachute. Definitely too small as it bounced on the ground. No damage.
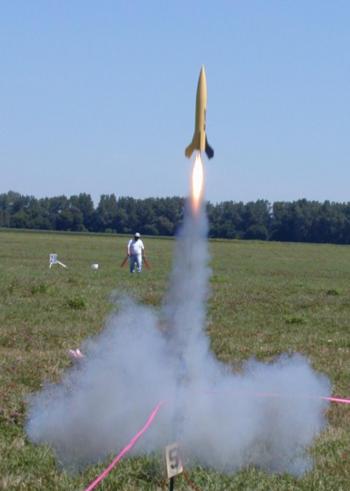
The second flight was on three C6-5's (pictured, but notice it only looks like two motors lit . . . but they all did!). All three lit and she flew nice and stable. RockSim says about 500 feet. I agree. It ejected past apogee with the nose cone pointing down. This time it came down on an 18" parachute. Much better, but I think I'm going to go a tad bit larger for the next flight.
I'm looking forward to flying it and hopefully not loosing it on an F20.
Regardless of the motor size, I always enjoy flying this rocket, the Meanie, but now it has some versatility that adds to the enjoyment!
 NARAM-43 Update (8/01):
I finally was able to fly this one on a 29mm motor. I choose an Apogee F10-6 and I was impressed. It was designed to fly on EconoJet F20's so the Apogee F10 was much longer and stuck out the top of the motor mount. I used that as an opportunity to retain it and therefore taped around the top of the motor and the bottom fully securing it into the motor mount.
The rocket is really borderline for weight on when using such a low average thrust (F10), but it came off the pad slowly and burned for 7 seconds on its way up. It appeared to actually arc (apogee) while still under thrust and therefore it made it appear to have a long delay. It did eject and recover nicely. I really enjoyed that F10 motor. I will want to go to an EconoJet F20 though to ensure adequate lift-off thrust.
The next NARAM flight was three (3) Apogee D10-7's. I dipped and matched 30# ignitors just for this launch. All lit and varooom. It was great! Check out the flame. Ejection was early and it probably could stand another 1-2 seconds because it still seemed to have a good head of steam. Recovered and successful. I've ordered more D10's because this is a very exciting combination to me.
#Related Reviews
- Descon 6 Meanie x2 By Nick Esselman
BACKGROUND: I have never made it a secret that I love the looks of Nordic Rocketry's Meanie. It is usually the first rocket I fly at every launch and I love it on D's to F's. Being the case, I decided that I would love a 2x version. Coming up with a 2x version wasn't exactly possible since ...
- Scratch Little Meanie By Nick Esselman
I have expressed and continue to express how much I enjoy flying my Nordic Rocketry Meanie kit. This kit has now logged 20 flights (as of 7/99) and is my traditional first flight at each launch. Well, liking this kit so much I first decided to build a 2x upscale. That venture was fun and very ...
Related Products

 |
 |