| Construction Rating: | starstarstarstarstar_border |
| Flight Rating: | starstarstarstarstar_border |
| Overall Rating: | starstarstarstarstar_border |
| Length: | 18.00 inches |
| Manufacturer: | Dr. Zooch  |
| Skill Level: | 3 |
| Style: | Scale |
Brief:
This is a recent addition to the fine line of Zooch scale-like kits that seem to defy the laws of physics and
economics, packing terrific detail, scale accuracy, and reliability into a small box. The kicker is that the finished
rocket can even fit back in the box for storage.
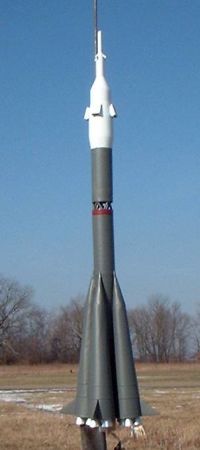
This particular design is one of the Russian workhorses--a Soyuz spacecraft mounted to a 20-engine R-7 booster. While you don't get the realism of strap-ons breaking loose (parallel staging) for the $20-25 price tag, you do get plenty of other detail, and it's not nearly as much effort as the finished product will look.
Construction:
My kit arrived in fine shape in the standard Dr. Zooch 3.5" x 3.5" x 12" box, which includes a nice
drawing of the model.
Parts quality is good but not exceptional--tube cuts are slightly sloppy but certainly not a problem and easy to work with. Basic inventory includes:
- BT-20 lower body/motor tube
- BT-50 upper tube
- balsa nose, transitions
- balsa fin stock
- wood dowels for detailing
- 15" plastic bag parachute
- cardstock templates/patterns/shrouds (lots)
I would probably rate the skill level on this approaching 3 on the standard 5 scale, mainly because it does involve a good deal of shroud forming and working with/shaping tiny details. There's nothing terribly complex about this, but a good craftsmanship effort will take some time and skill.
Zooch instructions, if you haven't heard this dozens of times before, are a unique style. Loaded with sarcastic wit, you'll either love them or hate them. Either way, you'll appreciate the detail and very obvious depth of knowledge of the author. You might have trouble locating a floating ghostly pencil for instance but won't have any trouble fitting the parts together if following the text.
Construction begins by making an alignment sleeve from cardstock before you start bonding stuff to the tube that is used to properly size the sleeve. Next, mark the lower body tube for 8 spiders that will be bonded shortly, which help in alignment of the strap-on boosters. The BT-20 is finished off with basic metal hook motor retainer and centering ring block. A cardstock shroud transition slides over the forward end.
The BT-50 needs to be cut into 3 smaller sections. I have an old X-Acto miter box that works great for cutting smaller tube like this. The longer of the 3 sections gets bonded to the BT-20 with the shroud sliding up for a flush fit. With the transition in place, you can now tack on the 8 spiders for booster alignment.
The strap-on boosters are a fair amount of work. You have to roll top cones/shrouds from cardstock, and since they are not a standard cone shape and have such a tiny tip, they are pretty hard to form very well. You also get to roll the main body, a slightly tapered shroud. The round shape is held in place at the aft end by balsa disks (that you cut). Getting a clean fit with these is probably the biggest pain point in the construction--the nose cone is mounted at an angle to the body to conform to the transition slope and hand-cutting perfectly circular balsa disks is not exactly easy. Sure, you can get them fairly close, which is probably the point, but if you're obsessive compulsive/anal retentive like me, you'll be seriously considering having BMS laser cut a few for you. The boosters are finished off with a couple cardstock strips around the lower portion.
Mounting the boosters was not terribly tough, thanks in good part to a handy alignment guide "tool" included--a small ring used as a riser to allow it to stand up despite the engine hook hanging down below the BT-20 and a template with outlines for keeping the boosters at 90 degree orientation. Once the boosters are secured, the same alignment tool is used to assist in bonding the fins.
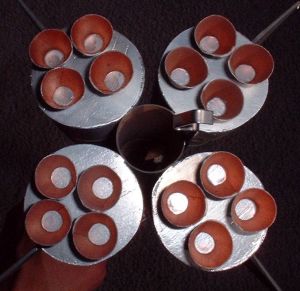
The engine bells really help nail the appearance of this kit. Sure, they're just a bunch (16) of little shrouds. No big deal, but when bonded to the boosters then painted copper/silver, the appearance is awesome.
The interstage assembly is another Zooch optical illusion miracle. It looks almost as complex to build as a Saturn capsule, but is really just 10 little pieces of dowel stock tacked into place using the alignment sleeve formed at the beginning. You need to be careful not to let any glue get on the sleeve or it becomes a permanent part of the rocket. Once the supports are in place and glue fully dried--do not rush this--use the alignment sleeve and sanding block (I used a nail file) to true up the tops of the supports.
The rest is all downhill. Four small shrouds acting as second stage nozzles, a couple of launch lugs/standoffs, and some details on the nose cone/capsule and you're ready to paint.
Finishing:
There are two different paint patterns suggested in the instructions, along with some interesting information behind
the differences. Basically, most of the photographic evidence suggests an olive drab green finish, but Zooch suggests
that the actual finish is more of a gray lower stage, white upper stage, and brownish red interstage. I went with the
"actual" scheme, which required very little masking, though I did pre-paint the upper stage nozzles and
booster engine bells.
Construction Rating: 4 out of 5
Flight:
Not wanting to be considered a wimp per the instructions, I skipped right past the A8-3 recommendation and went for
broke with a B6-4. Winds weren't too bad for a C6-5, but I was a bit leery of the upper stage being held together by
those itty bitty dowels of the interstage supports. I figured less altitude equals less walking if I have to chase
individual parts that separated.
My fear was unfounded--the flight went up straight as an arrow, though spinning a bit. The 4 second delay was perfect.
Recovery:
The plastic chute would probably do a decent job, but on my flight I had a slight mishap with one shroud line
breaking. As a result, it came down pretty hard on cold, hard ground and it broke a fin and booster loose landing.
Easily repairable, but considering how fragile the fins, engine bells, etc. are on this, I think I'll try using a thin
mylar 18" chute in the future just for kicks.
Flight Rating: 4 out of 5
Overall Rating: 4 out of 5
Other Reviews
- Dr. Zooch Soyuz By Stu Young (January 27, 2010)
( Contributed - by Stu Young - 01/27/10) Brief: Scale, parachute, 18mm single-staged Construction: The instructions were clear, and full of sarcastic humor that made me laugh out loud at times. I won't spoil the surprise by quoting my favorites. Suffice it to say, Dr. Z. anticipated any bone-headed mistakes, and warns the builder against making them, which saved ...
- Dr. Zooch Soyuz By Craig Zicafoose (February 26, 2008)
This is the latest offering from Dr. Zooch, a semi-scale version of the manned Russian spacecraft, Soyuz. It is powered by a single 18mm motor and comes down with parachute recovery. This model does require some patience and skill--it is not a beginner's kit. I'd rate this at a 3-4 skill level. All parts included in the kit are good quality and include: 1 T-20 core tube 1 T-50 ...
 |
 |
Flights
|
|
J.A.L. (February 22, 2010)
|
|
R.J.J. (August 13, 2008)