Dr. Zooch Return to Flight Space Shuttle
Dr. Zooch - Return to Flight Space Shuttle {Kit} (Shuttle)
Contributed by Mark Thompson
| Construction Rating: | starstarstarstarstar_border |
| Flight Rating: | starstarstarstarstar |
| Overall Rating: | starstarstarstarstar_border |
| Length: | 10.00 inches |
| Manufacturer: | Dr. Zooch  |
| Skill Level: | 4 |
| Style: | Scale |
Brief: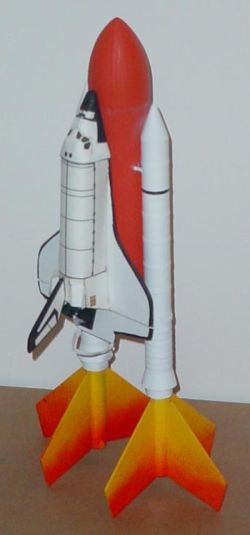 The Dr. Zooch Space Shuttle is a small but realistic model of the present day NASA workhorse. The Shuttle stack is launched and the orbiter separates at ejection to glide back to earth while the external tank (ET) and solid rocket boosters (SRBs) come back via the parachute. The lack of a multi-million flight computer means that augmentation fins must be added before flight for stability.
Construction:
It was the same as the previous review...However, I will touch on my experience with the build rather than a step by step build synopsis.
The instructions are easy to follow if you've had experience building rockets. Not to say they're hard but Dr. Z does require that you have a basic understanding of what and why. The illustrations are quite adequate and the fact that the designer is a cartoonist (among other things!) obviously helps. The parts fit is fine and any adjustments can be made with a bit of sandpaper.
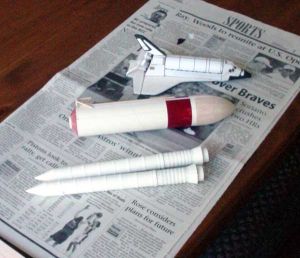
The hardest part of the whole build to me, was the SRBs. There are 15 individual rings made out of tiny strips of paper. You must cut and then accurately and neatly attach them to the SRB tubes. There are two boosters of course so this process is very time consuming. Patience here will pay off in those close up pictures you'll want to take later!
The external tank is built next and the parts you really want to take your time with will be obvious. The orbiter attach points are small but extremely important. Take your time to make them straight and sturdy. Be sure to keep the lower dowels, which the orbiter will attach to, short so as not to cause undue drag at separation. Make sure of the alignment of the ET nose cone. It is weighted off center to aid the flight characteristics. I followed the directions as written.
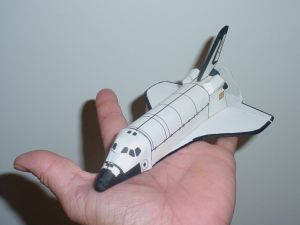
 The orbiter has some unique building techniques compared to what I know of airplane building (in a past life) but the sequence is easy enough to follow. The design makes for a very light finished product. There is no need for laying on layers of glue. This will only make your glider heavy and take away any chance of flying well. To make the nose button look better I carefully sanded it to match the contours of the shuttle. I added the orbiter engine bells but you are warned that attaching the elastic is a bit of a process. If you have the hands of a brain surgeon then by all means add them. The fun part was glide testing the orbiter off the back porch. The method for adjusting the elevator trim was simple and reliable. This is another step not to overlook as you shuttle will make you look silly if it isn't trimmed properly.
The stack as a whole is a bit on the fragile side. Not a flight issue but one of handling, particularly the augmentation fins. This is an expected and necessary evil when you're trying to mimic such a complex system at this scale. I would recommend adding some sort of engine block above the motor hook. I noticed the motor hook had developed some slop after a number of launches. I simply cut a section off a spent motor casing and pushed it down into the motor tube. A drizzling of CA and all was well.
Finishing:
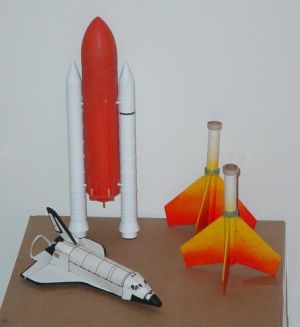
The finishing was quite easy. The printed heavy paper that makes up a good portion of the orbiter meant I really only had to paint the wings and the motor bells. Don't forget the nose button too. The SRB's repay you here for the time they took to build as you only have to paint them white! The external tank is really a blank canvas so you have some liberty here. The real one is covered in the now notorious sprayed on foam. The foam changes color due to UV light so almost any shade of rusty orange will do the trick. I used a Testor's car paint called Colors by Boyd Sunburst #52908. A top coat of flat clear gets rid of the gloss finish. The SRBs are gloss white! Don't forget to paint them separately. I finally painted the separate fins to make them look en fuego. There are no decals but I hope Dr. Z comes up with a few.
Construction Rating: 4 out of 5
Flight:
I've flown my shuttle stack on a number of motors. The best all around performance has been the B6-4. I've only had the chance for a C6 motor once so this may be an unfair comparison. As mentioned the augmentation fins are a must. Flying without them will not be safe. They do have the added benefit of providing a built in stand off on the pad! Pack the chute per standard rocket preparation but make sure you have enough wadding. The ET tube is fairly big compared to it's length and the motor isn't that far away. Make sure you've set the orbiter's elevator elastic.
 My flights have been near perfect I must say. Stay with the shorter delay motors to get separation before the assembly turns nose down. Keep the orbiter attach points no longer than necessary and paint free. You'll be rewarded with clean shuttle separation and a clean glide profile.
Recovery:
Flight recovery is by means of the ol' parachute for the ET and SRB assembly. The supplied chute, while not as glamorous as the nice printed variety, does its job. It is sized correctly in my estimation and provides a safe descent while not drifting too much. The shock cord is 1/4" wide elastic and is attached in the traditional manner. I have not experienced any burning or melting with my Dr. Z chutes.
Flight Rating: 5 out of 5
Summary:
I had built the Estes shuttle stack years ago. Contrary to the norm, my kit flew quite well. Upon my return to model rockets, I looked for it again but it's gone the way of the dodo. I was excited to see this version released. This was my first Dr. Zooch kit so I was a bit deflated by its small size. (Aren't we all?) All fears were laid to rest as I quickly realized that the designer knows what he's about with model rockets. The build requires skill and patience, there's no doubt. Rush this kit and you will not enjoy it. Take the time to do it right and you will be rewarded with a good looking, great flying Space Shuttle! A perfect score is hard to come by but I would give a 4.75 to this kit.
Overall Rating: 4 out of 5
Other:
I enjoyed the sarcasm and poking fun woven throughout the instructions. The fact sheet at the end of the build is quite informative and enjoyable. This tells me that the author has done his homework and makes the humor all the more palatable.
Other Reviews
- Dr. Zooch Return to Flight Space Shuttle By Daniel Griswold
Brief: This is a single stage "ant scale" version of the Space Shuttle. Construction: The kit includes: 2 T-20 SRB Tubes 1 T-5 tube (for fin insert) 1 T-60 External Tank Tube 3 Balsa nose cones (2 SRB, 1 external tank) T-20 MMT with black fiber centering rings. Mylar strip for texture on external tank Miscellaneous hardware including: snap swivel, ...
 |
 |
Flights
|
|
|
|
W.J.E. (August 13, 2005)