| Construction Rating: | starstarstarstar_borderstar_border |
| Flight Rating: | starstarstarstar_borderstar_border |
| Overall Rating: | starstarstarstarstar_border |
| Diameter: | 0.54 inches |
| Length: | 4.50 inches |
| Manufacturer: | Estes  |
| Skill Level: | 1 |
| Style: | Sport |
Brief:
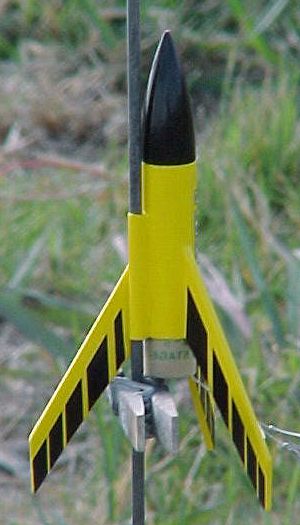
A tiny fun-to-build 13mm rocket employing tumble recovery, a descendant of the classic Estes Mosquito.
Construction:
Included in the kit:
- 1 body tube
- 1 plastic nose cone
- 1 launch lug
- 2 small balsa strips to cut your own fins
- 1 peel-and-stick decal set
This is an easy 3FNC kit to put together with next to nothing in the way of gotchas. The instructions as supplied by Estes were very easy to follow although I ended up not using them as the rocket is so logical and straightforward to construct.
I started by cutting out the fin template from the instructions, traced the pattern on to the supplied balsa strips and cut out the required three fins. Even though the balsa fin stock is of good quality, I did not appreciate the fact that two small balsa strips were supplied instead of a single larger balsa strip as the smallness of the strips made it difficult to keep even a small ruler in place when cutting. It would also have been better if the fin template had not been a paper template but preferably from cardstock.
After having slightly roughened up the body tube with 240 grit sandpaper, I then tackled the fin marking lines for which a wraparound fin marking guide is provided. I used the door jam method for drawing my fin lines. I then attached the fins with Craftworks Tacky Craft Glue using the double-glue method. After allowing the glue sufficient time to dry, I then added generous tacky glue fin fillets. Lastly, the launch lug was tacked into place with medium CA with tacky glue fillets then added.
I used 180 grit sandpaper to roughen up the plastic nose cone in preparation for paint although I opted not to attach the nose cone to the body tube at this stage despite the instructions.
Finishing:
I filled in the balsa fin grain with three coats of NHP Micro-Fill balsa sealer which nicely sealed all the balsa smooth and then gave both the rocket and nose cone two coats of Tamiya Fine White primer with light sanding in between using 400 grit sandpaper. I then followed this up with two coats of Tamiya Yellow spray lacquer for the main section with a 600 grit light sandpapering in between and two coats of Tamiya Black for the nose cone.
After allowing both the nose cone and rocket to dry, I attached the nose cone to the body tube with a small blob of 12-minute epoxy instead of the recommended plastic cement and then added the peel-and-stick decals.
Construction Rating: 3 out of 5
Flight:
For my first launch, I friction taped a 1/4A3-3T into place, set up the rocket on the launch pad, and hooked it up to my trusty Quest controller. The rocket zipped off the launch pad at breakneck velocity to somewhere around 200-250ft at a slight angle, spat the motor upon ejection, and lawndarted back to the ground.
The second launch, again using a 1/4A3-3T, was more satisfying with a perfectly straight flight although the rocket again spat the motor (despite more friction-taping) and again another lawn dart.
Recovery:
Despite my best attempts at friction fitting, this rocket is in the habit of spitting its motor thus making for a very fast lawn dart. As previously noted by Donald Besaw, the rocket comes down nose first to stick into the ground which I believe could possibly be unsafe if young children are in the vicinity.
Flight Rating: 3 out of 5
Summary:
This is a nice little rocket which I was happy to have the chance to build and really quite fun to fly.
PROS: Ease and quickness of construction, good quality components, nice finished appearance, great flight performance.
CONS: The supplied balsa fin stock difficult to work with, lawndarting tendencies.
Overall Rating: 4 out of 5
Other Reviews
- Estes 220 Swift By Bill Eichelberger (January 19, 2017)
For the old-timers, the 220 Swift is simply a Mosquito in an updated body with sticker graphics. The Swift is another of the "fire and forget" mini engine birds. I can't imagine that the recovery rate on these is anywhere close to 30%. Components BT-5 main body tube PNC-5 nose cone 1/16" fin stock launch lug decal sheet /h2 Construction ...
- Estes 220 Swift By Donald Besaw Jr
This is a new 2004 release kit by Estes. It is a small and sleek 4 1/2 inch tall rocket that flies on mini motors up to 750 feet and uses tumble recovery. The kit came in a plastic bag and included two 1/16 balsa strips for fins, body tube, nose cone, launch lug and decals. The instructions for this kit included the fin template as you need to cut them out yourself from the balsa strips ...
 |
 |
Flights
|
|
B.D. (August 24, 2006)
R.W.L. (January 9, 2007)
|
|
T+M B. (March 22, 2006)