| Construction Rating: | starstarstarstarstar_border |
| Flight Rating: | starstarstarstarstar_border |
| Overall Rating: | starstarstarstarstar_border |
| Diameter: | 1.84 inches |
| Manufacturer: | Estes  |
| Skill Level: | 2 |
| Style: | Military |
 Brief:
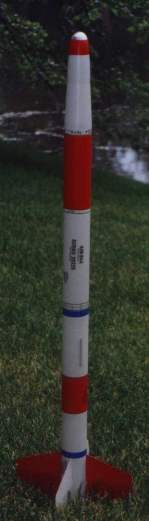
The Estes Python is a large D powered sport scale air-to-air missile. It is not
a scale model of an actual missile. This allows the builder to get a taste for
scale effects without the pressure of living up to the real thing. The size of
this bird is very impressive for the price and the moderate skill level.
Construction:
The Python comes in a large hanging box, which I appreciate because I always
worry about crushed parts. One look at the fins in this kit and it is hard to
believe the quality for the $16.99 price tag. They are just awesome and it is
hard to imagine going back to Balsa.
I would agree with other reviewers that the motor mount is way too wimpy. I wish I would have replaced mine but I was in a rush to build of course! I replaced the shock cord with a three foot piece of elastic, the Estes' cord just seemed too short. If I had some Kevlar® thread I would have done a Quest style motor mounted shock cord. I think the Estes style mount is a little scary for this size rocket. Once again, I was in a rush to build. I also purchased a yellow Loc/Precision nylon 18" parachute to replace the Estes plastic chute. I like to beef things up when possible and this is a great kit to do it. Clearly, this kit could handle a larger motor and do well. The strength ! of the fins and rear section of the rocket are awesome when finished.
Construction is pretty straight forward and the instructions are good. I departed from the instructions when it came to mounting the fins. I used liberal amounts CA on the root edges of the fins. After the CA dried I then put a fillet of Sig White Airplane Glue where the fins and rocket body meet. This gave the fin assemble incredible strength. The wimpy motor tube gave me some trouble during fin assembly. The motor retainer clip tore loose and required a liberal dose of CA. I would not build this rocket with the provided motor tube. The motor mount is also placed too high in the rocket body. I would depart from the instructions in this area and place it farther rear-ward.
Finishing:
I purchased this rocket with the intent of finishing it differently than
recommended red and white paint scheme. I used 2 coats of gray primer to start
off. Minimal sanding was required and I did not fill the grooves. (In the end
filler wasn't necessary-I used a lot of paint and that did the filling for
me!!) I then painted the entire rocket with 2 coats of Testers Flat Airplane
Grey paint. I used Testers Flat Red for the remaining details. I followed the
instructions for the stripping on the upper half of the body. I departed from
them by placing a red band near the fin assembly. I also painted 2 fins red. A
flat clear was then applied. I adjusted my decal placement to fit my paint
work. This paint scheme looks great and is really impressive when it is
combined with the size of this rocket. I also used Testers silver paint on the
radome.
Construction Rating: 4 out of 5
Flight:
I went with an Estes D12-7 on my first flight and it flew perfect. This rocket
is fun to watch and draws a crowd. Boy did that 7 second ejection delay seem
long after all the paint work I put in. She landed safely not far from the pad.
Installing motors is made difficult by the bad motor tube and mine is really
bent after 1 flight!!
Recovery:
I think that the descent was a little fast and a larger chute might be
necessary for harder recovery areas. The fins on this kit are very strong but
have delicate edges and that may pose a problem with the recommend chute size.
Flight Rating: 4 out of 5
Summary:
I am a October Sky B.A.R. and have memories of flying rockets with my Dad as a
kid. This is my biggest rocket so far and has got the best reaction from my 2
year old son. He was able to see the whole flight and recovery which is
important at his age. This kit also flies well on a small field that is close
to home. Which is always beneficial when working with kids. Overall this is a
great kit for the price and was fun to build and fly.
Overall Rating: 4 out of 5
(by Andrew Pohlman)
Background
If you like military styling and want to jump up to E power, the Python is the best for you. It is a good looking vehicle that has four, beveled, trapezoidal fins, a cool rounded nose cone, and a visible paint scheme. Its large size is impressive, and it produces sane flights with D motors and spectacular, yet recoverable flights on an E. Its fins are through-the-wall (TTW), so it can take the power! This kit is great as is or can be upgraded and modified for a superb result.
Construction
Construction is fairly straight forward so get your building supplies out; here goes!
Your first decision is whether or not to beef up the motor mount tube. The one provided is seriously wimpy and does not match the quality of the rest of the kit. Also, the instructions indicate placement of the thrust ring (forward stop for the motor) such that is useless. I recommend putting it in the traditional located: butted against the top of the motor hook. Also at this point, you may choose to move the motor tube farther aft than the instructions call for. This will greatly help motor removal because if you follow the directions, the motor tube and motor hook and quite far up inside the body tube. The motor tube is long enough to accomplish this and the rocket's stability won't be affected. It will turn out fine though if you simply follow the instructions.
The fins come in two pieces and must be assembled using plastic cement. They are hollow and have knife thin edges. This makes them seem fragile, but they are actually superb and far better than a typical pre molded fin can. With conservative use of glue, the fins will be perfectly formed. Once the motor mount is in place, and the fins are prepared, you can insert them into the pre slotted wells. I recommend using a medium cyanoacrylate (CA) on the root edge. This allows you to set a fin in position quickly and move on to the next one. Medium CA sets in less than 15 seconds, so you only have to hold the fin perfectly for a brief time. Use five minute epoxy for the fillets. The combination of CA on the root edge, epoxy fillets, and a TTW configuration makes very strong fin attachments. If all this seems like too much, again, simply follow the instructions for acceptable results.
The stock recovery system provides an optimal descent rate, but would benefit from some upgrades. Using a 1.8 meter long shock cord is one hop up that has been recommended by many Python owners. The paint scheme is simple and easy to execute. Use Krylon for the red and white parts and silver model paint for the shiny nose.
List of Recommended Upgrades/Modifications. A star indicates that it is highly recommended.
1. Beef up the motor tube.*
2. Move motor tube aft an inch.
3. Butt the thrust ring against the top of the motor hook.
4. Use CA and epoxy on the fins.*
5. Add a 1.8 meter long shock cord*, LOC style shock cord mount and parachute
swivel.
6. Beef tail well by gluing card stock around inner circumference.
Flight
This beast is an excellent flyer and is my favorite E rocket. It is very stable and delivers well behaved, predictable results. It does nicely on a D12-5, leaps on a D21-7 (needs adapter) and screams on an E15-7. On a medium to large F, it speaks Japanese and says, "Sayoara!". It refuses to weathercock much and doesn't wiggle or spin. It looks handsome and nimble and has proven to be quite visible on ranges from Lucerne to Livermore and locations in the North San Francisco Bay area. The mid-body separation feature makes for reliable recovery system deployment and reduces the probability of zippering. In addition, it creates a large payload bay! If you didn't move the motor tube aft, you'll need pliers to get the expended motors out.
Grades
Design: B+
Construction: B
Flight: A+
![[NAR]](/images/archive/images/link_nartitle.gif)
The following excerpt is
from "Sport Rocketry". The intention is to allow guests to get a
basic feeling about a kit. We strongly suggest that you get a copy of the
referenced Sport Rocketry and read the entire article. Inside you will find
many helpful hints in construction as well as other useful information. For
more information, use the two links above.
(Sport Rocketry - Jul/Aug 1997 - page 22 - by Greg Elder)
![[Picture]](/images/archive/images_est/rp_est_python.jpg) "Overall this is a very nice kit to build and fly."
"Overall this is a very nice kit to build and fly."
"A nice feature of this rocker is through-the-wall mounting of the
fins."
"The tube seems a bit flimsy to me for D powered flight."
"The top portion of the Python consists of a 12-inch long payload
section."
"The nose cone is made from molded plastic and is 6 1/2" long."
"I fly my Python on a D12-5. The flight was straight and recovery was
error-free."
"This would be a good first D powered kit."
The entire article gives the impression is that this is a nice kit for an novice/intermediate modeler.
Other Reviews
- Estes Python By Jim Stuckman
CONSTRUCTION: The Estes Python kit is well packaged in a cardboard hanging box. All parts were present and in good shape. This is a skill level 2 kit and should not present any problems to someone with a couple of rockets under their belt. The instruction sheet is clear and well written. This combined with a well designed kit make for an enjoyable and rapid build. The ...
- Estes Python By Eric Fletcher
Estes - Python ( Contributed - by Eric Fletcher) Brief Model has been modified to use G80-10. Modifications I had to make new centering rings out of 1/4" plywood. I also added steel wool above the motor mount so I would not have to use wadding. I also had to cut some of the fin off because it is a through the wall fin designed for 24mm motor mount. I did not add any ...
 |
 |
Flights
|
|