| Construction Rating: | starstarstarstarstar_border |
| Flight Rating: | starstarstarstarstar |
| Overall Rating: | starstarstarstarstar_border |
| Manufacturer: | FlisKits  |
Brief:
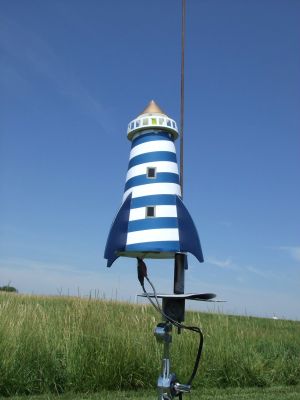
Inspired by the return of NARCON in 2009 to the New England area, this oddroc is a flying lighthouse. Thanks to some
outstanding engineering/prototyping and excellent instructions, this is not nearly as difficult to build as you'd think
and it flies perfectly.
Construction:
Parts are top quality and include:
- BT-55 body tube
- BT-50 motor tube (24mm)
- 3/16" launch lug (actually a long tube)
- Balsa nose block/bulkhead
- Metal motor hook
- Kevlar®/elastic shock cord
- 16" plastic parachute
- 1/8" balsa fin stock
- Assorted wood dowels, do-dads
- Cardstock shrouds, patterns
- Clay weight
One item not included in the kit that you'll seriously want to consider is the pre-printed shroud. The stock kit comes with a plain white cardstock shroud that you can decorate yourself. At time of release, Jim made the beautiful pre-printed design I used available via a free download and had plans to offer up several other designs as well. The design can be printed on 2 pieces of 8.5" x 11" cardstock (for two seams) or on a single 11" x 17" piece (for one seam). I didn't have 11" x 17" and wasn't going to buy a batch for this one project, so hit my neighborhood Kinko's for a quick and easy shroud that cost me an additional $1.50.
While this is not too difficult a build, it does require some unusual skills and techniques, so paying careful attention to the instructions are in order. It's rated a skill level 2.5, which I'd agree is a fair assessment due to the forming of a couple shrouds and some tricky fit/trim of interior structures.
Starting with the motor mount is a fairly standard assembly using a 24mm tube, centering ring block, a couple 50/55 centering rings and a metal hook with the Kevlar® line anchored to the forward centering ring. The instructions assume you're going to stick with shorter D motors but do describe an optional modification for E motors. One thing not pointed out in that modification, though, is that the metal motor hook furnished is not long enough to support Es. I generally prefer in 24mm kits the longer hooks and configuration for Es as the default with a 1" section of coupler or something similar to serve as an E-D adapter.
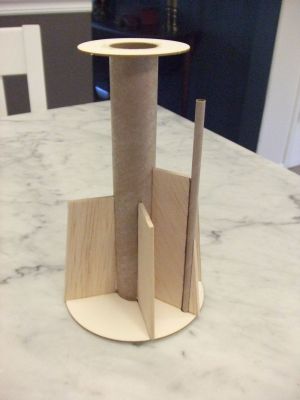
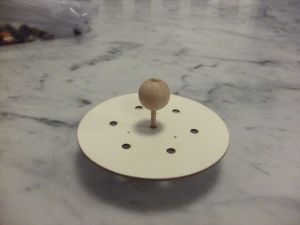
After building the motor mount, you're on to the nose cone section. There's a laser-cut fiberboard base with a number of holes and a few alignment marks near the center. A balsa block gets glued to the center inside the alignment marks and a series of dowels go in the holes circling the center. These dowels are the posts of the "tower". The "beacon" consists of a wooden ball mounted to another dowel section, which in turn gets mounted through the base and into the balsa bulkhead, ensuring a nice strong bond which should help keep everything together at ejection. You'll want to think through your paint scheme before going too far along at this point as the dowels and base wind up getting mostly covered in the next few steps. There's another fiberboard disk with holes that goes on top of the dowel posts. You'll add the clay nose weight to this, then cover it up with a cardstock shroud cone. As a finishing touch, there's a fence/railing that surrounds the base of the tower, which is formed from a cardstock pattern. There's a lot of cutting involved to get all the little squares out, but it's worth the effort.

The main structure of the rocket consists of a BT-55 body tube and 4 balsa braces supported by a fiberboard disk base. The braces need to be hand cut from balsa stock based upon cardstock patterns and need to be very precisely traced and cut. They taper as they go up the body coinciding with the taper of the lighthouse shroud. One of the brace sections is actually 2 pieces--an inner section that the interior launch lug butts up against and an outer section between the lug and the shroud. The top of the main structure gets a fiberboard disk/centering ring to support the top of the shroud.
With the braces carefully aligned, you'll want to take a good look at the taper and the fit of the braces. In my case, they stuck just a hair too far out and would have caused the shroud to bulge a bit so I had to sand them down slightly. I used a long sanding block and basically held a straight taper from the lower base disk to the upper disk.
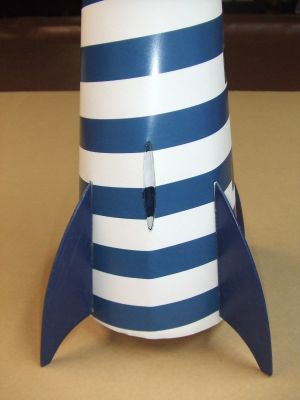
When the interior structure is complete, it's time to cut out and attach the main body shroud. Since it's such a large shroud, it's really not too difficult--less risk of wrinkling, gentle curve that doesn't result in a tendency for flat spots, etc. The shroud includes a small cutout section to accommodate the launch lug so it must be very carefully aligned as you slide it down the interior structure. The launch lug will protrude a good bit and must them be trimmed off flush with the shroud. The shroud itself is also too long (on purpose) and needs to be trimmed at the top flush with the upper disk.
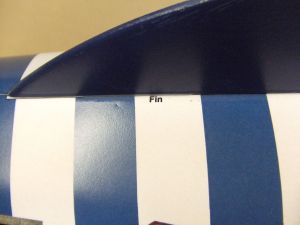
With the shroud in place, you then cut 4 exterior fins from balsa stock and attach to pre-marked spots along the outside of the shroud. There are 2 pattern options included: a standard pattern that has very pointy feet and an alternate pattern that has flatter feet less prone to damage on landing. Knowing my luck with hard landings, I opted for the flatter pattern.
Finishing:
Since I went with a pre-printed body shroud, there was not that much finishing involved. I had decided to paint the
tower white before covering it up, then for the lamp/beacon, I hand painted it a day-glo yellow. I then formed the top
shroud/cone and painted it gold. With these pieces done, I then glued the cone to the top of the tower, completing that
assembly.
For the fins, I painted them before attaching to the shroud and went with a blue that closely matched the blue of the shroud pattern. Being the obsessive compulsive/anal retentive type, the even painted the exposed launch lug interior to match the shroud pattern with white and blue sections. After attaching the fins, I applied a couple white glue fillets, which dries clear and wouldn't mar the finish.
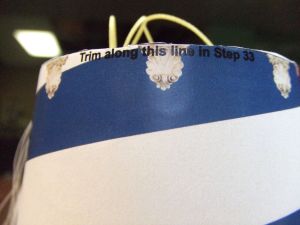
While the pre-printed shroud is beautiful, I will point out two minor issues I found with it from a finish perspective. I believe corrections to these are in the works and will be posted soon. At the top of the shroud where it needs to be trimmed flush with the disk, there's a little text that says it's to be cut away per the instructions. Unfortunately, this is printed on the side of the line that stays on the model, not the section that gets cut away. Also, the regions marked for fin alignment are labeled nicely inside the region for 3 of the 4, but the fin area formed by the seam overlap has the label outside the region. This means that only three of the four labels are covered up through mounting the fins.
Construction Rating: 4 out of 5
Flight:
For the first flight, I loaded up a D12-5, but things didn't work out so well. The motor CATO'd in spectacular
fashion, blowing the flaming propellant out the forward end with enough force to melt the chute, eject the nose, burn
the elastic off, but leave the main body (lighthouse) still on the rod flaming away. I was able to blow out the flames
before it got beyond the inner stuffer tube, but the guts of the rocket were trashed.
With literally hundreds of feet of just about every imaginable tube size known to man stashed in my basement, I figured the repair wouldn't be too bad, but as it turns out, I didn't have any coupler tube stock for BT-55s other than some short sections, and I needed a full 9" or so to slide down inside the burnt BT-55 to act as a replacement tube. I wound up tacking it onto a BMS clone-of-the-month order and waited the 4-8 weeks or so for that order to ship before finally having the parts to repair my Nantucket Sound.
With the proper tubing, the repairs were simple: insert the TC-55 down the throat, sand down the nose shoulder accordingly, replace the elastic shock cord and chute.
The repaired model went up on a fresh D12-5 in calm winds (maybe 3-4 mph). With a good motor the boost was terrific--perfectly straight, not even much of a roll.
The -5 delay is the right choice for this as it was horizontal and just starting to turn nose-down when the deployment kicked.
Recovery:
My replacement chute was a standard FlisKits 16" plastic one, and while the model came down a bit fast,
everything was fine in the tall grass. I can appreciate though that the "alternate" fin template with squared
aft ends could be the way to go on shorter grass/harder fields.
Flight Rating: 5 out of 5
Summary:
Of the couple dozen sport models I brought to the field today, this is the one that caught the kids' attention the
most. It certainly scores high on the cool factor as well as the oddball factor, and the flight was outstanding.
The only cons I'd suggest, while very minor, would be relãted to the shroud markings having notes/instructions on the "good" side of the line, which I believe have since been corrected.
Overall Rating: 4 out of 5
 |
 |
Flights
|
|