Public Missiles Little Lunar Express
Public Missiles - Little Lunar Express {Kit}
Contributed by Gary Sinclair
| Construction Rating: | starstarstarstarstar_border |
| Flight Rating: | starstarstarstarstar_border |
| Diameter: | 3.90 inches |
| Length: | 35.00 inches |
| Manufacturer: | Public Missiles  |
| Style: | Futuristic/Exotic |
 Brief:
PML's Little Lunar Express is a well known HPR kit which has a 50's SciFi look. Recovery is via parachute which is ejected from the airframe using a PML piston.
Construction:
This kit comes with the following components:
- (1) 4" OD Ogive nosecone (a good one too) which has NO bottom (i.e. the bottom of the shoulder is missing allowing access to the inside of the nosecone).
- (1) 4" OD , 5.5" long section of PML Quantum airframe tubing.
- (1) 4" OD plastic tailcone which has been pre-slotted for through the wall fin attachment.
- (2) large G10 fins
- (2) small G10 fins
- (4) urethane fin-pods which attach to the tip of each fin.
- (1) elastic shockcord
- (1) PML Piston with piston strap and D-ring assembly
- (1) PML parachute
- (1) 17" long 3"OD Quantum tube used as the 'recovery tube' -- piston goes inside of this.
- (1) 1 centering ring to fit over 'recovery tube'
- (1) 1 centering ring to fit over motor mount.
- (1) 10" long 38mm motor mount.
- (1) internal nosecone bulkhead with hardware.
- (1) set of sticky-back decals
Pros: ----- The instructions were extensive and easy to follow. The order of assembly was logical but you should read the entire instruction set first at least two times to get the flow of how it all goes together. Since this is a 4 fin (though of different sizes) design the alignment of the fins is no problem. I use West Systems epoxy for my rockets and a Dremel to cut and sand when necessary. In this case (and usually for PML kits) there is no need to cut or sand anything (except the piston prior to launching). I really liked the way the recovery tube connected to the airframe and motor mount assembly. This was well thought out and I have subsequently used ideas from this in a design for modification of my KingBlobbo (when I submit my MOD of this I will detail the design then). Lots of decals were included to give it the advertised finish but I decided to finish my differently (see below).
Cons: ----- The G10 fins are really striking but I found that mine had a slight wobble in them once they were attached to the tailcone. The urethane pods are a nice touch but I wasn't holding out any hopes that they would stay on after a landing. I hate painting plastic and this rocket was a nightmare to paint (I will discuss more below). I can't blame PML for this since the basic design can only be realized using plastic or fiberglass.
Finishing:
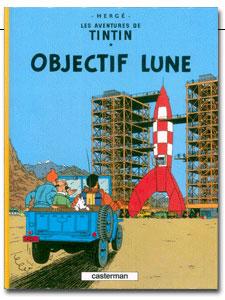
The decals supplied are meant to give the LLE an 'Earth to Moon' spaceship look. There is sufficient instruction supplied to achieve this look with ease. I however decided to model mine on the Tintin story 'Destination Moon' where Tintin and his trusted companions travel in their red and white checked spaceship to the moon. The two spaceships where similar enough that I felt confident of a successful outcome. So with the picture taken from the book cover in mind I set about finishing the LLE as the 'Tintin Express'.
To start with I rough sanded both the nosecone and tailcone. I then applied then sanded filler-primer several times to give a smooth transition between sections (I had to fill in the seem between the airframe and the tailcone with resin first). I first painted the whole rocket RED several coats until it gleamed.
Next came the task of masking out a surface which was reducing in size (i.e. the nosecone and tailcone) into four regions round (i.e. there are four 'checked' areas in the circumference of the rocket at any point along the airframe) and four regions long (the actual Tintin rocket has five checked sections but four seemed to work better on mine). This is the point where things started to get complicated. I had no problem in masking off the proper areas (even taking into account the changing geometry of the nose and tailcones) and painting the white gloss. It was the pulling off of the mask (I used clear 'scotch' tape) where things went wrong. Well needless to say the paint just pulled off 'here and there' leaving patches of bare nosecone and tailcone. Alas it took me several attempts to get it even close to looking acceptable.
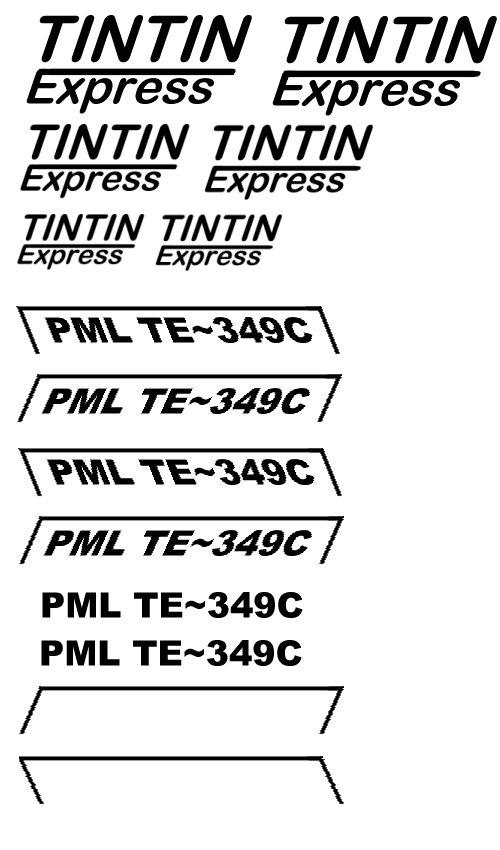
In the end it turned out OK but has really turned me off of painting plastic. My final touch was to have some decals made up which mark the ship as the 'Tintin Express'. I even change the PML LLE ship ID to a PML TTE ID.
Construction Rating: 4 out of 5

 Flight:
(Please note the launch photos are by Bob Arnott (bob@fatboab.org) who takes wonderful pictures.)
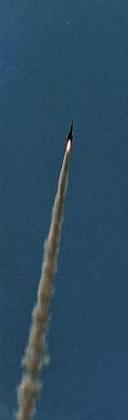
I decided to use an I161W-10 on its maiden voyage with the usual prep routine of talc'ing my parachute and testing the piston (it was a bit cool so I wanted to check for shrinkage of the recovery tube) which was fine (slid right out when I turned the rocket up side down). Well the time for the countdown came and when I pressed the button it took no time to blast (and I mean blast) off the pad. It seemed to scream off the pad and then coast forever before the ejection charge deployed the chute perfectly.
Recovery:
I had put in a smaller chute to avoid the long walk the wind was going to provide. I was also rather cynical about the prospects of this rocket landing without mishap. So I figured if its going to break it might as well do it near the pad. It landed about 1/4 mile down range and upon inspection had chipped one fin-pod, loosened another and completely dislodged one of the big fins from its mooring (no damage, just pulled the fin and its fillets from the tail cone --- more plastic...). Well, it wasn't too bad and I can fix almost everything (I can get a replacement pod) so it will fly again. Next time I am putting in an I211W.
Flight Rating: 4 out of 5
Summary:
I can't give it a 5 for flight as the fins and fin pods are too susceptible to landing damage. PROS: Despite its faults I really like this rocket. Its design and flight characteristics are great. CONS: The large fins don't give you that solid feeling when mounted to the airframe. Painting plastic... well you know what I mean.
Overall Rating: 4 out of 5
Other Reviews
- Public Missiles Little Lunar Express By Bob Morstadt
Brief The Lunar Express Jr. is a model based on the 1950s Sci-Fi concept of a single stage rocket that could go to the moon and back. The model is capable of taking a 38mm motor, but has an adapter to accommodate a 29mm motor. Construction The kit has high quality like all the PML kits and the completed rocket is capable of taking a beating without damage. There are some tricky steps in the ...
 |
 |
Flights
|
|
G.A.F. (October 2, 2003)
R.A.M. (August 28, 2005)
|
|
R.V. (July 1, 2001)