| Construction Rating: | starstarstarstarstar_border |
| Flight Rating: | starstarstarstarstar_border |
| Overall Rating: | starstarstarstarstar_border |
| Diameter: | 3.90 inches |
| Manufacturer: | Public Missiles  |
| Style: | Sport |
Photo Courtesy of PML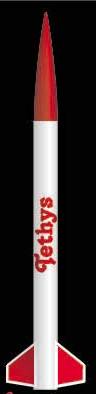
Brief:
The Tethys is a basic 3FNC kit, capable of flying on G motors or bigger.
Construction:
The Tethys came with a single length of airframe tubing (phenolic, per my request), 3 pre-cut G10 fins (the thickest fiberglass fins I've used to date), a 4:1 ogive plastic nose cone, a thick nylon strap, a length of tubular nylon, piston kit, a 48" parachute, two brass launch lugs, and the 54mm Kwik-Switch motor mount system. All parts arrived in good condition, although there was a crack in the airframe, running from a fin slot to the base of the tube- a very minor problem.
I used West System epoxy throughout construction, and found the kit went together very easily. I was a bit shocked to discover the Kwik-Switch system was just a few pieces of threaded plastic! Not having any experience above H motors, I was boggled, as my concern was whether these parts would hold up to the stresses that a really big motor would place on them. Well, I suppose PML knows what they're doing. Anyway, part fit was good overall, and there really aren't any "gotcha's", if you follow the instructions.
I built mine stock, with one exception- I replaced the lugs with 1/4" ones. What I got in the kit were supposed to be either 3/8" or 1/4" (depending on what info you read...), but were neither, when I measured the ID.
Otherwise, everything else went together fine, with nothing more than the usual bit of sanding to get optimal fit. No motor retention is provided with the kit, so I had ordered the PMR kit that PML offered for the Kwik-Switch motor mounts. Sinking those threaded inserts was a pain, but I couldn't ever imagine them coming back out, short of destroying the centering ring.
I did add one extra construction step- I had picked this kit to use as my CAR level 2 rocket (Which is an I motor), and had plans on using it for level 3 eventually too. I order the phenolic airframe so that I could put a layer or two of glass on it, to give it extra strength. That went on surprisingly easy, considering I'd never done any glassing before. When I was done, I had a pretty solid-looking rocket... if kinda plain.
Finishing:
Unfortunately, I was pressed for time, and never had the chance to even shoot a coat of primer on this rocket. I finished it a day before I (and it) left for Blazing Archer IV, and I didn't want to use any paint until I'd given the epoxy plenty of time to cure. The kit does come with a pair of PML logo decals, but nothing more.
Construction Rating: 4 out of 5
 Flight:
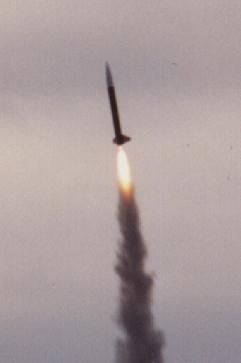
My first and only flight with the Tethys used an I-161, with a 10 second delay. One thing I really like about PML kits is the lack of need for wadding, thanks to the piston system. Sure cuts down on the pre-flight prep! For motor retention, I had intended to use the PMR that I had installed. However, the three hex bolts that hold the plate in place had vanished, so I was forced to friction-fit the motor in place- something I did with great trepidation. I'd run a number of sims for this rocket in Rocksim, and was unable to find a motor delay in any "I" motor that I was really comfortable with. The slowest deployment speed I could get was on the order of 40 MPH, which I thought was a bit high. So... I added a length of PML's old stretchy shock-cord to the tubular nylon, just in case.
Boost was very nice! The motor lit with no fuss, and the rocket was off the pad in a hurry. The flight was pretty straight, with only a bit of weather-cocking.
Recovery:
Things fell apart on recovery. That 10 second delay turned into a 4 or 5 second one, resulting in chute deployment at about 100 MPH, at around 2000 feet. The extra length of shock-cord I had added as a precaution sheared cleanly, leaving the airframe to tumble 'chute-less to the ground. The airframe fell horizontally, so I figured damage would be minimal. However, it hit the runway, shattering the aft portion of the rocket, almost to the forward centering ring. I was told that, had I not glassed the tube, I probably would have had nothing but confetti left. The fins survived the disaster with a couple of scrapes, but the 38 and 54mm motor tubes are destroyed, as well as a good portion of the airframe. The piston is banged up as well, but appears to still be functional.
Examination of the motor casing showed evidence of a blow-by, which explains the early ejection. Since my record with 38mm motor failures is now 2 for 2, I think I'm either going to switch to electronic recovery, or else Pro38 motors. However, the recovery problems really can't be blamed on the kit... although perhaps if I'd used extra tubular nylon instead of that other material, it might have held together.
Flight Rating: 4 out of 5
Summary:
I don't have much to add here. The rocket is pretty much a plain "vanilli" 3FNC bird, which makes it a good choice for someone that doesn't have a lot of HPR experience. It is light enough to still qualify as a "large model rocket", and can fly on G motors, so you aren't restricted to HPR flights only (a major consideration for me). Yet, it is big enough that it would scream out of sight on an H or I motor (a small J will throwing it over 4000 feet). I'd say it's a pretty solid, forgiving rocket.
Overall Rating: 4 out of 5
Other Reviews
- Public Missiles Tethys By Scott Weihe (July 3, 2007)
This is a big beautiful stock PML kit with 3 fins, parachute recovery, and would be perfect for level 1 attempts. The kit came with a 36" x 4" PML Quantum body tube, G10 fins, plywood centering rings, PML's 54/38/29 Kwik-Switch motor mounts, a tough plastic nose cone, PML's piston ejection system, 12 feet tubular nylon shock cord, a 48 inch chute, 2 brass lugs, and some very good ins ...
- Public Missiles Tethys By Greg Gardner
Mostly stock rocket for my Level One certification. This is my first rocket higher than an Estes kit. First Flight on this rocket was my L1 attempt as built weight was too heavy for a "G" test flight. The kit includes: 1 36" x 4" PML Quantum body tube Piston ejection system 3 G-10 .093" fins 2 1/4" plywood centering rings 54mm Kwik-Switch motor mount with 38mm & 29mm ...
 |
 |
Flights
|
|
A.D.W. of PML (January 1, 2001)
(January 3, 2001)
G.S. (April 1, 2001)
D.B.M. (August 17, 2005)
|
|
D.J. (November 1, 2000)