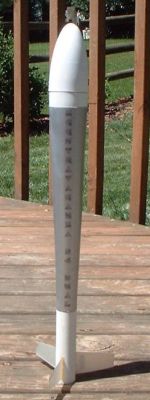
Aerospace Speciality Products Eggstravaganza (24mm)
Aerospace Specialty Products - Eggstravaganza 24 {Kit}
Contributed by Chan Stevens
| Construction Rating: | starstarstarstarstar |
| Flight Rating: | starstarstarstarstar_border |
| Overall Rating: | starstarstarstarstar_border |
| Manufacturer: | Aerospace Specialty Products  |
Brief:
This is a NAR competition style egg payload kit, which can be used for either altitude or duration events. If you're
new to competition rocketry, ASP kits make excellent starters as they are generally easy to build, use very good
materials, and perform reliably well (high performance designs, in general, are riskier and more susceptible to
problems).
The kit is available in various forms from 18mm to 24mm motor mounts and in a regular version as well as an upgraded platinum edition. The platinum upgrade offers a reflective silver shroud instead of cardstock, and G10 phenolic fins instead of basswood. The 24mm kit is also available in a single or dual egg capsule format, with the dual kit upgrading to a 24" chute.
This review will cover the 24mm platinum edition though I have built and flown all versions in NAR competitions and review comments for each would be the same.
Note that there are generally two designs used in egg lofting: lower drag "egg on a stick" designs using a capsule on a body tube and a tapered shroud. ASP uses the tapered shroud approach, which offers much more room for a chute but is slightly lower altitude due to additional weight and drag.
Construction:
ASP uses parts of very good quality, and I am especially a fan of their 1/4 mil mylar competition chutes. When one of
those bright silver chutes pops open, if you're lucky enough to catch any thermal activity, you'll be watching it drift
away for what seems an eternity. The parts list for an Eggstravaganza includes:
- Vacuform egg capsule (Pratt capsule)
- Cardstock shroud
- Motor tube
- Centering ring/large
- Centering ring/small (motor block)
- D/E engine spacer (24mm kit only)
- Kevlar®/elastic shock cord
- Launch lug
- Wire (for forming upper launch lug)
- Small competition-style chute (1/4 mil, Kevlar® shroud lines)
I've generally found that what few competition kits are on the market have instructions that are aimed at the seasoned competitor and not at all user-friendly to someone starting out in competition. ASP would be the exception to that, offering very detailed and adequately illustrated instructions. They are not quite as good as you'd find on a typical modroc but good enough to get you a qualified flight in competition or possibly even a top 4 finish.
Begin by sanding down the body tube. This is a critical step as you need a strong bond to avoid losing fins in flight and the glossy finish on the tube will not suffice. Next, mark the fin lines using the template on the instructions (3-fin, 120 degree orientation). Glue in the centering ring motor block (with provided stuffer tube).
Scott's review mentioned some difficulty in forming and fitting the shroud. I have generally not had any troubles with this now having built 5 ASP egg lofter kits, but I am pretty experienced forming shrouds and usually tape the shroud together first for a dry fit before breaking out the glue. I also use a very thin finger-wiped layer of white glue for the bond and make sure I roll the seam back and forth over a wood dowel or motor casing so that it holds a curved shape instead of a flat joint. It's also not a bad idea to place a piece of clear tape over the outer seam, which helps keep it aligned and reduces the drag a bit.
The upper centering ring serves to keep the tapered shroud in alignment, and you'll have to peel away several layers of the cardboard wrap to get it down to the proper size. Once it's in place on the body tube (and the Kevlar® shock cord is anchored to it), you'll need to test fit the shroud in place and mark the point on the body tube where the end rests, which serves as a glue line later. The key to fitting the shroud is for a snug fit against the centering ring, but not too snug, which would result in a slight bulge around the centering ring. The aft end of the shroud should be so tight that you need to push the body tube through from the forward end of the shroud but not so tight that it does not slide back/forth smoothly on the tube. Once you've marked the fit, you remove the shroud, apply a bead of glue (I suggest epoxy for the 24mm version) then slide the shroud back in place.
Once the shroud is in place and the glue dried, you can bond the fins. Scott's review noted that he did not sand them. For a competition model, that's probably a mistake and will hurt performance. We tend to focus too much on materials and weight for competition models and not enough on the very basics of fin alignment and airfoiling. If your fins are well airfoiled and perfectly straight, you'll do much better than someone sporting an ultralight model with rounded edge fins. For the regular style kits with basswood fins, this means about 45 minutes worth of work to round the leading edges and taper the trailing edges and finishing with 400 grit fine sanding. Do not waste time and weight with a sealer as there's no performance gained by that. For the platinum edition kits with G10 fins, they are already so thin that airfoiling is nearly impossible without some funky tooling so rounding the leading and trailing edges is probably fine. There is no need to sand the other surfaces of G10 fins, which are already smooth.
Bonding the fins is one of the most critical steps affecting performance. You want them perfectly straight, oriented as closely to the 120-degree positions as possible, and you need a great bond. For the basswood fins, you can tack them on with CA and follow up with very thin wood glue fillets. Do not sand the root edges. For G10 fins, CA is a must--not wood glue, though you can get by with wood glue for fillets but CA is better. Avoid epoxy as it's heavy and does not bond as well. Also, for the G10 fins, you must sand the root edge with some coarse (120-180 grit) paper first or the laser-cut edge burns will not hold up under flight stress.
As Scott noted, the egg capsule needs a light touch. You need to melt a hole in the bottom of the capsule for the Kevlar® to pass through (I use a heated paper clip for the hole) and a pair of holes in the side of the capsule for the upper lug if you're using a lug rather than a piston or tower. You'll wind up epoxying in a Kevlar® loop at the bottom of the capsule (don't use CA, as it eats away Kevlar® over time) and can tape in the formed wire lug/loop.
Normally I don't comment on chute construction in a kit review, but with ASP competition chutes, they're worth a brief comment or two. For the egglofting kits, you'll be making what's referred to as an over-the-top shroud line for added strength and durability, since an egg capsule blasted off the top of the shroud can pose a bit of a strain. The chute instructions walk you through the basics of tacking the lines in place using mylar tape, followed up by wicked super-thin CA, and tying things together at the snap swivel. Where you might spend 10 minutes building a sport chute, figure anywhere from 20-40 minutes on a competition chute depending on the size.
Finishing:
For competition style rockets, you generally don't add weight for paint, instead flying "nekkid". If you
really want to add some color or personalization (NAR number on the rocket is required in contests), you can use magic
markers to color the shroud and/or fins (Scott's does look pretty sharp). If you go with the platinum version of the
kit, the shroud is already bright silver and should not be decorated since the silver is intended to make it more
visible in flight.
Construction Rating: 5 out of 5
Flight:
Flight prep for an egglofter is time consuming. Most eggs will be fairly tight fits in the capsule, but as Scott
noted, you'll want to put some padding for and aft to keep the egg from sliding around. I use dog barf and also slide
the egg in a plastic baggy just in case... Seal the capsule using black electrical/friction tape if possible. It has
better tack than masking tape, is flexible, and is not as high a drag penalty as masking or packing tape.
For egglofting contests, your get two flights and the best of the two counts (not combined, as most other events). Since you have to bring the egg back undamaged, there's a trade off between going with a big chute and potentially losing it versus a smaller chute and definitely getting it back. With an 18" chute (single egg) or 24" chute (dual egg), you'll almost certainly get it back but probably not place near the top in most contests. ASP offers sizes up to 36" as spare parts/upgrades, and I typically use the 36" chute for a first flight, going larger or smaller depending on the drift of the first flight. The shroud may not look like it can hold a chute that large, especially with the yards of elastic shock cord (use it all, that elastic will save your egg and chute). I've even gotten a 50" chute in one of these. The key is in carefully prepping and folding the chute and shroud lines. One key tip--use talcum powder prior to every fold, especially on humid days.
I normally fly the 18mm version using 5 or 7 second delays. For the 24mm, I went with a D12-5. The flight was absolutely perfect, straight up and no roll, excellent altitude. Deployment was slightly early/nose up though not enough to justify going with a longer delay. I would imagine on an E9-6 you'd have trouble seeing this all the way to apogee and deployment would be perfect.
Recovery:
As noted, with smaller chutes you'll get it back, the egg will be fine, and you'll get so-so performance. With a
larger chute, you run the risk of losing the model. Also, depending on your flying conditions, you'll find one of the
most common causes of breaking an egg is not on landing but on being dragged bouncing along the hard ground by a big
chute that is catching wind while you're trying to catch up to the landing spot from half a mile away. I typically get
2 minute durations on a C motor with a 30" chute and anything 36" and larger stands a good chance of drifting
out of sight if I hit a thermal. Those bright silver mylar chutes seem to be thermal magnets sometimes.
Flight Rating: 4 out of 5
Summary:
PROs: easy build, reliable flier in what is a challenging event, very good value, and great starter kit.
CONs: should offer multiple chutes--one small and one large.
Overall Rating: 4 out of 5
Other Reviews
- Aerospace Speciality Products Eggstravaganza (24mm) By Scott Simka
Brief: This Competition Egg Lofting kit features an aerodynamic & lightweight Pratt/CMR plastic egg cone, shock cords made of Kevlar ® and elastic, and thin wood fins. It also has a 24mm motor mount. Don't let this rocket's basic design and simple building fool you. The intricacies of loading and flying these babies can be complex and you should ask for help from an ...
 |
 |
Flights
|
|