| Manufacturer: | Rocketflite  |
RocketFlite - Magnelite Ignitor Kit review is provided courtesy of:
Making Igniters The Rocketflite Way
 I learned about the Rocketflite name years ago when those super sparky motors were all the rage. Greg Dyben has been a household name around the hobby rocketry arena for years producing great products like the Silver Streak motors and his Magnelite igniters.
Recently, Greg began marketing a kit-based form of the Magnelite igniters. One of the benefits of being made available in kit form is that there is no hazmat fee. The components don't become considered an explosive mixture until they are actually mixed together.
The ML-KIT includes all the necessary mixing tools, chemicals and simple instructions to make 48 grams of pyrogen! This is enough pyrogen to make over 800 ML-16 electric matches! The price Greg is representing is a cost to you of under $0.65 a piece, which is a pretty good deal.
Once ignited, the pyrogen burns for approximately one second at a reported temperature of around 6,400 degrees Fahrenheit! Rocketflite maintains that since the first 1/4 inch of this electric match is only 1/16 of an inch in diameter, it can be used to ignite most C sized and up end burning and core burning black powder motors on up, as well as most H and up composite motors.
Peak amperage requirement for successful ignition is from 5 to 6 amps with a minimum amperage requirement of 2.6 amps for 118ms. This electric match can be fired using any high-capacity 9 volt rechargeable ni-cad battery such as Radio Shack's part# 23-299.
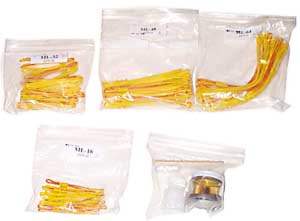
 I set out to see just how difficult making these igniters was, so a full igniter kit was ordered from Rocketflite. The top right photo shows what I received: four different lengths of igniter leads (16 inch, 32 inch, 48 inch and 64 inch lengths) as well as the pyrogen components unmixed in separate containers.
The separate components consist of the base igniter pyrogen dip in a glass bottle with a metal lid, a small plastic bottle of what appeared to be potassium percholorate, a small pipette, for adding naptha in the event you need to reduce your mixture at a later date, and a craft stick to stir the mixture.
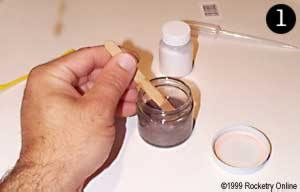
Photo 1 shows the first step of the mixing procedure, the thorough mixing of the base pyrogen dip. The instructions call for about one minute of mixing to thoroughly mix the base mixture. It appeared to have settled a bit before I had opened it, and since the pyrogen appears to have a heavy metallic content, the particles need good suspension in the mixture to work properly.
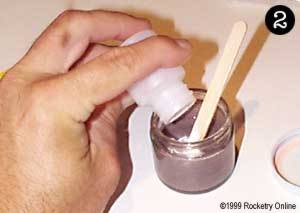
In Photo 2, the powered components from the small white plastic bottle are added to the pyrogen mixture in its entirety. That's right, bottom's up. Pour the whole amount in and then stir the mixture again thoroughly for about a minute.
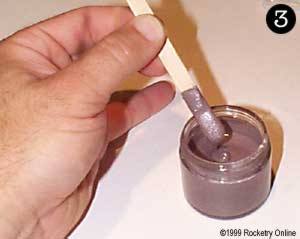
What you are looking for is shiny candy-like consistency, sort of like when you are making fudge. Photo 3 shows how thick the pyrogen looks on the stirring stick and the shiny texture it attains when ready to use.
Once you have completed this second stirring, you're done mixing. That's as hard as it gets. Add the contents of one bottle to another and stir. Real rocket science here, people. It's simple and easy. Anyone can make igniters with this product. But, we have to dip some first, right?
After selecting which lead length you are going to use, you are instructed to bend a 90 degree angle in the end of the igniter that has the bridge wire soldered to it. Photo 4 shows how this should look. This gives you a handle to hold onto the igniter and a way to lay it down after you have finished dipping it until it dries.
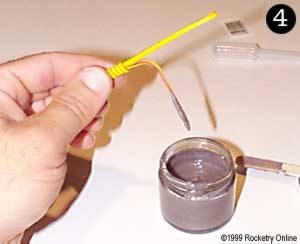
I dipped this 16 inch lead by inserting the igniter slowly into the mixture and slowly stirring the pyrogen a few times to coat the wire. This allows the pyrogen to flow all around the head of the igniter completely. This is especially beneficial if you make igniters for larger motors, in that you are bending the end of the igniter lead, which forms potential air pockets that need to be filled.
Make ingiters for larger motors is as simple as bending the end of the igniter lead into a "U" shape about 3/4" from the end and dipping. You should make sure there is an air gap between the igniter bridge wire and insulation of the wire next to it, so that pyrogen covers the bridge wire completely and not in spots.
Larger igniters can be made similarly, just make two "U" shapes like a flattened out "S". This increases the surface area that holds pyrogen and makes for a larger ball of flame when the igniter is ignited.
CAUTION: Do NOT double dip igniters. One dipping is sufficient, multiple dippings can cause the pyrogen to explode without igniting the motor. There is no need to double dip when you can increase the pyrogen area by making bends in the head of the igniter wire, so don't do it.
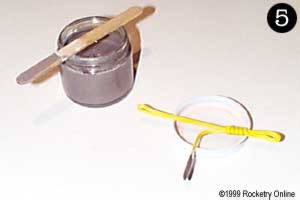
Photo 5 shows a finished igniter drying. By laying the igniter where the wet pyrogen is able to hang into the air, such as on the edge of a table or shelf, air gets to all sides of it, allowing it to dry quickly. Igniters are ready to use within the hour, no later than three hours.
I have to say I was impressed with ease and simplicity that Rocketflite makes of igniter making. I used to think it was a lot of voodoo and science, selecting the right wire and bridge elements, carefully silver-soldering the leads in place and then carefully mixing the correct pyrogen formula.
Not anymore! Rocketflite has taken all the mystique and difficulty out of the process and made it truly simple. All I needed now was proof in the pudding!
 Photo: Tim Eiszner |
What I needed was a down and dirty test to see how these igniters compared to others on the market. Seemed like a good excuse for a drag race to me!
Traveling to the Tripoli South Carolina Freedom Launch over the recent Independence Day weekend, I arranged to test the fruits of my experiment -- I conducted a drag race consisting of two LOC EZI-65's.
The two rockets were virtually identical, both being built stock. For propulsion, I selected identical AeroTech 38mm 360ns RMS™ motors, loaded with I-161W reload kits, both with medium delays.
The one on the left had a dipped Magnelite igniter prepared by me. The one on the right had a name brand competitor's pre-built igniter. Both weighed in at 4.25 pounds at the RSO table. After safety check-in, I loaded them onto identical launch pads with 3/8" stainless steel launch rods. Everything was as equal as I could make it. All that was left to do was arm both pads, do a countdown and press the button.
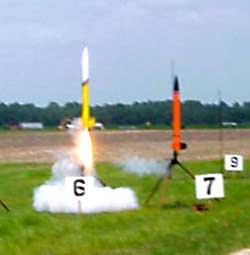 Photo: Tim Eiszner |
I have to tell you, even I wasn't prepared for the holeshot the Magnelite put on the competitor, but photos don't lie. While the competitor's igniter was still chuffing the I motor up to pressure, the Magnelite-equipped rocket was two feet up the launch rod!
It appears the Magnelite-equipped rocket literally exploded off the pad, with the motor igniting instantly. The other rocket still took another second or two to ignite, and by that time, the Magnelite-equipped rocket was long gone. Good thing I owned both rockets and wasn't racing for 'pink slips' or I would be short a rocket!
The results are right there, these things work. They are simple to use, simple to make and produce great results. If you would like more information about Rocketflite's Magnelite igniter kits, contact them via their website at http://www.rocketflite.com or send email to Rocketflt@aol.com.
There is also a double page ad in the current issue of High Power Rocketry magazine, page 42. Give 'em a try, I think you may like them.
Written and submitted by Darrell D. Mobley for Rocketry Online -- Copyright 1996-1999
Other Reviews
- Rocketflite Magnelite By Tim Burger
( Contributed - by Tim Burger - 08/21/06) Brief: I've been flying model rockets for a long time now, some 30 years I guess, but high power rockets are still a new and novel thing to me. In truth, I'm still not certified level two yet. However, I have noticed some problems with certain igniters and was planning to get an igniter making kit to dip my own for those stubborn to ...
- Rocketflite Magnelite By Darwin May
(by Darwin May - 09/19/04) Brief: Magnelite is an igniter making kit by Rocketflite and appears to use magnesium and acetone for some HOT burning igniters. Construction: The Magnelite kit comes with a bottle of oxidizer and the magnesium/acetone solution. It also comes with a sheet of instructions, a paper cup for a funnel, and a nail for stirring. To start, you stir the liquid ...
- Rocketflite Magnelite By Dick Stafford
I won a Magnelite kit from the EMRR 'Boink' Rocket contest . I received the 2-part pyrogen kit, and 12 each of the 12" (E-G), 24" (H-J) and 48" (K-M) igniter wires. Here's what I think of it. The pyrogen in my kit came in plastic bottle, sealed with wax, and packed in some sort of sand. The oxidizer powder was just in a plastic bottle. The kit included a set of instructions and a ...
- Rocketflite Magnelite By Darwin May
(08/21/99) The Magnelite kit simply consists of two containers. The oxidizer and the pyrogen. The oxidizer must be combined with the Pyrogen in order to make the igniters. You will also need some RocketFlite ignitor wires which come in a variety of lengths (16", 32", 48", 64"). CONSTRUCTION: The instructions are on a single sheet and straight forward. These ignitors ...
 |
 |
D.W.G. (March 10, 2002)
J.D.G. (June 30, 2002)
M.S. (December 26, 2009)
|
|
S.B. (September 1, 1999)