Art Applewhite Rockets Flying Saucer 24mm (7.25")
Art Applewhite Rockets - Flying Saucer 24mm (7.25") {Kit}
Contributed by Dick Stafford
| Construction Rating: | starstarstarstarstar_border |
| Flight Rating: | starstarstarstarstar |
| Overall Rating: | starstarstarstarstar |
| Manufacturer: | Art Applewhite Rockets  |
 Brief:
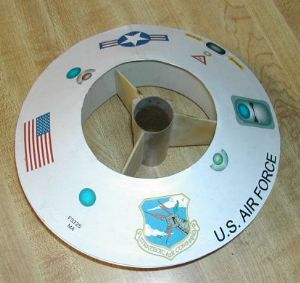
This is the 7.25" version of Art's saucer line. Like the larger 9" version, this saucer flies on C11-0 and D12-0 motors. The saucer's card stock shell is pre-printed in an USAF motif. Art now offers several designs, various colors, and blank versions of his 6", 7.25", and 9" saucers.
Construction:
The components are the same as the 9" version (but smaller, of course):
- Preprinted card stock comprises the top and core assembly of the saucer.
- One 7.25" plastic picnic plate comprises the bottom.
- One 2.75" BT-50 motor tube
- One 2.75" motor hook
- One 3/16" launch lug
- 3/32" basswood fin stock
Tools and materials required:
- Scissors
- Exacto knife
- Elmers' white glue
- Rubber cement
- Clear enamel (RUS-TOLEUM Crystal Clear or equivalent)
- Double-sided tape
- 150 grit sandpaper
Construction is identical to the 9" version. You first cut out the top and core pieces and glue them together using the printed tabs, similar to any paper shroud. An inner ring is attached to the core, and the core is glued into the top section. These steps use white glue, and, of course, the glue must dry between each step. Using a provided template, a hole the size of the paper core is cut in the plate. The template is supposed to be attached temporarily with double-sided tape, but I just used clear tape. The plate is to be glued to the saucer assembly with rubber cement. When I built my 9" saucer, I substituted some old Liquid Nails. It had thickened some and I thought the recommended rubber cement would work better. Well, I had bought some fresh Liquid Nails and decided to try it again. This time it worked fine.
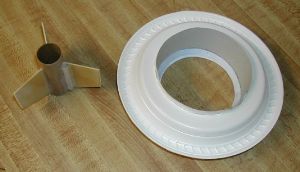 To assemble the fin can, you mark, cut and sand the fins. These are attached to the motor tube like any other fins. You optionally can add card stock spin tabs. On this saucer, I elected to leave them off (I used them on my 9" version). Finally, the launch lug is added and the fin unit is complete. If you are going to use the spin tabs, make sure you glue the launch lug on the side of a fin that is away from the direction of the tabs. As with my previous saucer, I left off the motor hook to allow longer motors, staging, etc.
The last step is to sand the tip of the fins so that the fin assembly slides into the core section of the saucer.
Finishing:
Finishing consists of spraying the printed top and core of the saucer with clear enamel. You have to make sure not to get this on the plastic plate as the paint might damage it. I guess you could paint the fin can, but I elected to leave it naked.
Construction Rating: 4 out of 5
Flight:
I flew the saucer on a D12-0. Its boost was noticeably faster than its 9-inch cousin (no real surprise) and it really put those silly plastic RTF saucers to shame :-). As with the bigger saucer, the fin unit and saucer sections did not separate. Unlike the bigger saucer, however, it came down nose first.
Flight Rating: 5 out of 5
Summary:
This saucer is easy and fun to build. It looks better, IMHO, than the RTF ones, and there are several colors/patterns to choose from. If you like saucers, I suggest you get one of these and go drag race a Snitch :-).
Overall Rating: 5 out of 5
Other Reviews
- Art Applewhite Rockets Flying Saucer 24mm (7.25") By Mike Salter
(by Mike Salter) Brief: This is another of Art's flying saucer collection, this one is 7.25" in diameter and will fly to heights between 150 to 300 feet. Construction: All of the components were of high quality, the tube was neatly cut and the fin material was basswood for extra strength. The top and core sections are made of card stock and the bottom is a plastic party ...
 |
 |
Flights
|
|