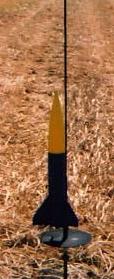
| Diameter: | 3.10 inches |
| Length: | 25.20 inches |
| Manufacturer: | LOC/Precision  |
| Style: | Sport |
 Brief:
The LOC/Precision Onyx is a popular entry level mid-power rocket capable of G
motor flights. After tinkering around with RockSim, I decided to convert the
rocket for a 38mm motor.
Modifications:
Although for me this project was born via spare LOC parts, I had sitting
around, the listing below is what one would need if he or she bought the Onyx
as a kit. The additional things needed for this version of a 38mm Onyx is as
follows:
- 38mm motor tube.
- 3 centering rings for above motor tube in a 3" diameter airframe.
- 3/16 birch plywood for new fins.
- 8 ounces of nose weight (I used modeling clay).
- Eyebolt for recovery harness.
- 3/8 tubular nylon.
- Launch lug for 1/2 rod (optional as supplied lug is probably fine).
The first thing I did was cut new fins out of 3/16" birch plywood that I picked up from the local R/C aircraft shop. Due to the simple shape of the fin pattern, I used a jig saw for this. Next, I slotted the airframe with a hobby knife. This process seemed daunting at first, but a new sharp blade makes clean cuts.
Next, I started on the motor mount assembly. I cut an 8" section from the motor tube and roughed it up with 80 grit sandpaper to ensure a better epoxy bond. On the forward most centering ring, I installed the smallest eyebolt I found at the hardware store (I have since forgotten the exact size) and locked the nut on with thick CA. Then I took the stock braided nylon shock cord mount and tied the ends together to make a it a continuous loop. Using a square knot, I attached the nylon to the eyebolt.
Next, I epoxied the forward centering ring on the motor tube 1/8" from the forward end. I followed that with a middle centering ring for the top of the fin tabs. I epoxied this on 2 1/8" down from the forward end of the motor tube. After the epoxy dried, I installed the partially built assembly in the airframe so the motor tube was flush with the rear of the rocket.
Before putting on the rear centering ring, the fins were installed. Each fin received fillets at the motor tube/fin tab connection as well as where they come through the wall. I also added fillets to the rear side of the middle centering ring at this time.
To complete the motor mount/fin can, I added t-nuts for motor retention, and installed the last centering ring. It sits 1/8" in from the rear of the rocket and sandwiches the fins completely.
Lastly, I added 8 ounces of modeling clay to the nose cone to keep the CP and CG in a working relationship. I widened the hole at the bottom of the nose cone and jabbed the clay in little by little with a wooden spoon handle. The launch lug was attached per the kit instructions.
Construction:
The nose cone and airframe are the only kit items I used for this project. Of
course, they are what one would expect from LOC: beefy kraft paper airframe,
and a seemingly bullet-proof nose cone. The original fins I used for patterns
for cutting new ones to go through the wall and to the motor mount.
Pros: Easy modifications. Durable. It's an Onyx on a 38mm motor :) It can still fly on a 29mm motor.
Cons: Additional expenditure for extra parts
Flight:
I added Nomex® for parachute protection and an 18" Top Flight parachute.
Getting all the recovery gear into the tube is kind of tricky, but quite
possible. I ended up drilling a vent hole below the nose cone should to make
this task a bit easier.
I first flew this rocket at Tripoli Central California's Dairy Aire 2001 one event. I went with an H242 which put it up around 3900 feet, according to RockSim. The Blue Thunder motor really punched it off the pad and the boost was extremely straight with no wobble. Ejection was a bit past apogee, but outside of that post flight inspection showed no damage to the rocket or the parachute.
Summary:
For me,
stubby
rockets are fun to watch. I already like the Onyx with the regular 29mm option.
After seeing one fly with a 38mm motor, I like the Onyx even more. The only
major drawback to this project is the extra money you might spend on the
additional components needed. The main pros are that you've just built a far
more durable Onyx than the kit alone would yield. Also, you still have
flexibility because 29mm motors are still an option.
Other Reviews
- LOC/Precision Onyx By Chip Jenkins
Single stage mid-power rocket. All of the parts were contained in a plastic bag and they were all intact and high quality. The airframe had a very small spiral groove, the fins were top quality plywood, and the nose cone was sturdy plastic. The centering rings were also quality plywood. The parachute provided was hot pink in color and 15" diameter. The instructions were contained on the ...
- LOC/Precision Onyx By Alex Jordan
The LOC Onyx is a stubby 3 inch mid power single stage rocket with 14 inch chute recovery. The fins are glued directly to the body tube with no tabs. It has a 29mm motor mount. This was my first 3 inch and LOC/Precision kit. I didn't know what the quality of the parts would be but they turned out to be great. The contents of the bag were: 2 3" x 29mm plywood centering rings (1/8" thick) ...
- LOC/Precision Onyx By Nick Esselman
The LOC Onyx is my second LOC kit and I purchased it as one of three "stubby" rockets that were around three inches in diameter. This diameter compliments my 2.6" and my 4" collection. I had also purchased a RocketVision Grymm and the Estes Big Daddy. See my 3" Stubby Rocket Comparison Page The Onyx is the biggest of the three being 3.1" in diameter and 25.2" long, qualifying as a ...
 |
 |
Flights
|
|