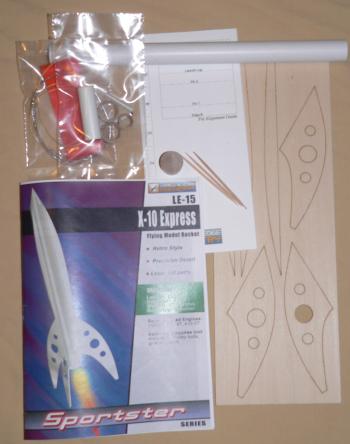
Leading Edge Rocketry X-10 Express
Leading Edge Rocketry - X-10 Express
Contributed by Nick Esselman
| Published: | 2010-11-13 |
| Manufacturer: | Leading Edge Rocketry  |
Leading Edge came out of the shoots producing a night-flying rocket called the Night Skeeter which is new, unique and interesting. Their theme is "Fly the Edge". So, although I was not interested in a night rocket, I did want to sample at least one of their kits. I purchased the X-10 Express. The X-10 is part of their Sportser series of rockets, for which there are now five (5) and I'm told more to come!
The X-10 claims to have "Retro Style, Precision Detail, and Laser cut parts". I agree. The fin shape (and apparently the holes within the fins) give the rocket a "retro" look. The "detail" comes in the instructions and the laser cut parts... well, are laser cut.
The rocket included a 0.736" diameter body tube with a 13mm motor mount (including the motor clip), a balsa nose cone and 3 (made from 6 parts) balsa fins. The shock cord is Kevlar®-to-elastic which is attached to the motor mount and nose cone eye-screw. A streamer is attached to the shock cord for recovery.
CONSTRUCTION:
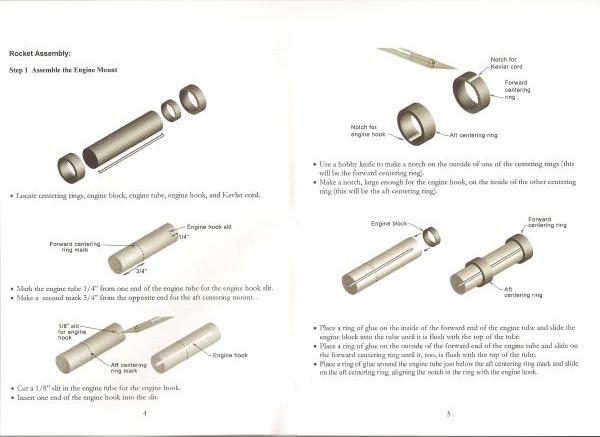
The instructions are printed in a small booklet that is very profession and worthy of notice (by comparison and stand-alone). There are 17 pages of instructions in this form covering parts, tools needed, step-by-step directions and flying information including the NAR code. There are graphics illustrations that make the building directions easy to follow. Here's a small sample:
Leading Edge calls this kit a Skill Level 1, but because of the 2-piece fin and the Kevlar® shockcord mount to the motor tube (have to cut the centering rings), I think it may fall into the Skill Level 2 when compared to Estes or Quest. Regardless, it is not too difficult to build and with the instructions it is a straightforward kit.
The instructions say to use wood glue. I followed that direction. The kit even came with 3 toothpicks and calls out using them for glue placement (that's a first!)
 The motor mount is built first. It is a typical except that you must cut the notches into the paper
centering rings using your hobby knife. The first notch is cut on the inside of one ring for the motor hook. The second
notch is on the outside of the other ring to allow the Kevlar®
shock tether to pass by into the body tube.
The motor mount is built first. It is a typical except that you must cut the notches into the paper
centering rings using your hobby knife. The first notch is cut on the inside of one ring for the motor hook. The second
notch is on the outside of the other ring to allow the Kevlar®
shock tether to pass by into the body tube.
The body tube fin alignment marking guide is cut out from a piece of card stock and is wrapped around the body tube. After this is done, the fins are added. They are cut so precisely that as long as you align to the marks on the body tube, they will look like one continuous fin.
My fins extended about 3/32" beyond the top of the body tube when aligned to the rear of the body tube. I didn't like this, but left it.
The launch lug is glued in place after the fins are complete. Then all the joints get a fillet of glue.
The eye-screw is attached to the nose cone, the elastic is tied to the Kevlar® shock tether and it is then tied to the nose cone. The plastic streamer is then taped to the elastic shock cord.
I finished the rocket using my basic techniques with Plasti-Kote primer. I followed that with Krylon Gloss Red paint. My only complaint was, again, that the fins extended beyond the top of the body tube and therefore created 3 spots that were "masked" while priming and painting the rocket. For the last coat of Red, I had the nose cone sticking out slightly to cover those spots. (I regret not taking a picture during this portion of the build for show-n-tell.)
There are no decals provided with this rocket kit.
NOTE: One more thing on the fin length... if it was intentional, it did not detract from the looks of the rocket and may have actually created a better looking transition into the nose cone.
Overall, for CONSTRUCTION I would rate this kit 3 ½ points. Some of the best instructions I've seen in a while make this a great build. The provided parts are high quality and the precision cut of the fins was impressive. I was a bit disappointed with the length of the fins, but maybe I'm just being too picky and there were no decals.
 FLIGHT/RECOVERY:
Leading Edge recommended the 1/2A3-4T, A3-4T, and A10-3T motors for the X-10 Express.
I happened to have a pack of A10-3's and was ready to put this rocket in the air. I added about 3 squares of wadding for the rocket's first two flights.
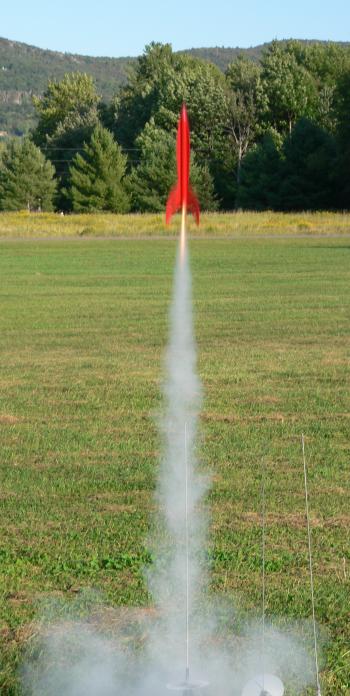
The first flight (pictured) was perfectly straight and stable. Due to the rocket's weight, it did not go that high. I found this to be an excellent feature of this rocket! A small rocket using 13mm motors that doesn't go out of site. I would recommend this rocket for anyone that does demonstrations.
The second flight was exactly as the first. The streamer is orange and can be seen easily.
The third flight was also on an A10-3, however, it was in our front yard and unfortunately is was blown into the nearby trees and is now lost. Too bad!
For FLIGHT/RECOVERY, I would rate this rocket 5 points. The Kevlar® to elastic shock cord system is excellent along with the streamer recovery. The weight of the rocket allows it to perform well on 13mm motors. If built correctly the rocket is stable.
I give the rocket an OVERALL rating of 4 ½ points. I would recommend this kit as a school yard flier or to have as a demo rocket. It has unique looks and doesn't fly out of sight on 13mm motors. It is also priced in a range that makes sense (to me) coming in at $12. I will look forward to future Leading Edge rockets.
 |
 |
Flights
|
|