| Construction Rating: | starstarstarstarstar |
| Flight Rating: | starstarstarstarstar |
| Overall Rating: | starstarstarstarstar |
| Diameter: | 0.79 inches |
| Length: | 20.00 inches |
| Manufacturer: | Quest  |
| Skill Level: | 3 |
| Style: | Glider |
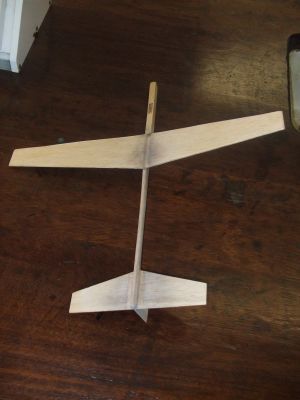
Brief:
A pop pod glider for B and C motors. The design is tried and tested and there are two levels of finish: one simple
one that is a quick glue together without any airfoils, which is where the flat part of its name comes from, and a
second where there is a great deal of sanding involved. Quest puts this rocket at a skill level three which is about
right for the airfoil version
Construction:
Kit consists of:
- 2 inch launch lug.
- Yellow motor mount tube
- 8.5 inch white body tube
- Blue motor thrust ring
- Plastic nose cone
- Plastic nose cone base
- Single gripper tab
- 2 foot plastic streamer
- ¼ by ½ by 16 inch balsa fuselage
- ¼ by ½ by 4 inch balsa pylon
- 2 Balsa wings
- Balsa parts set
- Motor mount clip
- Trim clay
- 21 inch white elastic shock cord
- 18 inch yellow Kevlar® cord
- Chrome Decal
- Instruction sheet
To build the kit I used:
- Model knife
- sand paper
- White PVA glue
- Sanding sealer
The instructions are clear and straightforward. Provided that you read the instructions through a few times, there are no real problems.
You have the two options of finish; I went for the airfoil version, which took nearly an hour of sanding airfoils into the quite thick and firm balsa wings. This option is supposed to give up to 3 minutes of glide time. I normally never put any lifting surfaces on rocket gliders as this usually leads to arched boosts and broken gliders. One thing you have to do is put strong fillets on the joints. The stresses on the joints under thrust are huge and weak joints will have the wings stripping themselves.
Once the glider is finished, it needs to be balanced. The instructions are weak here as they don't give a balance point for the glider, which usually is one third of the wing depth back from the leading edge of the wing. On my Flat Cat, the balance point was bang on the trailing edge of the glider. I was worried about this but with several indoor test throws the Flat Cat glided level every time although the sink rate was steeper than I would have hoped for. More vigorous test throws outside revealed a slight stall and a bank to the right. I added a small blob of clay into the cavity at the front which corrected the stall.
The hook mechanism that releases the glider needs more preparation than the instructions suggest. I have had hook mechanisms fail on pop pod gliders such as the Fun Rockets Silver Hawk and Edmonds Aerospace DeeCee Thunder. For the mechanism to work, the hook needs to be sanded down smooth on both sides and the rear of the hook sanded down a millimeter or so and rounded off so there are no edges to stick.
Sealing the balsa and using very fine sand paper to give a glassy finish on the hook also helps. To make sure separation occurs, a quick spray of silicon grease on the hook also helps. Testing the hook mechanism is as important as testing the stability of the glider. If the glider does not release with a quick jerk of the booster pop pod, then the hook needs further prepping.
Finishing:
Initially I was in too much of a rush to finish the glider by sealing the balsa. After some time in a tree (the
glider--not me!) I have sealed it, and the performance has improved.
The foil sheet of stickers supplied add unnecessary weight to the glider and are not needed if the balsa is sealed. After several flights there has been no damage to the balsa with the exception of some very slight charring that was done to the glider on flights done before sealing the balsa
Construction Rating: 5 out of 5
Flight:
Recommended motors are B6-2 or C6-3
I used 2 swatches of Nomex® wadding in the pop pod.
First flight was on a B4-2. Even thought this is not a recommended motor, I didn't have a B6-2. There were very strong winds that day ranging from 10 mph up to very strong gusts. I would not normally fly in these conditions, but I was putting on a small display to a visiting Royal Air Force Air Commodore so rocket gliders seemed to be an obvious choice. The boost was straight, with the rocket tipping past apogee before the glider deployed. The actual glide was very good, with the strong wind the flat cat gained height when flying into the wind, and it gave several circuits in the air. It did however travel a fair distance down wind narrowly missing several trees.
The second and third flights were on A8-3, which does not take the glider up very high but still delivers over a 20 second flight and a circuit or two.
When a calm day arrived I flew on a C6-3. The rocket arched on boost, deploying the glider over a narrow strip wood of trees about 5 meters wide, I watched for a minute the glider circling above the trees before finding a resting place in one.
Five days later I retrieved the rocket with help from one very long pole and some overnight winds. Remarkably, despite the rains there was no damage to the glider apart from some fluffing up of the balsa. I then sealed the glider and retrimmed.
After a few flights more with some trimming, I got a flight of over 2 minutes.
The only con to the Flat Cat is that there is a strong chance of flyaways, but that's a risk I'm willing to take.
Recovery:
The pop pod recovers on the 2 foot long streamer. The fall rate is a little fast, but so far there has been no damage
to the pod. By the 6th flight the Kevlar®
cord had burned through. I might swap the streamer for a larger Mylar streamer and attach the cord to the outside of
the tube, which looks ugly but it stops shock cord failures.
Flight Rating: 5 out of 5
Summary:
This is a great boost glider if you are willing to put in the time to build, test, and trim it.
Overall Rating: 5 out of 5
Other Reviews
- Quest Flat Cat By Jim Bassham and Edie Parkhouse (June 28, 2010)
Brief: The Flat Cat is a classic boost glider with a streamer-recovery pod. Construction: Parts List: Launch lug 18mm motor tube 8.5 inch body tube Thrust Ring Plastic nose cone and base 24inch streamer and gripper tab Balsa fuselage Balsa pylon Three sheets of die-cut parts Motor mount Trim clay Elastic shock cord Kevlar ® ...
- Quest Flat Cat By Hank Helmen (November 13, 2008)
Brief: This is a boost glider rocket with streamer recovery for the booster. Construction: The Quest Flat Cat boost glider includes an 18mm body tube for the booster as well as an engine mount kit. There are die cut balsa wings and fins. Also included in the kit is a 24" plastic recovery streamer, shock cord, plastic nose cone and decals. The instructions were easy to ...
- Quest Flat Cat By Chris Taylor Jr. (November 5, 2008)
Packaging: Plastic bag with cardboard display picture. The Parts: Lots of very nice, high-quality, thick balsa wood. No skimpy stuff here. This is going to be one tough glider! Standard Pop-pod Glider. Basically a short, finless rocket that attaches the nose of the glider with a one-way hook, I. e. go up and it hooks, go back and it falls off. The motor's ejection ...
- Quest Flat Cat By Mitch Marchi (December 14, 2007)
Brief: Low power rocket booster with streamer recovery and glider flight recovery. Construction: Rocket booster is basically an 18mm minimum diameter rocket with a balsa "hook" assembly on it instead of fins. Glider is comprised completely of balsa. Wings and stabilizer are 1/8", fuselage is 1/4" x 1/2". The instructions were good, except that ...
 |
 |
Flights
|
|
R.J. (September 1, 2000)
B.M. (October 1, 2000)
(December 1, 2000)
HWH (November 9, 2008)
|
|
B.M. (August 1, 2000)