Brief:
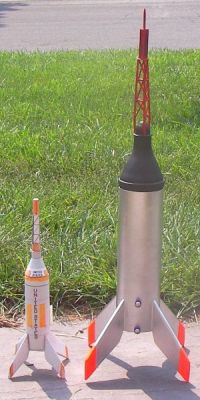
This rocket is based on a paper model of the Little Joe I, unit LJ-1, by
Cards in Space. I converted it to fly on 13mm mini motors.
Modifications:
The main things you have to do is: cut holes in the bulkplates to accommodate a
motor ejection tube, build a shoulder to mate the capsule to the body, add a
piece of elastic to keep the parts together after ejection (a streamer is
optional), and add a launch lug. In fact most of the changes I made were
leaving detailing components off. More on this below.
Construction:
The rocket consists of:
- three sheets of white cardstock
- 13mm tubing, ~5.5"
- 1/8" launch lug
- spent 13mm casing
- thin elastic
The parts and instructions come in a single PDF file. The model includes a lot of parts, many of which I didn't use. For example, I didn't install the 4 engine bells, however, they probably could have been integrated into the flying version. The one page of instruction is bare bones but is adequate to build the model. The penalty for mistakes is only an extra sheet of cardstock.
I used white glue throughout. The body consists of one long wrap and a few rings. A short reducer section rests on top of this. The rings on the bottom end are pre-marked for the 4 engine bells so you have to mark and cut the hole for the motor tube. The designer was good enough to mark the two other rings with a single circle, which I cut out and used as a guide to mark the bottom rings. This was very convenient. A section of 13mm tubing extends the length of the main body.
The four fins each consist of two parts: an outer shell that folds over on itself and a spacer that forms the base of the fins. The capsule consists of a couple of transitions, a cylinder, and two plates. I formed a shoulder by first embedding a section of 13mm tube in capsule through the bottom plate. I then glued in about ½ of a spent 13mm casing. I cut corners big time on the escape tower. This would be by far the most difficult part of the build and the most fragile. The instructions require you to cut out the trellis sections and the tip probe. I didn't cut these sections out, nor did I bother with a the probe. A piece of toothpick would probably be a good substitute for the latter. The way I built it also made it inconvenient to install the escape tower nozzles--so I said adios to these also.
For recovery, I merely attached a short piece of thin tubular elastic. I small streamer could probably be packed in the gap between the top body ring and the capsule, but I was satisfied with tumble recovery.
Finishing:
It is obviously pre-printed, so all you need is a clear coat for protection.
Flight:
I have flown the rocket 3 times to date, twice on A10s and once on an A3. Prep
consisted of friction fitting the motor and that's it. Both motors resulted in
nice flights, but the A10 is a better choice in my opinion.
Summary:
This is a nice looking, simple scale model that is an excellent introduction to
paper model conversion. It flies great on the 13mm motors!
 |
 |