Brief:
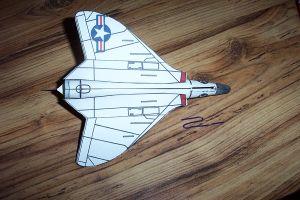
This is a card model of a 1950's American Navy Interceptor aircraft that with
the addition of a paperclip (I glued a smallpiece of paper over the paper clip, just for reinforcement)
and a little modeling clay in the nose, makes a
perfect parasite glider! Fiddler's Green offers it free of charge. All you have
to do is go to www.fiddlersgreen.net and click on the
free models section.
Modifications:
The only thing you need to do this kit is some either 65-110lb cardstock, a
printer, a paperclip, and some clay (used as noseweight). All assembly is done
with scissors and white glue. Once the kit is finished, you bend a paperclip to
point forward into the nose section, bend the opposite way to lay flat against
the lower fuselage of the plane, and then back again to fit into a launch lug,
which is added to the rocket to hold the glider. The whole body is hollow, so
just add a little bit clay at a time until it glides well with a good toss. I
made one in both 67lb, and 110lb cardstock and they both work well. I prefer
the 110lb, just because it's thicker and I trust it, plus I had some laying
around.
Construction:
This kit is very easy to assemble. It's free and if you mess up, all you have
to do is print another one. It comes with instructions and a history of the
plane as well. On the site are also hints to make a rubber band launched
version, which is where I got the idea for a parasite glider. Once I opened the
PDF file, I used the camera feature to encircle just the parts of the glider
and select "print graphic". Set the printer settings to "fit to
output paper". What you want to do is make as big a glider as you can and
this gives you one that is 113-114% of the original. Fiddler's Green also has a
whole section explaining downloading, sizing, and printing. You need a bottle
of white glue, scissors, and a little patience. The only "tricky"
spot is a the rear, where the rear of the wings meet the rear of the fuselage.
You have to push down on the fuselage, taking it a bit out of round to get it
to mate up with the wings. This kit is extremely tough when finished.
Finishing:
No painting or finishing is needed.
Flight:
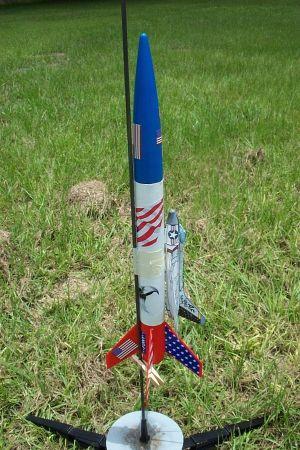
I used the Estes Skywriter, with the addition of a tiny section of a plastic
straw taped to the side to insert the paper clip. Alternately you can use the
straw for the launch lug, and use the original launch lug to insert the glider.
The rocket actually flew better with the glider attached. I have also used the
Estes Stars And Stripes model. I should warn you that this glider really does
work! If you use a C motor, it will not only be up a long, long time, but I
lost 2 because they flew over large fences and landed in trees over 1/4 mile
away while they were circling! I found the B6-4 size motor to be a good choice
with both rockets. No damage or wear whatsoever has been noticed on both 67#
and 110# paper gliders from launching, although the nose is beginning to look
like an old prize fighter from playing with it all the time, bumping into
walls, the side of the house, and the cats catching it before I do!
Recovery:
Trimmed with clay for noseweight, it delivers impressive glides.
Summary:
It works, it's easy to build, easy to modify, and it's FREE!
 |
 |