| Construction Rating: | starstarstarstarstar |
| Flight Rating: | starstarstarstarstar_border |
| Overall Rating: | starstarstarstarstar_border |
| Manufacturer: | Estes  |
 Brief:
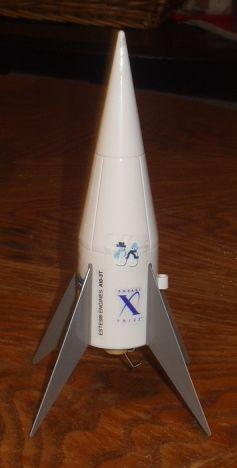
The Estes Lucky Seven is a 1:50 scale model of the rocket being designed and built by Acceleration Engineering. It features 95% plastic construction, Estes mini-engine power, and parachute recovery. Santa brought this kit for my 5 year-old son for Christmas 2004.
Construction:
This model is made entirely of plastic, except for the motor tube, motor hook, shock cord and parachute.
Here is a reasonably complete parts list:
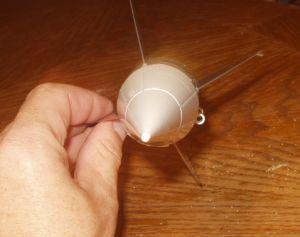
- 3 piece white plastic nose cone
- white plastic body tube
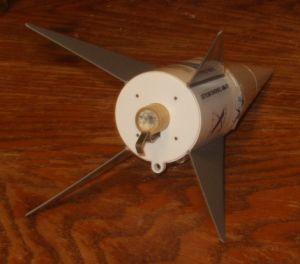
- 4 silver plastic fins
- circular white plastic plate to mount on bottom of rocket
- 4 very small silver plastic rocket nozzles
- clay for nose weight
- 24" gray rubber band shock cord
- 12" plastic parachute
This is one of Estes' E2X skill level kits, which means it is very easy to assemble. Tube type plastic cement is the recommended glue.
I used medium CA glue throughout because that's what I had and I've had good experiences using CA for gluing plastic parts together in other model rockets. No parts have come apart (yet) when I used CA.
 The instructions were extremely easy to follow. How could they not be? Pull the clay into two pieces and mold them into the two halves of the nose cone, glue the circular shock cord mount to one half of the nose cone, and glue the two halves of the nose cone together. Insert the motor tube and hook into the plastic body "tube," slide the four plastic fins into the slots in the side of the body, and glue the circular plate onto the bottom of the body. This plate serves as a retainer for the fins as well as for the motor mount. Glue the four tiny rocket nozzles where indicated onto the bottom of the plate. Tie the ends of the rubber band shock cord to the nose cone and the inside of the body "tube," tie the parachute shroud lines to the shock cord (closer to the body end than to the nose cone end, since the parachute will be stuffed into the nose cone), stick on the stickers/decals, and voila! The rocket is finished!
The build was very easy. The only thing that could even remotely be considered difficult was fitting the end of the rubber shock cord through the small slot provided for it inside the bottom of the body section. My fingers are too big to fit in there, so I used the tip of a pencil to help slide the rubber band through the slot. One other small thing is that I had never built a model rocket using a rubber band shock cord, so I wasn't sure just how tightly to tie the knots in the two ends. We'll see if I tied them either tight enough or too tight.
Everything fit perfectly. The nose cone pieces glued together nicely, the nose cone fit into the body really well, and the fins slid into the slots in the body very well. The retaining plate that was glued to the bottom of the body seemed to hold the motor mount and fins exactly as intended.
Since it's made entirely of plastic, this rocket is sturdy. In fact, I taped the nose cone on with scotch tape and my son has been flying it around the house like that for a week.
All of the white plastic parts are hard, rigid plastic. The silver plastic fins, though, are much more flexible. Assuming this was a deliberate choice on Estes' part, it was probably done so that the fins are less likely to break upon landing. That seems like a good idea to me.
I did not use ANY tools to build this rocket, only medium CA glue.
Finishing:
Finishing involved removing clear peel-and-stick plastic decals from the backing sheet and sticking them onto the sides of the model. There were two "Lucky Seven" decals, one "Acceleration Engineering" decal, one "X Prize" decal, one "Estes" decal, and a decal that listed the recommended motor (A10-3T only).
My son told me where to apply the decals, and I did as I was told.
Construction Rating: 5 out of 5
Flight:
The only recommended motor is the 13 mm Estes A10-3T.
Wadding is required, and I used several squares of Estes wadding, which I wadded up and placed in the rocket. The motor is retained by the plastic "thrust ring" molded into the rocket's body and by a mini engine hook. No problems were seen with motor retention.
 I've flown this model three times. First flight was extremely low and the rocket moved very slowly off the launch pad. Not only did the parachute fail to deploy, but the nose cone didn't even pop off. The rocket landed on asphalt nose cone first, and the only damage was a slight dent to the tip. On closer inspection, I found two major problems. I used an A3-4T instead of the recommended A10-3T and the ejection charge didn't go off! Looks like I should both read and followed the instructions, but this is the first ejection charge failure I've ever seen.
Second and third flights were much more as expected. I actually used A10-3T motors and the parachute ejected fine both times. Flight was still pretty low but it allowed me to see the whole flight.
Recovery:
The shock cord is the gray rubber band that Estes has started providing with their kits again. I have read that this material is supposed to last longer than the elastic shock cord material Estes used before but only time will tell.
There has been no shock cord damage in three flights (two where the ejection charge actually went off), however, the parachute shroud lines have gotten really tangled both times the chute deployed.
Flight Rating: 4 out of 5
Summary:
PROs: It's so simple, pretty much anyone could build it. It's sturdy plastic, so an energetic 5 year old can play with it without fear of damage.
CONs: It's so simple, pretty much anyone could built it. It's a toy! Minor difficulty in getting shock cord into mount inside body.
Overall Rating: 4 out of 5
Other Reviews
- Estes X-Prize Lucky Seven By Chris Gonnerman (September 24, 2007)
This is a semi-scale model of the Acceleration Engineering "Lucky Seven" rocket, one of the contestants for the Ansari X-Prize. This is a largely plastic rocket. The package includes a three-piece plastic nose cone (two side halves and a bulkhead), a plastic body tube with integral bulkhead, a plastic tail bulkhead, four plastic decorative nozzles, four plastic fins, a paper engine tube, a ...
- Estes X-Prize Lucky Seven By Alan Tuskes
Brief: 1:50 Scale model of the Acceleration Engineering LLC's entry in the X-Prize race. Single stage, parachute recovery. Skill level E2X. Construction: The kit includes: 1 BT-5 engine mount 1 mini engine hook 1 rubber (REAL rubber) shock cord. 1 12" chute clay weight plastic parts: nose cone assembly (2 halves, nose cone cap) body and body ...
- Estes X-Prize Lucky Seven By Donald Besaw Jr
Brief: The Estes X-Prize Lucky Seven is a 1:50 scale model of Acceleration Engineering's Ansari X-Prize entry. This model flies on an A10-3T motor up to 200 feet and uses a 12 inch parachute for recovery. Construction: The kit came in a plastic bag with header card and included: 1 motor tube 1 motor retention hook 1 pack of clay weight 1 rubber shock cord 1 12 ...
 |
 |
Flights
|
|
Bill Eichelberger (July 16, 2014)
Hey, John. What is that plastic parachute made out of?
|
|
K.J. (January 30, 2005)