Essence Aerospace Technologies 18mm Lambda-Class Shuttle
Essence Aerospace Technologies - 18mm Lambda-Class Shuttle {Kit}
Contributed by Dick Stafford
| Manufacturer: | Essence Aerospace Technologies |

(by Jason Myers - 01/14/03)
 Brief:
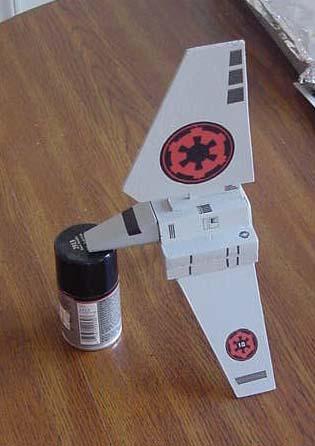
This kit is the Star Wars Lambda Class Shuttle. Most people will probably
remember that it is the vessel that the Rebel Alliance used to smuggle
themselves onto the moon of Endor to destroy the shield generator that
protected the second Death Star in Return of the Jedi. Is it an 18mm downscale
of a scratch built design by EMRR. It is single stage and uses an 18"
parachute for recovery.
Construction:
The kit came with:
- 1 sheet of 1/4" balsa
- 2 sheets of 1/8" balsa
- 1/32" piece for the rear cover
- 18mm motor tube
- thrust ring
- Kevlar® shock cord
- plastic nose cone
- launch lug
- nose weight
- decals
The instructions for how to build this kit were a dream. The nose cone got very tricky to assemble and took a few readings to completely understand, but all in all, they were great!
The templates were perfect for the most part. The hardest one was the rear cover plate. I ended up having to make a new one for my rocket as the canopy wasn't quite the same shape as the template.
Assembly was done with a combination of CyA and yellow wood glue. Epoxy was needed to attach the shock cord and nose weight.
The canopy platform went together first with the motor tube. Very straight forward on that. The fins were then attached after strengthening with a coating of CyA glue.
The canopy itself was somewhat difficult to attach since there are 3 pieces that must be glued more or less at the same time. I ended up tacking the pieces with CyA and then following up with wood glue.
The nose cone was next and the instructions say very clearly that this is the most difficult part. They aren't kidding. The plastic cone is very thin and flimsy and will tear very easily when you begin to cut it in half. The top and bottom balsa pieces go on easily enough, but the side pieces are another story.
There are 2 pieces on either side that make up the angled side of the nosecone. Careful sanding is required and some quick acting glue is also handy for this. Balancing the pieces to tack them down is a very good trick for people with steady hands. For mine, it was very difficult to get the pieces to stay together. Once it did all stay put and was dried, I used wood glue to try and fill in some of the gaps that were caused by imperfect cutting and alignment of the side pieces.
After that ordeal is done, you have to cut out the bottom of the plastic nosecone for weight addition. I tore the shoulder a couple of times due to the paper thin plastic. It was easily fixed by a little CyA glue.
Adding the nose weight is very simple. I emptied the pack of BBs into an epoxy mixing cup and poured a few at a time in the nosecone along with some 15 minute epoxy. I used a toothpick to get all of the BBs inside the nose.
After all of the BBs and shock cord were in the nose, I mixed another small batch of epoxy (I used a total of 10Ml of epoxy) and capped off the plastic nose cone and leveled off the balsa section.
The launch lug was then attached with CyA and some small fillets were added.
Finishing:
Finishing will comprise a couple coats of primer along with a few coats of
paint. I haven't gotten that far yet, so I'll keep you posted.
It appears that finishing will not be difficult on this as there are no small nooks or crannies to get into. There is a lot of fin area to paint.
Construction pics can be viewed here.
Construction Rating: 4 out of 5
Flight:
I flew it once so far. on a C6-3. Great motor for this bird if you have a large
field! It flew to about 60 feet or so and arced over. It did fly with the top
stabilizer wing on top just like was supposed to!! Just as it started heading
down, the ejection blew and it coasted down with no damage at all.
I can't wait to fly it again!! Thanks for the great experience!
Recovery:
The 18" parachute is proving to be a challenge to find the right way to
fold/roll it to fit in the very small area for it and have it come out with
minimal difficulty. Once the chute is rolled and crammed in, great force is
necessary to pull it out and an ejection charge just won't do it.
I plan on cutting a 6" spillhole in it to help alleviate this problem.
Flight Rating: 3 out of 5
Summary:
Overall, I love this kit. It was very challenging to build, but also didn't
take forever to construct. I can't wait to see it fly.
The only con I can see is the difficulty in building the nosecone. It is small and people with shaky hands like mine may have trouble.
Overall Rating: 4 out of 5
Other Reviews
- Essence Aerospace Technologies 18mm Lambda-Class Shuttle By Dick Stafford
Brief: This 18mm version of the Lambda-Class Shuttle was produced in limited quantities by EAT (Essence Aerospace Technologies). Although the kit isn't being produced, you can still purchase a plan pak [here] . It is one of the most innovative kits around and is a great addition to anyone's fleet. Construction: Parts: One 1/4" balsa sheet (3" x 6") ...
 |
 |