| Construction Rating: | starstarstarstarstar |
| Flight Rating: | starstarstarstar_borderstar_border |
| Overall Rating: | starstarstarstarstar |
| Manufacturer: | Quest  |
Brief:
Single stage, parachute recovery, skill level 1 kit that featuring a plastic
nose cone and fin can, making assembley virtually foolproof.
Construction:
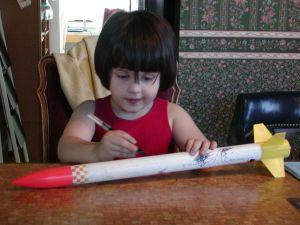
Bought the Bright Hawk kit at a Hobby Lobby 40% off sale in order to have
something extremely simple that I could build with my 4 year old daughter
without having to worry about anything getting messed up. This kit appeared to
be just the thing. Upon opening the kit, everything appeared to be accounted
for and of the usual high Quest quality. The parts were:
- 1 T35 body tube, 17 inches long
- 1 motor clip
- 1 thrust ring
- 1 motor mount tube
- 2 fiber centering rings
- 1 plastic nose cone
- 1 plastic fin can
- 24 inch long elastic shock cord
- 21 inch long Kevlar® shock cord
- 2 strips of 3 gripper tabs each
- 3 26 inch shroud lines
- 1 14 inch parachute
- 1 self-adhesive decal sheet
- assembly instructions and launch procedure sheet
One thing I noted was that the quality of the parachutes has increased lately. They no longer have that poly grocery bag quality of a few years ago that seemed to tear very easily. Packaging quality was very good and there was no damage to any parts.
My daughter and I sat down to put the Bright Hawk together at the dining room table. The only tools needed to assemble the kit (per the instructions) are a hobby knife, a pencil, white glue, and either scotch or masking tape. Curiously enough, plastic cement, for bonding the fin can to the body tube was not listed but more on that later.
 The first step
was construction of the motor mount, which was very straightforward, included
the installation of the standard Quest Kevlar®
shock cord, which was wrapped around the engine tube for a very strong mount. A
nice touch which I don't remember seeing before was that the engine tube
already had the slit for the engine hook cut into it. I think that if the nose
cone didn't have had some plastic flash in the shock cord eye, you could have
gotten away with assembling this kit without even having the hobby knife on
hand.
The first step
was construction of the motor mount, which was very straightforward, included
the installation of the standard Quest Kevlar®
shock cord, which was wrapped around the engine tube for a very strong mount. A
nice touch which I don't remember seeing before was that the engine tube
already had the slit for the engine hook cut into it. I think that if the nose
cone didn't have had some plastic flash in the shock cord eye, you could have
gotten away with assembling this kit without even having the hobby knife on
hand.
After installing the dried engine mount, using either white or wood glue, the following step caused me some consern:
Step 7 - Slide the one piece molded fin unit onto the body tube as shown.
That's it. No mention of plastic cement or tape. Nothing. Using glue was no problem for me, but I was concerned that another person, perhaps building this as a first model, may have their model disassemble itself under thrust. Wondering if this was an oversite or possibly a way of changing out fin cans in case of damage, I made a call to customer service at Quest and was promptly put through to Matt Constabile (aka "El Chubbo" on The Rocketry Forum). He assured me that it was not an oversite but that the fin can was molded with a bit of taper on the inside and that it friction fits quite nicely onto the body tube. However, plastic cement or a silicone sealer could be used to secure it if so desired. I found Matt to be quite personable and he answered some other questions not related to this kit as well (being the nosy little man that I am...) I ended up not gluing it on but put a couple of small pieces of masking tape on the body tube to make sure the fin can fit extra snug. Inertia can be a bear and I could just imagine my daughter's rocket being the first Bright Hawk to fly out of its fins...
As the launch lug is molded into the fin can, you didn't even need to worry about gluing that on straight. In a way, this kit reminded me of my very first rocket from about 1970, the MPC Pioneer-1, which also had the molded fin can with integral launch lug.
The last steps were to assemble the parachute and tie the shock cord to the nose cone. I opted to put the chute on a snap swivel as this bird looks sturdy and light enough to be able to use streamer recovery without too much problem. Besides, I'm old and fat and I don't want to walk that far to recover my rockets anymore.
Wait a minute! It's my daughter's rocket. She can walk after it. Where's that chute?

Finishing:
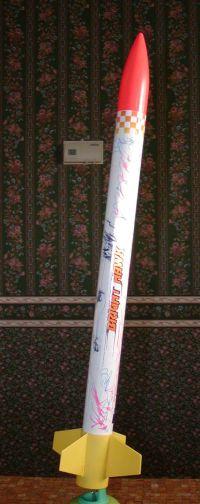
The fin can is molded in bright yellow plastic, nose cone is orange, and the
body tube is white, so no painting is really necessary. The self-adhesive
decals are also in bright, happy yellows and oranges as well. My daughter
finished the rocket off with markers and other miscellaneous stickers. Every
time I turn around, she has either removed a sticker or added a new one, so it
appears to be that this rocket will be a "work in progress" until she
tires of it or it is lost or destroyed.
Construction Rating: 5 out of 5
Flight:
I will be flying the Bright Hawk on April 23, 2005, at the Great Lakes Regional
Meet Revisited, where my daughter will be allowed to push the red button to
make it go over and over and over and (switch to the Snitch) and over and
over....
Flight Rating: 3 out of 5
Summary:
PROs: Easy to build, big and easily seen rocket that your younguns will enjoy
assembling and decorating. Inexpensive enough that you won't mind when they do
a child's job of decorating it.
CONs: I can't think of any.
Overall Rating: 5 out of 5
Other Reviews
- Quest Bright Hawk By Bill Eichelberger
Brief: Quest's Bright Hawk is a good example of a Skill Level .5 rocket. (It's listed as a Skill Level 1, but its plastic fin can makes that a bit of a stretch.) Big and sturdy with a brightly colored plastic fin can and nose cone, it might be one of the better rockets currently available to gradually step up with if your previous experience has all been with RTF rockets. ...
- Quest Bright Hawk By Clive Davis
Brief: 4FNC skill level 1 easy build kit with plastic fin can. Construction: The kit comes in plastic bag with: bright orange nose cone large, wide white body tube yellow plastic fin can motor mount, motor block, engine hook, and centering rings parachute kit Kevlar ® & shock cord decal stickers I selected this kit for a rocket build I was ...
 |
 |
Flights
Sponsored Ads


|
|