The Launch Pad Nike Ajax MIM-3A
The Launch Pad - Nike Ajax MIM-3A {Kit}
Contributed by Larry Zeilmann
| Construction Rating: | starstarstarstarstar_border |
| Flight Rating: | starstarstarstarstar |
| Overall Rating: | starstarstarstarstar_border |
| Manufacturer: | The Launch Pad  |
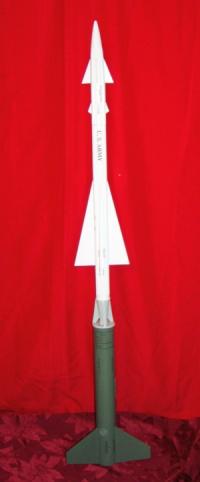 |
The Nike Ajax is a personal favorite of mine, and I have wanted to build this kit since I first became aware of it’s existence. Unfortunately, It appears to be a rarely available kit that commands a healthy price if you are fortunate enough to come across one. Prices can range from high 30’s to retail of $53.99 and beyond on E-Bay. The manufacturer claims that his kit’s are not for the beginning modeler, and require a moderate level of experience. I would have to concur with his appraisal, and add that in the Nike Ajax case perseverance leads to success.
However, Being a bit of a construction rebel, I am never happy with a “Plain Jane” construction process. The Actual Nike Ajax flew as a staged missile, and I wanted mine to mimic the actual vehicle as close as possible. Therefore, mine will be a staging project with a three motor booster and a single motor sustainer. The sustainer ignition will be accomplished with a PerfectFlite Mini Timer, and all chute deployments will be accomplished by motor ejection.
Finally, I would have to add that one should not expect to be able to contact the manufacturer for any assistance on this or any Launch Pad kit. Conversation amongst various rocketry communities and retailers often begin with; “Is The Launch Pad still in business?” Several attempts to contact the manufacturer concerning construction questions always resulted in no response.
Construction:
Packaging is typical Launch Pad: soft plastic bag. I have no complaints. All
parts were present and in good shape.
A part inventory is not included so I will try to provide my best recollection of what is included. Plus parts needed for my staging modification.
Manufacturer included parts are:
 |
- 1 PNC60 nose cone
- 1 BT80 Booster Tube ~ 19”
- 1 BT80 Reinforcement Tube Coupler ~ 2”
- 2 BT60 Sustainer Tubes, 12.5” and 13.5”
- 1 BT60 Tube Couplers
- 1 BT50 Interstage Coupler Tube
- 3 BT50 24mm Motor Tubes ~ 3”
- 2 Centering Rings for 3x motor cluster
- 3 Motor Clips
- 1 sheet of 1/8” balsa for Booster Fins
- 2 sheets of 3/32” balsa for Sustainer Fins
- 1 small sheet of 1/16” Balsa
- 1 Package of Ballast Modelers Clay (Mine was unusable, hard as a rock.)
- 2 CR5080 Centering Rings
- 4 CR5060 Centering Rings
- 2 BT80 Exterior Decorative Rings
- 2 BT60 Exterior Decorative Rings
- 1 Cone Transition Card Stock
- 1 Antenna Card Stock
- 8 Lengthy Square Balsa Stock 3/16” Thick for Wiring Tunnels
- 1 Lengthy Square Balsa Stock 1/8” Thick for Wiring Tunnels
- 2 Mylar Parachutes with Elastic Shock Cords and Swivels. (assembly required)
- 1 3/16” x 2” rod guide
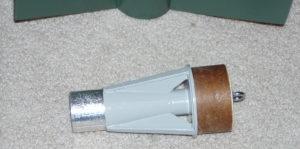 |
| Interstage coupler |
- 1 BT80 1/8” Balsa Vented Bulkhead
- 2 BT60 Tube Couplers
- 1 BT50 Motor Tube 12”
- 1 Motor Clip
- Timer and Wiring, On/Off Switch
- 1 24” Nylon Chute
- 1 30” Nylon Chute & addition Shock Cord
- 2 Rail Buttons
 |
| Looking into the Interstage Coupler. Sustainer Motor Mount and Baffle is on it’s left. |
Making and sanding the wiring tunnels is a tedious task. I decided the best approach was to cement the tunnel ends together and sand them as a assembled unit. That way the 45 degree chamfered edge is uniform.
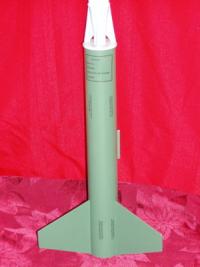
Finishing:
I finished my rocket with three coats of Blitz primer. This sealed remaining
wood grains and tube spirals. I then followed the booster up with three coats
of Krylon Satin Green, the interstage received three coats of Gloss Gray, and
sustainer received three coats of Gloss White. No taping was required since I
painted each section as a separate unit. Since mine was staged this is easy to
do. If you choose not to stage, I think you could still paint in this method by
holding off on gluing the interstage in place ’till after the painting is
finished.
No Decals are included in any Launch Pad Kit that I am aware of. This did not impose any problem. For the less ambitious assembly, one can make the minimum decal markings with relatively inexpensive press-on adhesive lettering. This is actually mentioned in the instructions. Since I was after realism I visited Jim Ball’s Scale Data web site and downloaded the drawings illustrating the actual markings. I then purchased some water-slide ink-jet decal paper and printed my own decals. For those interested in the actual markings I used, see Jim Ball’s Scale data web site.
Construction Rating: 4 out of 5
Flight/Recovery:
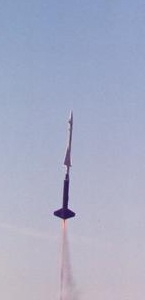 |
| Moments after liftoff on a three motor cluster of Estes E9-4 motors. |
Preparation of the stock kit requires wadding in the sustainer to protect your Mylar chutes. Since my staged version incorporated a baffle in the sustainer, I only required wadding in the booster (see pictures).
I used the included Estes style motor clips and then wrapped one winding of masking tape around the motor and clip for security.
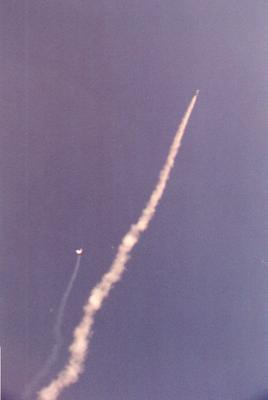 |
| Moments after staging is completed. Booster is the other light smoke trail to left of sustainer's smoke trail. |
I thought with all that lumber hanging off the sustainer and booster something would certainly break off. I believe the Mylar supplied chutes barely meet the recovery demands of such a big rocket with so much fin area. Since I recovered in stages with big Nylon chutes, everything came back pristine.
Flight Rating: 5 out of 5
Summary:
Overall, this rocket is pricey, (sorry Launch Pad). I don’t believe the
parts should command a $53.99 retail price. However, this is probably my
favorite kit to date. I also believe that it is a fairly easy kit to scratch
build. In the survival durability area, I can’t stress enough the
importance to follow the instructions on applying CA to the fin material. The
payoffs are big when you have that much lumber hanging from such a tall rocket.
Ratings:
A Strong 4+
I like this kit and would give it a 5 except for three areas I believe it cries
for change in. First, this kit needs to be staged! Second, at this price a
decal package should be included. Finally, Manufacturer support of some sort
would be nice.
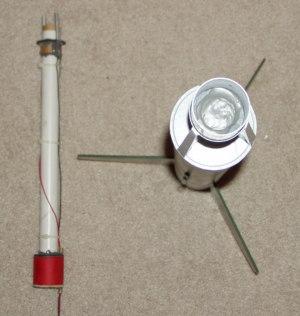
 |
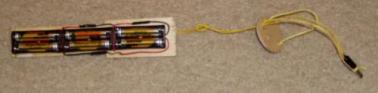 |
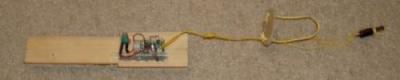
| PerfectFlite Mini Timer Assembly and six cell, AAA, NiMH battery pack. Complete assembly is mounted in the nose cone area and serves as ballast. Thus no further ballast is needed. |
![[NAR]](/images/archive/images/link_nartitle.gif)
The following excerpt is
from "Sport Rocketry". The intention is to allow guests to get a
basic feeling about a kit. We strongly suggest that you get a copy of the
referenced Sport Rocketry and read the entire article. Inside you will find
many helpful hints in construction as well as other useful information. For
more information, use the two links above.
(Sport Rocketry - Holiday 1996 - page 22 - by Tom Hand)
![[Picture]](/images/archive/images2/rp_lp_ajax.jpg) "Top notch computer generated instructions, laser cut discs,
pre-cut tubing, engine clips, Mylar parachutes, fabric shock cord, fin
templates, and first rate balsa combine to make a detailed, challenging, and
rewarding kit."
"Top notch computer generated instructions, laser cut discs,
pre-cut tubing, engine clips, Mylar parachutes, fabric shock cord, fin
templates, and first rate balsa combine to make a detailed, challenging, and
rewarding kit."
"Fin installation is critical on all model rockets, but this Ajax, having
fifteen fins to install and align, requires extra patience and
care."
"My biggest problem was making the wiring tunnels."
"The Ajax kit uses three 18 inch diameter metallized Mylar parachutes that
are complete with color-coordinated shroud lines and snap and barrel
swivels."
"Using two D12-5's and one D12-0 in the booster and one D12-5 in the
missile . . ."
". . . the Missile/booster combination flew dead straight, and the
staging, parachute ejection, and recovery were perfect."
". . . it is great fun to build, the instructions are excellent, and the
final product is well worth the time spent."
The entire article gives the impression is that it is a nice scale model for the experienced, patient modeler.
* SPECIAL NOTE off of RMR from Chuck Barndt, President of The Launch Pad
 |
 |
Flights
|
|
J.S. (May 1, 2000)
J.C. (October 1, 2000)
K.J.T. (October 31, 2001)
R.F.W. (May 19, 2003)
H.D.C (April 29, 2006)
|
|
R.W. (May 1, 2000)