| Construction Rating: | starstarstarstarstar_border |
| Flight Rating: | starstarstarstarstar_border |
| Overall Rating: | starstarstarstarstar_border |
| Diameter: | 0.74 inches |
| Length: | 24.80 inches |
| Manufacturer: | Estes  |
| Skill Level: | 1 |
| Style: | Glider |
Brief:
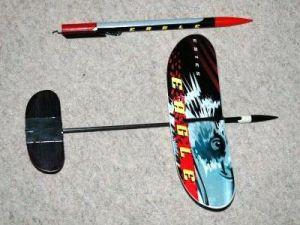
The Estes Eagle Rocket Boosted Glider is an easy to build E2X level rocket that is fun to build and even more fun to fly.
Construction:
The kit includes:
- BT-20 Engine Tube with Eagle decal already applied
- Engine block
- Engine hook
- 12" boom
- Red plastic nose cone with insert
- 2 pieces clay weight
- 1 large and 1 small steel ball for glider cone weight
- Rubber shock cord
- 30" plastic streamer
- 2 pieces red vinyl tape
- Black glider nose cone
- Glider carrier
- Fuselage
- Glider hook
- Tail adapter
- Heat reflective tape
- Horizontal stabilizer
- Vertical stabilizer
- Wing with Eagle decal already applied
You start by gluing the engine block inside the engine tube, then insert the engine hook and glue the glider carrier over the hook. The instructions recommend using plastic cement, but I do not trust cementing plastic to cardboard, so I opted for 5 minute epoxy. I believe CA would have worked fine as well. You then wrap a piece of red vinyl tape around the exposed cardboard to finish off the engine tube assembly.
The red nose cone is for the engine tube. You stuff one of the pieces of clay into the nose cone and then glue on the insert with plastic cement. The shock cord is the new rubber band type that Estes has switched to. I just do not trust them, so I used Kevlaron the tri-fold mount with a piece of elastic tied to the Kevlar. The streamer is then attached to the shock cord and the other end to the nose cone. This completes the engine tube assembly.
The black nose cone is for the glider. It gets two steel balls inserted into it with a small piece of clay to hold the balls in place. The nose cone is glued to the end of the fuselage. I had a little problem here because the end of the fuselage goes into the clay of the nose cone. I was a little concerned because the instructions tell you to put the plastic cement on the part the goes into the clay. I test fit the fuselage and only put glue on the parts that did not touch the clay. It was a fairly tight fit to get the nose cone all the way on, but was fine once the glue set up.
You then insert the tail boom into the fuselage. Follow the instructions carefully as the boom can go in two ways but only one is correct. You are then told to use plastic cement to glue the fuselage to the boom. I opted for CA instead since the boom is some type of carbon fiber and I wanted a good solid connection. The tail adapter is then glued to the other end of the boom, and again, I used CA. The wing saddle has double stick tape which you peel off the outer covering to expose the sticky side. I added several small drops of thick CA to the tape around the edges which I think will help hold the Styrofoam wing in place in the event of a hard landing. The glider hook is glued to the slots in the wing.
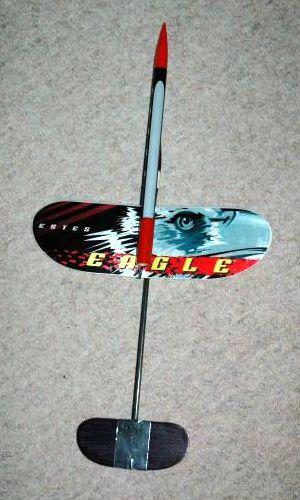
The tail adapter also has double stick tape, which I also strengthened with CA. The horizontal and vertical stabilizers are just white Styrofoam with no decals. The instructions tell you to color the horizontal stabilizer with a black marker. I used a wide tipped Sharpie marker, black on one side and red on the other. I also colored the vertical stab as well. Once the horizontal stab is in place, you then need to attach the reflective tape to the top of the horizontal stab. This is to help reflect the heat from engine exhaust and is a nice touch. Once the vertical stab is in place, you take the remaining piece of red vinyl tape and wrap it around the front edge of the stabilizer. I believe this is to help strengthen the joint.
Lastly, you just need to balance the glider. The bottom of the wing has two red dots which are the balance points. You just add clay to the front of the fuselage until you can balance the glider on your finger. I do not like the look of gray clay stuck in the front of the fuselage, I would have preferred that there be a container of some sort to hide the clay, I may add something later if it becomes a problem. It definitely detracts from the appearance.
Finishing:
No finishing is required. You can opt to use a marker to color the horizontal and vertical stabilizers. I would have liked to seen decals for both to help match the rest of the glider. There needs to be a better way to add clay to the front of the rocket for balancing.
Construction Rating: 4 out of 5
Flight:
The first flight was on a B4-2, the smallest recommended motor. The whole unit had a fairly straight flight to about 250 feet. Good separation on the booster but the glider came down fairly steep and hit hard on the grass. It did not do this when I made my "hand tossed" test flights. Fortunately, there was no damage. The booster came down quite nicely on its streamer. It's hard to follow both pieces when you launch alone. I removed some nose weight for the second flight on a B6-2, this time the glider came down much more gently. However, it did not fly in a circle as mentioned in the instructions. I went all out on the third flight with the maximum recommended motor, a C6-3. This time, the unit reached almost 500 feet and the glider came down a long way from the pad. Not sure why it is not circling, so I will have to play with it some more.
Recovery:
Aside from the fact that the glider never did circle, it was still fun to watch. Just make sure you balance the glider properly before you launch and you should have no problems. The booster section had perfect landings each time on the streamer with no problems.
Flight Rating: 4 out of 5
Summary:
This is a fun rocket to fly and it is very fast to build--this one would be great for kids. The decals are impressive and the overall quality is good for an E2X rocket. I think decals for the stabilizers would really have set this rocket off.
Overall Rating: 4 out of 5
 |
 |
Flights
|
|
D.K. (February 28, 2006)
D.K. (March 13, 2006)
|
|
J.W.C. (June 22, 2005)