
Brief:
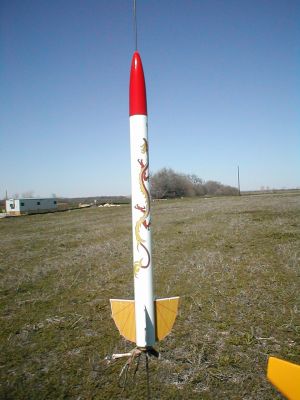
This newest kit from Squirrel Works looks super! It's a BT-55 kit that should catch some big air on a 24mm motor with 12" parachute recovery. The face card in the kit is a true work of art, a signature of Squirrel Works kits. Parts quality is excellent, too. The decals really set this rocket apart.
Construction:
The parts list:
- 1 BT-55 kraft main body tube
- 1 BNC-55 balsa nose cone
- 1 laser cut balsa fin sheet
- 1 standard 24mm motor mount kit with motor clip
- 1 standard 1/8" launch lug
- 1 screw eye
- 1 shock cord, 1/8" elastic
- 1 12" mylar parachute kit
- 2 decal sheets, water slide
I test fit all the parts first and sanded for fit as needed, then sanded all the tubes and balsa and filled the nose cone using Elmer's Fill 'n' Finish to get that all out of the way in the beginning. The body tube seams were hardly noticeable, so I didn't worry with filling them. Construction is really simple. It's your basic three very cool fins and a nose cone. Considering the fins are laser cut, it's a piece of cake. Putting the motor mount together was the most time consuming effort.
Next, I inserted the motor mount into the tube. While that was drying, I constructed the shock cord attachment, inserted the screw eye, cut out the marking guide, and drew the alignment lines. Then the fins and launch lug, after cutting it in half, were attached, and lastly, the shock cord mount and shock cord was installed and connected to the screw eye in the nose cone. I added a six-inch length of Kevlar to install in the shock cord mount, my standard installation. I put CA around the forward end of the tube and tied a knot in the Kevlar at the exit point to protect against abrasion, then added a loop at the end of the Kevlar to tie on the 1/8" elastic cord. Then I put the parachute together and it was done.
Finishing:
Since the nose cone is painted red and the body tube and fins are painted white, I painted them separately before installing the shock cord. Only the leading edges of the fins were rounded. The fin decals were easily cut out but the Dragonfire takes a little more time, as I like the cut to follow the outline of the decal. There was no way to get it to lie down like the picture on the kit though. Even though Don provided an extra dragon decal with the kit, I proceeded to immediately shred both of them trying to wrap them around the tube. He provided me with another full set, but I still managed to tear the next one in about five places just trying to get even a small twist partially around the body. My hands just aren't steady enough to pull something that thin along. They were so thin I even tore a piece in two of the fin decals. It still looks great though. I could have tried again, but didn't think I'd really do any better with another try. Next I applied a couple of coats of Future Floor Wax to protect the finish and improve the shine. She's ready to throw a few fireballs!
Construction Rating: 5 out of 5
Flight:
Wowee! This rocket zooms on a D12-5. Flying at DARS new field, a G-capable field in Frisco, the winds were blowing at 8-12 mph. The rocket flew straight as an arrow with very minimal weathercock. It was so fast off the pad, I don’t think the winds had a chance to have much effect on the rocket. I would guess the altitude was somewhere around 1,200 feet.
Recovery:
The chute popped right at the top. I didn’t reef the 12-inch chute, but luckily one of the shroud lines tangled and the chute didn’t fully deploy. It came down fairly rapidly but sustained no damage in the soft field. If the chute had fully deployed, I would have been recovering beyond the field.
Flight Rating: 5 out of 5
Summary:
The Dragonfire is a high flying rocket that can be put together easily in one day. Parts quality is superb, and the decals look fantastic. The specially designed laser cut fins with the decals applied are simply awesome, but the dragon spitting the fireball just adds that special flare that the rocket can't do without.
Pros: A simple design that comes alive with a set of decals that are a pure work of art. Complement that with a set of quality parts with laser cut fins, excellent instructions, and a nice long shock cord, and you've got a rocket that will turn heads at every launch and last long enough for the grandkids to fly. That is, assuming you don't lose it on one of those flights into the clouds.
Cons: Decals are too thin. I made the change with the shock cord, but that is just personal preference.
Overall Rating: 5 out of 5


