Semroc Constellation (xKit)
Semroc - Constellation {Kit} (XES-K35) [2008-2014]
Contributed by Chan Stevens
| Construction Rating: | starstarstarstarstar_border |
| Flight Rating: | starstarstarstarstar |
| Overall Rating: | starstarstarstarstar_border |
| Diameter: | 0.98 inches |
| Length: | 16.50 inches |
| Manufacturer: | Semroc  |
| Skill Level: | 1 |
| Style: | Futuristic/Exotic |
Brief:
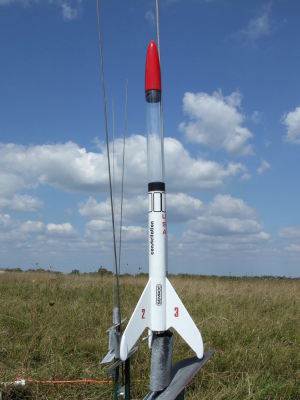
Another of the clone/parts kits, this one a replica of the Estes K-35 Constellation. This one features a clear
payload tube and cool futuristic fin styling complete with mini pods. Once nice upgrade in this modernized version is
the laser-cut fins, saving a bit of hand cutting.
Construction:
Parts are standard Semroc quality, top notch. Your $13.50 (retail) gets you:
- balsa nose cone
- Clear payload tube (24mm)
- Balsa bulkhead
- BT-50 body tube
- laser-cut fins
- laser cut pod extensions
- 18mm motor mount kit
- plastic chute
- rubber shock cord
- waterslide decals
Well, one of the things that comes with the xKit savings is that there are no instructions. This is because the original kit instructions are sufficient and are available in online archives. In this case, the plans are on JimZ's site only in tiff format, and a link to the plans is included with the kit and through Semroc online. If you don't have a tiff viewer, try looking for Irfanview, a free downloadable utility.
The original instructions were fairly easy to follow, but they do make one appreciate the advances in kit instructions with the aid of computer-based drawings.
Overall, I would rate this about a skill level 2 kit, and spent about an hour and a half on it, plus finishing.
The motor mount is pretty standard, featuring an 18mm tube, a 20/5 block, a metal clip and a pair of 20/50 rings. One of the rings needs to have a small section removed to offer clearance for the metal clip. I would think simply mounting it an inch forward instead of flush with the aft end, but that's just me...
The laser cut fins are a nice feature, as cutting these by hand would be a bit of work, plus cutting matching extension pieces to form the pods would be tough to match.
The pods are really a clever approach. I had expected looking at the cover art that they were spun balsa, but they're really just a pair of balsa pieces added to each side of the fin then sanded round. This technique is quick, easy, and looks sharp.
I had a little trouble with the bulkhead. As it turns out, the balsa piece was a bit too large to fit in either the body tube or the payload tube, so I sanded it down a bit. I apparently sanded down a little too much, as it was a bit loose in the payload bay. It was really loose in the body tube, making me think they are not exactly the same ID. I would up having to build it back up a bit with a wrap of paper on the body tube half.
There is a small dowel standoff for the launch lug, which struck me as a bit odd, considering the payload tube was almost exactly the same OD as the body tube.
The shock cord is very retro--a rubber cord anchored via tri-fold. This is one of those times when I would have rather had the normal Semroc retro-repro upgrade: Kevlar® and elastic. I know rubber has worked fine for everyone else for years, but I tend to have bum luck with it.
Finishing:
There's a good deal of balsa grain to deal with on this if you're picky like me. Elmer's Fill 'n' Finish rubbed on
the nose and diluted then brushed onto the fins and body tube.
Paint prep consisted of two coats of gray primer, a good sanding, and two coats of Krylon gloss white. I followed up by painting the nose (separately) Rustoleum red then painted the bulkhead and nose cone shoulders gloss black. The tips in the Semroc notes suggest tacking in the clear payload bay with CA. In my case, that didn't turn out so well. It attacked the paint and crazed the interior surface of the payload bay quite a bit, leaving an ugly mess. Fortunately, there were some black decals left over so I cut a few of those into trim rectangles and applied to the outside of the payload tube covering up my mess.
The waterslide decals are a Semroc introduction, as the original kits had no decals and later versions had assorted decal colors/styles.
Construction Rating: 4 out of 5
Flight:
For the first flight I went all the way up to C6-5 on a beautiful but breezy (8-10 mph) day. The flight was perfectly
straight and spun a couple times on the way up. No weathercock at all. Deployment was right at apogee.
Recovery:
My chute lines tangled a bit, bringing it down a bit fast, but in the tall grass this was fine and there was no
damage at all. The shock cord held up fine.
Flight Rating: 5 out of 5
Summary:
See my Penetrator review--I'm not a big fan of payload models, but this one also has enough unique styling aspects
that I find it appealing. I really like the larger fins and accent pods, giving this a futuristic appearance. The
decals are also a nice touch.
The only con I'd toss in is the "authentic" shock cord. Just because we didn't have good stuff like inexpensive Kevlar® line back then doesn't mean the modern day clones need to revert back to rubber cords. Heck, this kit cheated by laser-cutting the parts to improve the kit so why not toss in a little Kevlar® too for even more improvement? That's a very minor thing though. I really think overall this is an excellent kit and a terrific value.
Overall Rating: 4 out of 5
Other Reviews
- Semroc Constellation (xKit) By Robert Koenn (October 4, 2008)
Brief: I picked up a Constellation at the Semroc booth at NARAM 50 this year. I had planned on picking up a couple of Semroc kits while at NARAM but didn.t know for certain which ones I would buy. I didn.t even know they had released this old Estes kit until I noticed it hanging in the display. I also purchased an OOP Centuri Taurus and Carl, being the great guy he is, threw in ...
 |
 |
Flights
|
|
|
|
D.G.R. (September 19, 2008)