| Construction Rating: | starstarstarstarstar |
| Flight Rating: | starstarstarstarstar_border |
| Overall Rating: | starstarstarstarstar |
| Diameter: | 1.64 inches |
| Length: | 30.50 inches |
| Manufacturer: | Semroc  |
| Skill Level: | 2 |
| Style: | Cluster, Futuristic/Exotic |
 Brief:
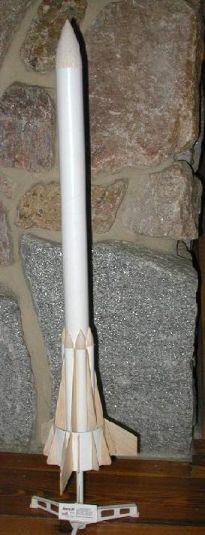
The Hydra 7 is a currently the "newest" kit by Semroc Astronautics
(originally released in 1969 and re-released on January 1st, 2004). The rocket
is based around six 18mm motor tubes and is a great clustered, high altitude
payloader, and retails for $23. The rocket can fly on anything from 1 C6-3 to 3
C6-5s to 7 C6-7s. With its largest motor setup (7 C6's) it is supposed to reach
1700'. For recovery it splits into two sections, the payload comes down under
one 12" parachute, and the booster on two 12" parachutes.
Construction:
All parts came packaged in a large plastic bag, with the smaller ones being
inside their own small bag. All parts were in excellent condition and all
present.
Parts List:
- 2 Body Tubes 1.69"
- 7 Body Tubes 0.79"
- 1 Body Tube 3.63"
- 1 Nose Cone 1.631"
- 3 Nose Cones 0.714"
- 4 Laser Cut fin sheets
- 1 Balsa Tube Coupler for 1.69" Tube
- 1 Launch Lug 1/8"
- 1 Screw eye
- 2 Elastic Shock cords
- 1 Kevlar® Shock cord
- 3 Parachutes 12"
- 3 Sets of shroud lines
- 1 Wooden dowel 3/16"
- 7 Thrust rings
- 6 Plugs for thrust rings
- 1 Decal Sheet
- 1 Engine spacing tube
- 1 Q-Tip for glue application
Construction starts with sealing the fins, because there are so many it would be hard to reach them after the rocket is finished. I used about 3 coats (on each side) of some type of spray-on sealer, although I'm not sure what brand it is. Next, you glue together the 7 motor tubes in a six-point star pattern. From here, you attach the 6 shroud support fins in between the joints of the motor tubes (LOC Viper style). Then you glue on the shroud and put in the motor blocks. The six outside blocks are plugged with cardboard disks, and the central one is left open for the ejection charge to go through. The next step is where the rocket begins to get its unique appearance. From the outside, the nosecones in the kit appear to go halfway through the body tube. However, instead of cutting the body tube, you are supplied with 3 nose cones. You have to cut each one in half and then sand the curvature of the 1.6" tube into the side of them so they conform to the body tube. I thought this step would be the trickiest of them all, however, it was quite easy. First I cut the Nosecones in half with a microsaw, then I used a drum out of a drum sander to sand down the curve on the nosecones. Once you get that done, you test fit them into the booster tubes and slide the Main body tube down onto them. You are supposed to re-sand if necessary but I didn't have to. The next few steps involve gluing on the fins, which I'm sure everyone here knows how to do just fine. The only little catch with the fins is that...there are 21 of them! (And thank goodness they were all laser-cut!) After that is done, you assemble the payload section (glue in coupler and screw eye), and the other little things you do at the end like fillets, launch lug, etc. Construction was pretty fun, and I liked the way that everything fit almost perfectly.
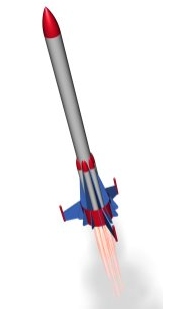
Picture courtesy of
SemRoc
Finishing:
For finishing, I first sprayed the entire rocket with white primer. I then
touched up rough spots with sanding and putty until when I primed it everything
was smooth and filled in (spiral, balsa grain, fillets, etc.). I then sprayed
the entire rocket with white gloss Krylon paint. When that was dry, I sprayed
the payload tube and nose cone Krylon gloss blue. After that was dry, I applied
4 of the many decals the rocket comes with.
Construction Rating: 5 out of 5
Flight:
At long last, I finally got to fly it! Last month's launch was cancelled due to
snow, so I had been waiting anxiously for this month.
First flight was with only one C6-3 just to test things out. Worked nicely, with a slow, majestic ascent.
Second flight was with seven C6-7s.
First attempt: Wired up 7 high current igniters to the motor and twisted the wires together. 5-4-3-2-1-Lauch...nothing. Too little current coming from the launch controller.
Second attempt: Same igniters and setup, but used leads from the high-powered pads. Still no go.
Third attempt: Took out 3 motors to have a 4 motor cluster. Used leads from high-powered pads. 5-4-3-2-1-Launch...Smoke...nothing. Igniters in all 4 motors burned but not the motors. The igniter plugs seemed to have insulated some of the current because only the lower-most part of the igniter had burned and the pyrogen was still intact on the upper portion--the motor touching portion.
Fourth attempt: Used a clip whip (Thanks to Dave Morey for supplying it) to wire up 7 Estes igniters. 5-4-3-2-1-Launch....Smoke....FIRE!!! The rocket roared up into the sky with the full fury of 7 C6 motors burning in the rear. After about 3 seconds, with the rocket barely in sight, POP! POP! POP! POP! POP! POP! As the 6 outboard motors were ejected. The central motor ejected the parachutes and it drifted about 1/2 mile downwind. Post-flight inspection showed that all motors had apparently burned, because all of the motors ejected.
PROs: Full cluster ignition is incredible to watch. Attracts a lot of attention on the pad.
CONs: Hard to light all motors, especially with high-current igniters. The only igniters I found that would work are Estes Solars, but for those you need a clip whip because the wires aren't long enough to twist together.
Recovery:
First Flight (1x C6-3): Loosened one fin on impact, but that was my fault,
because I only attached one of the parachutes to the booster section. Fin was
easily fixed with some CA glue and accelerator.
Second Flight (7x C6-7): If you ever fly this rocket on the full load-out of motors, you may want to consider tying the two sections together or installing a micro dual-deployment device because this rocket DRIFTS! I had to walk about 1/2 mile for the booster and then the payload was another 1/2 mile past that. Whew! I'm glad I didn't put the two parachutes on the booster for that flight! Anyway, the same fin loosened again at the fillet, but that can still be repaired.
PROS: Recovery device is well made and anchored well. Provides an okay decent rate.
CONS: Drifts very far even without one of the three parachutes.
Flight Rating: 4 out of 5
Summary:
Overall, I really enjoyed this rocket in building and flying. The only thing
that needs a little work is the recovery system. If you buy it you will not
regret it and you will have a lot of fun with it. Currently this is my favorite
rocket out of a fleet of about 20.
Overall Rating: 5 out of 5
Other Reviews
- Semroc Hydra VII By Nick Esselman (August 9, 2008)
The Hydra VII is my second Semroc kit. My first one, Lil' Hercules , never got reviewed by me and only saw one flight as it vanished from the pad. My second impression of Semroc, which confirms my first, is that they run a very professional company. From 1969 to 1971, " Semroc produced a full line of rocket kits and engines. At its peak, Semroc had twenty-five full time employees working at ...
- Semroc Hydra VII By Frank G. Whitby
Semroc Hydra-VII is a 7 motor cluster rocket with a futuristic design. The kit included every part that was described in the long list. There is a very nice exploded view of the rocket in the instruction sheet that helps in identifying the wide array of parts, along with 3 sheets of very nice laser-cut balsa fins and a host of tubes and several nosecones. The kit comes with some plastic ...
 |
 |
Flights
Sponsored Ads


")


|
|