Public Missiles Small Endeavour
Public Missiles - Small Endeavour {Kit} (PML-SMALLENDEAVOR)
Contributed by Al Casper
| Published: | 2010-11-13 |
| Diameter: | 2.50 inches |
| Length: | 47.25 inches |
| Manufacturer: | Public Missiles  |
| Style: | Sport |

PML's Small Endeavor, featuring the Quantum Tube
Assembly, Quantum Tube Tests, Finishing, Launch
By: Al Casper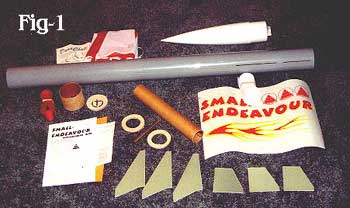 Public Missiles is
now offering the new Quantum body tubes in several of their kits. The tubes are
gray in color and made from a special blended polymer. PML claims you can drop
it, squeeze it, even throw it, without damage. We shall see. They also claim
most epoxies and paint will work just fine on the new
tubes.
Public Missiles is
now offering the new Quantum body tubes in several of their kits. The tubes are
gray in color and made from a special blended polymer. PML claims you can drop
it, squeeze it, even throw it, without damage. We shall see. They also claim
most epoxies and paint will work just fine on the new
tubes.
The Quantum tube does have one thing missing, the spiral groove! For me, the Quantum tube had to be an improvement over Phenolic body tubes which I avoid using. I chose the Little Endeavor kit (Fig-1), a 2.6" diameter, 38mm motor rocket for this review. The kit features fiberglass fins, a heavy duty nose cone, 1" shock cords, a quality 30" parachute, piston assembly, and decals.
 With a few exceptions I built the Small
Endeavor following the instructions carefully. I found the instructions to be
about average for a high power rocket kit. They had not been updated for the
new Quantum body tube; an orange insert explains the use of epoxies and paint
on the tube.
With a few exceptions I built the Small
Endeavor following the instructions carefully. I found the instructions to be
about average for a high power rocket kit. They had not been updated for the
new Quantum body tube; an orange insert explains the use of epoxies and paint
on the tube.
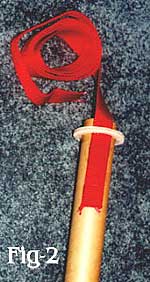
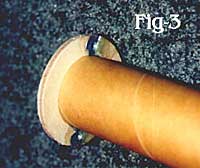
The lower nylon shock cord mounts through the upper centering ring and is epoxied to the motor mount tube (Fig-2). I usually add a section of fiberglass cloth over the shock cord/motor mount just to be sure. I also added a pair of #6-32 blind T-nuts to the lower centering ring for motor retention (Fig-3). Just add two spacers, two fender washers and #6-32 screws, and your motor will stay where it belongs.
 Before proceeding to step 3 - mounting
the motor mount tube assembly into the body - thoroughly rough up the inside of
the Quantum tube with 60-80 grit sandpaper. This is only mentioned on the
orange instruction insert. I cemented the sandpaper to the end of a 38mm tube
to allow sanding the whole area where the fins and centering rings must adhere
to the inside of the body. Also sand the area around the fin slots on the
outside of the body tube.
Before proceeding to step 3 - mounting
the motor mount tube assembly into the body - thoroughly rough up the inside of
the Quantum tube with 60-80 grit sandpaper. This is only mentioned on the
orange instruction insert. I cemented the sandpaper to the end of a 38mm tube
to allow sanding the whole area where the fins and centering rings must adhere
to the inside of the body. Also sand the area around the fin slots on the
outside of the body tube.
At this point I performed an epoxy adhesion test on one of these sanded areas; I tried three different epoxies from 6 to 30 minute cure times. When completely dry, I used an exacto knife to remove the little test blobs. All three were removable, but I was satisfied with the quality of the bond.
Be sure you do not epoxy the lower centering ring at this point in the assembly, it needs to be removed later.
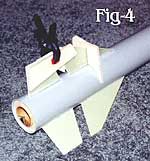 I used 6 minute epoxy and a homemade
alignment jig for the initial fin assembly. I clamped the upper and lower fins
together to keep them perfectly aligned (Fig-4). Let each fin dry thoroughly
before moving on to the next set.
I used 6 minute epoxy and a homemade
alignment jig for the initial fin assembly. I clamped the upper and lower fins
together to keep them perfectly aligned (Fig-4). Let each fin dry thoroughly
before moving on to the next set.
Now it’s time to remove the lower centering ring; I just installed #6-32 screws into my blind nuts to gently pull it out. I’m not sure how you would get it out without the screws.
At this point, the instructions have you apply epoxy fillets to the areas where the fins contact the motor mount tube and at the inside of the body tube. I decided to try something a little different: I cut 12 pieces of fiberglass cloth about 1" x 3"; one at a time and soaked them with epoxy. With the help of a long stick, I was able to work each piece into those same areas of contact inside the body tube, after completing all 12 areas of the upper fins, I repeated the process on the lower fins. I believe this method will be much stronger than an epoxy filet. The exterior epoxy filets were done in the usual manor; I like to pour the epoxy out of a small paper cup with a "V" folded on the edge.
The kit included one 4" brass launch lug, but the instructions called for two 2" lugs. I guess you have your choice. I decided to cut the lug, and mount it per the instructions. After the epoxy had set, I added some fiberglass cloth around the lugs and to the body tube for added strength. I have seen several brass launch lugs still on the launch rod after a launch attempt.
The piston assembly and shock cord setup were installed without any modifications.
 Before I painted the rocket, I wanted
to see for myself if you could really abuse the Quantum tube. I placed a sock
over the nose cone and took the almost completed Endeavor outside and gave it a
toss -- I was attempting to get it to stick in the ground like a lawn dart. On
the first two or three tries, I did not get enough zip or arch on my tosses,
and the rocket just bounced when it hit the ground, without any damage. Finally
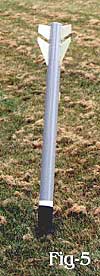
I gave it a throw with enough on it for the rocket to stick (Fig-5): again
there was no damage. I was not finished. I put the Small Endeavor in the
freezer for two hours and then repeated the test: I was not able to damage the
Quantum tube.
Before I painted the rocket, I wanted
to see for myself if you could really abuse the Quantum tube. I placed a sock
over the nose cone and took the almost completed Endeavor outside and gave it a
toss -- I was attempting to get it to stick in the ground like a lawn dart. On
the first two or three tries, I did not get enough zip or arch on my tosses,
and the rocket just bounced when it hit the ground, without any damage. Finally
I gave it a throw with enough on it for the rocket to stick (Fig-5): again
there was no damage. I was not finished. I put the Small Endeavor in the
freezer for two hours and then repeated the test: I was not able to damage the
Quantum tube.
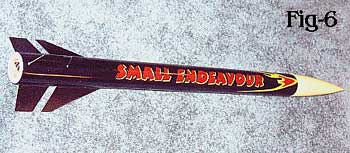
I wanted the Small Endeavor to look good with a minimum of time spent on finishing. The orange instruction sheet has you give the body tube a light sanding with 320 or 400 grit sandpaper, I used 400 grit on the whole rocket. I used an inexpensive gray primer, followed by Rustolium metallic charcoal paint. I applied the included decals, and then sprayed inexpensive gloss clear paint over the entire rocket and decals: this gives the decals the same sheen as the paint while making the whole finish more durable (Fig-6).
I compared the weight of the Small Endeavor to my Rocket R&D Ibis which is the same diameter, slightly longer and was modified to include a piston and 38mm mount. I weighed both rockets with the same PML 30" chute, the Endeavor came in at 31 ounces compared to 25 ounces for the cardboard Ibis.
 I planned to launch the Small Endeavor
on either a G-64W or H-73J on it’s initial flight. Because of strong
winds, I chose the G-64W with a medium delay. The boost was as straight as
possible for the weather conditions. It was the longest medium delay I have
encountered to date; I started thinking I would be able to report on what
happened after it penciled in. Finally the chute deployed with a jolt that
surely would have zippered a phenolic rocket. After the flight I could not even
find a mark on the end of the body tube.
I planned to launch the Small Endeavor
on either a G-64W or H-73J on it’s initial flight. Because of strong
winds, I chose the G-64W with a medium delay. The boost was as straight as
possible for the weather conditions. It was the longest medium delay I have
encountered to date; I started thinking I would be able to report on what
happened after it penciled in. Finally the chute deployed with a jolt that
surely would have zippered a phenolic rocket. After the flight I could not even
find a mark on the end of the body tube.
As of now, the Quantum tube is available in diameters up to 4", and it is a bit more expensive than phenolic or cardboard tubes. I would like to see the Quantum offered in the larger sizes, or maybe some new sizes like 3.5" or 4.75". This is a great new product I highly recommend.
Written and submitted by Al
Casper for Rocketry Online -- Copyright 1996-1999
Other Reviews
- Public Missiles Small Endeavour By Brian Sutton courtesy of WildRocketry.Com
(by Brian Sutton courtesy of WildRocketry.Com) A couple of months ago, Charlie, the owner of HobbyTown USA in Brea, CA told me he was bringing in PML kits I started getting excited. I told him to hold on to a Pterodactyl Jr. for me (See Kerry's review of the kit ). When they came in, I opened the shipping box for Charlie and pulled out the Pterry (sorry Kerry). I found the kit easy to ...
 |
 |
Flights
|
|
T.L. (January 1, 2001)
J.S.G. (October 2, 2001)
S.R. (January 26, 2002)
|
|
G.G. (July 1, 2000)