Aerospace Specialty Products Aerobee 100 Junior
By Jeff Curtis
Published: 2024-10-27
| Construction Rating: | starstarstarstarstar |
| Flight Rating: | starstarstarstarstar |
| Overall Rating: | starstarstarstarstar |
| Manufacturer: | Aerospace Specialty Products  | |
| Diameter: | 1.8900 inches | |
| Length: | 29.5000 inches | |
| Style: | Scale |
The Aerobee 100, or Aerobee Junior, was first flown early in 1958. This vehicle was designed by Aerojet General to be an inexpensive rocket to fly payloads of 50 - 100 pounds up to 90 miles. Most of the 20 produced used a solid-fuel booster, but two were actually sea-launched as a single-stage rocket (which makes this model eligible for NAR Scale competition).
Aerobee rockets have long been a favorite of scale modelers. This kit is 1.89" in diameter and 29.5" tall and features thru-the-wall laser-cut plywood fins (with optional balsa laminations), a big balsa nose cone, pre-rounded basswood conduits, a steel cable shock cord mount and a water slide decal.
1.89" body tube
Balsa nose cone
1.89" coupler
Plywood fins
Balsa fin skins
29mm motor mount with plywood centering rings
Half round conduits
Elastic shock Cord
Steel wire shock cord anchor
Plywood bulkhead
Waterslide decals
Stir sticks and syringes for epoxy
Components are top notch. I'm subtracting one star because the fins have through-the-wall tabs but the body tubes are not slotted.
The first thing I did was cut the fin slots in the body tube. This is not something you have to do very often, but with a sharp knife blade it's really not too difficult. They do not need to be perfect as any blemish will be covered by epoxy fillets. Once you have the slots cut you can position the centering rings on the motor tube. The wire shock cord anchor was inserted in holes in the forward centering ring. A loop in the wire is threaded through a metal sleeve which is then crimped, A similar loop is made in the forward end of the wire anchor. Here I deviated from the kit aa I replaced the elastic with Kevlar. With the motor mount done, I glued the motor tube into the aft end of the body tube. I made sure there was enough motor tube extended from the rear centering ring to allow for a Estes 29mm motor retainer to be installed. I used System 3 15-minute epoxy for all construction.
You have an option with the fins. There are plywood fins with the option to add balsa skins. The balsa skins are cosmetic and evidently make the fins more scale like. Use of the skins is optional, but I decided to use them. After attaching the skins I rounded the corners and glued the fins into their slots. Once the epoxy dried I added fillets made from epoxy and micro balloons. Then the 4 strakes were added in line with the fins. The semi circle strakes only required some rounding on the forward end.
Now it was on to the nose cone. It's one of the bigger balsa nose cones I have seen. The shoulder of the nose cone is small enough to fit inside the 1.89 coupler. Before the coupler was glued to the nose cone, I epoxied a couple of large washers to the base of the nose cone. Then the plywood bulkhead is glued into the end of the coupler. This was done after an eye screw was added to the bulkhead. I added epoxy to both side of the bulkhead around the eye screw. The Kevlar was tied to the eye screw using an improved clinch knot and a 24" nylon parachute was attached.
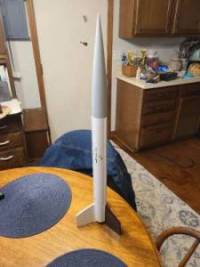
All that was left was painting the rocket and applying the minimal decal. ASP provides detail painting instructions on their website, but the paint scheme is pretty easy to apply. The instructions say the nose cone is aluminum but photos I had seen showed it a light gray. I went with the gray. One fin is black and everything else is white. The lone decal is an "Aerobee 100 Jr".
The ASP information say it should weigh 9 ounces but mine came in an 10.9 ounces. The washers added to keep the center of gravity forward probably accounts for most of the difference.
I've flown the rocket once to date, using an E20-7. The kit recommends an E20-4. Open Rocket said the delay should be 6.1 seconds so I went with the E20-7. I used the Estes 24/29 adapter. Flight was straight and close to the estimated altitude of 952 feet. I forgot to put in my Jolly Logic Altimeter II but I will use it on the next flight. Recovery was slow and there was no issues after it hit the ground. It was a low wind day, but on a windy day it might be okay to use an 18" parachute. Open Rocket said the descent rate on the 24" parachute was 16 feet per second while the 18" parachute simmed at a rate of 21 fps. I might try an F next. An F23 is only a couple of hundred feet higher than the E20 but a F62 reload predicts an altitude of 1500 feet. A G would be out-of-site and a Jolly Logic Chute Release would be advised.
This is a fairly small rocket for a 29mm motor and in fact most of my sims show the 24mm E and F motors are quite acceptable. It was an enjoyable build and I used high power techniques to produce a robust rocket. I highly recommend it if you like scale models and especially the Aerobee family. I would like to see the kit come with a slotted air frame, but it was not too much of a hassle to cut the slots myself. Cudos to ASP for producing this kit. There are a lot of Aerobee kits on the market, but I believe this is the only Aerobee 100 Jr.
Flights
Aerospace Specialty Products Aerobee 100 Junior Reviews
 |
 |