| Construction Rating: | starstarstarstarstar_border |
| Flight Rating: | starstarstarstarstar |
| Overall Rating: | starstarstarstarstar_border |
| Diameter: | 1.33 inches |
| Manufacturer: | Semroc  |
| Skill Level: | 2 |
| Style: | Futuristic/Exotic |
 Brief:
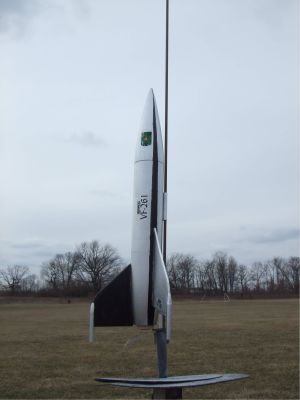
This is a Semroc original design, although it is inspired by the 1961 Estes catalog #261 (the VF stands for Vern's Fanttsay), which in turn was inspired by the Luna 3 from "Destination Moon".
The futuristic model shares many parts with the V-2 and flies fine.
Construction:
Parts are top quality:
- Balsa nose cone, screw eye anchor
- BT-55 body tube
- Balsa boat tail
- Laser-cut balsa fins (3)
- 18mm motor tube
- Launch lugs (trim details)
- Centering ring motor block
- 12" plastic chute
- Kevlar/elastic shock cord
- Waterslide decals
The instructions for this kit are very good, consisting of about 6 half-pages of black and white illustrations and notes. It is rated a skill level 1, however, I'd suggest that for someone wanting a nice finish, this would be at least a skill level 2, possibly a 3. It does go together quickly and easily but takes a careful hand to really make it look sharp.
Construction begins by gluing the centering ring motor block inside the BT-20 motor tube using a stuffer tube that's included with the kit. Next, tie a couple knots on the end of the Kevlar® shock cord and tape it to the outside of the motor tube. It doesn't have to be that secure since the whole thing slides into the boat tail and is pretty snug.
Before gluing the boat tail to the body tube, make sure to mark for the fin lines using the alignment guide printed in the instructions. Once the tube is marked, you can then glue in the boat tail and extend the fin lines down the tail cone.
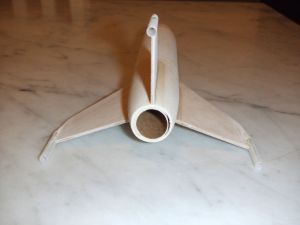
Fin attachment and alignment is a bit tricky. For starters, there are two main fins (aka wings) and a smaller central fin (aka rudder). These are spaced evenly around the circumference of the body tube but not mounted perpendicular so you won't get the normal 120-degree alignment. The wings line up nicely to the tapered tail cone at about 3/4" forward from the end of the cone and the dihedral is set by placing the tail cone flat on a table (atop a 3/32" shim), tacking the wings on, and letting the tips just touch the table. The rudder mounts flush to the end of the tail cone and is perpendicular to the cone.
Even though the laser cut fins fit fairly well, generous fillets and a little bit of filler putty are going to be needed.
Since this is based on a V-2 style design, it's going to need stability help. In this case, nose cone weight takes care of moving the CG forward. The cone comes drilled out so all that's needed is to pack in the provided clay then glue in a wood disk to seal it up (and serve as the attachment point for the screw eye anchor).
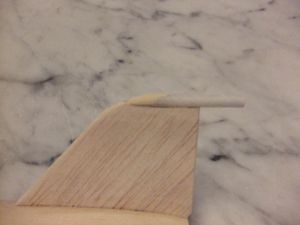
Construction wraps up by applying the launch lugs. One is obviously for the launch rod, and three others slide onto spars on the end of the fins. These leave a very rugged finish so it is suggested that small rounded cones be formed from wood putty to improve the appearance. It's that type of work that in my opinion elevates the skill level a good bit above the beginner's 1 level.
Finishing:
Most folks will probably want to go for a basic silver paint finish to this, and Patrick Bissonnette's previous review certainly looks nice with that approach. I decided though to add the black accents to model the cover art. It turned out to be much more difficult than I'd thought.
I started off, of course, filling balsa grains and tube spirals with a quick application of Elmer's Fill 'n' Finish but didn't wind up with as nice a job hiding the tail cone/tube seam as I'd hoped. I then applied a filler coat of automotive primer and wet sanded down to take off the roughness. I then hit it with three coats of Rustoleum Silver, which is supposed to be a mirror-like metallic finish as opposed to the more glittery silver metallic. This tends to be a finicky type of paint, especially in the variable humidity of the Midwest, and so I have a couple of flatter spots.
After allowing a full 4 days for the paint to cure out (tip: if it smells like paint, it's not cured) then masked off for the black trim. The upper rudder is black (except for the launch lug detail), and there are two stripes that run the length of the rocket centered around the two wings. While this looks like a straight line, due to the contours it requires a lot of curved mask lines. I wound up having to do a little touch-up with a black marker to even out the lines a bit. After doing all that masking and touch-up, I kept thinking it shouldn't be too tough to add in some black decals...
The decals add to the final appearance and were a breeze to apply.
Construction Rating: 4 out of 5
Flight:
For the first flight, I was flying on a smaller field and opted for the moderate B6-4 motor in 8-9 mph winds. It flew fairly straight though had a little bit of a spin on the way up. No weathercock at all so stability was perfect. It was still coasting up a bit when the deployment occurred but not so early as to warrant a longer -6 delay.
Recovery:
The 12" chute is a fine size for this, and everything came back in good shape.
Flight Rating: 5 out of 5
Summary:
Overall pros are the cool space ark type of design and quality of parts.
Con: The launch lug detailing is a bit rough, and it might be easier to just work with wood dowels or pick up some Micromaxx nose cones. It does though just come down to how much work you want to put into it for the appearance.
Overall Rating: 4 out of 5
Other Reviews
- Semroc VF-261 By Bill Eichelberger (May 5, 2009)
Brief: Recognizable by almost everyone as either the spaceship from the sci-fi classic "Destination Moon" or as the cover model from the 1961 Estes catalog, the Semroc VF-261 is both a quick and challenging build. It's quick because it has relatively few parts but challenging because of a couple of non-traditional steps. Construction: The kit includes: ...
- Semroc VF-261 By Patrick Bissonnette (September 23, 2007)
Brief: This is a cool retro style rocket that is sure to please everyone with its looks and flying. Construction: If you like quality balsa parts, this kit has it. Here is what the VF-261 comes with: Balsa nose cone BT-55 tube Balsa tail cone 18mm motor tube Laser cut fins Engine block Screw eye Plywood block 4 launch lugs Clay Kevlar ...
 |
 |
Flights
|
|
|
|
J.B.B.Jr (December 27, 2007)