| Construction Rating: | starstarstarstar_borderstar_border |
| Flight Rating: | starstarstarstarstar_border |
| Overall Rating: | starstarstarstarstar_border |
| Manufacturer: | Sunward Aerospace  |
Brief:
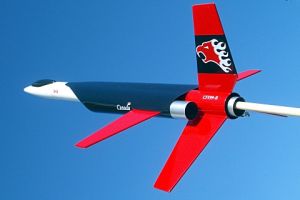
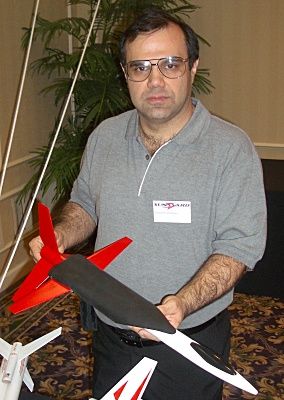
The Phoenix, like many other kits from Sunward Aerospace, is a conventional single-stage rocket with parachute
recovery and is styled to look like a fighter jet.
Construction:
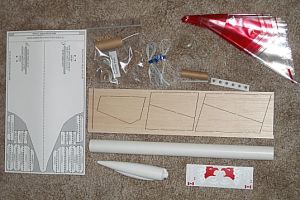
Parts list:
- 1 PNC56 Plastic Nose Cone with Canopy
- 1 18" BT56 Tube
- 1 Laser-cut balsa fin sheet
- 1 18" plastic parachute, clear and red
- 1 18mm motor mount kit
- 1 24mm motor mount kit
- 1 1/8" launch lug
- 1 Decal sheet
- 1 Printed cardstock sheet
The component quality is typical of other Sunward rocket fighter kits. The laser-cut balsa parts are well cut and the main body tube has almost no spiral. The motor mount tubes appear to be from a lower grade of brown kraft which fray easily if not soaked in cyano-acrylate before use.
My only substantial complaint about the components is the printed cardstock sheet. It contains one of the most distinctive features of this kit, a large wraparound shroud that looks like a major portion of the fuselage as well as a set of air intake scoops. Unfortunately, the shiny side of the cardstock, which should face outward when assembled, is covered with printed text. This makes it difficult to use light colors without resorting to multiple coats of paint. In addition, the cutouts for the wings are larger than they should be. The opening is sized to match the chord of the wing root, but because the wings taper, they are about 1/2 inch narrower than the hole when they pass through the shroud. Finally, the lines on the pattern are quite thick, making it unclear exactly where to cut.
Most of the Phoenixes that I have seen have been painted a single dark color. This may be because the printing on the shroud shows through light colors and the shape of the shroud makes it quite tricky to mask for multiple colors. To allow for multiple colors, I like to paint the components first (with the glue surfaces protected) then glue the parts together. My initial plan for the Phoenix was to paint it similar to the Canadian Air Force's Snowbirds precision aerobatics demonstration team with a predominantly red and white pattern and an angular stylized bird design on the belly.
 My first step in building the Phoenix was priming all the balsa parts to fill the grain
then sanding them down to almost bare balsa so only the grains were covered with paint. A similar primer/sanding
treatment was applied to the body tube after using 1/4 inch masking tape to cover the lines where the fins and shroud
would later be attached.
My first step in building the Phoenix was priming all the balsa parts to fill the grain
then sanding them down to almost bare balsa so only the grains were covered with paint. A similar primer/sanding
treatment was applied to the body tube after using 1/4 inch masking tape to cover the lines where the fins and shroud
would later be attached.
While the primer was drying, I cut out the shroud, curled it, and wrapped it around some BT-56 body tubes to help it achieve the proper curved shape. I let it sit overnight with several CD cases holding it in place.
Next, all the fins were attached to the body tube using the double-glue method with Elmer's Carpenter glue. Yellow glue fillets were also applied. I decided to use normal glue fillets and skip the cardstock reinforcing tabs provided by Sunward. The tabs do provide a lot of strength, but I don't care for their appearance. Based on my flight results, I probably should have used the tabs.
 After the glue had dried overnight, I painted the rear half the rocket with Rustoleum
Painter's Touch Apple Red paint. Due to some nasty "alligator skin" on the red paint, I ended up sanding
about half the red paint off and re-priming the lower half. After allowing the primer to dry thoroughly, the red paint
went on much better and had a beautiful smooth glossy finish.
After the glue had dried overnight, I painted the rear half the rocket with Rustoleum
Painter's Touch Apple Red paint. Due to some nasty "alligator skin" on the red paint, I ended up sanding
about half the red paint off and re-priming the lower half. After allowing the primer to dry thoroughly, the red paint
went on much better and had a beautiful smooth glossy finish.
The front half of the body and the nose cone were painted with Rustoleum Painter's Touch Gloss White. The canopy was painted with Gloss Black without incident.
Everything was going pretty well until I got to painting the shroud. It took two coats of primer and one coat of gloss white to cover the lettering printed on the shroud. At that point the paint was so thick that just attempting to guide it onto the body caused the paint to crack and splinter.
I then tried to print my own shroud using several different pieces of cardstock from Hobby Lobby and Staples. Some of the card stocks were too thin and flexible. Others were too stiff to curve nicely without creasing. The only one that was close to the right thickness had a surface so rough that even after two coats of gloss black paint it looked blotchy instead of shiny.
Greatly discouraged, I sent an email to Angelo Castellano, the president of Sunward. Knowing that we would both be attending NARCON in February, I asked him to bring a spare shroud sheet with him. He responded by bringing me three fresh shroud sheets and a spare set of decals.
 (A side note about Angelo. I had conversed with him several times online and already
thought he was a pretty nice guy. I was surprised to find that he is even nicer more personable in real life. Seeing
how he dealt with customers and his policy against competing against his dealers and distributors gave me a whole new
level of respect for Angelo.)
(A side note about Angelo. I had conversed with him several times online and already
thought he was a pretty nice guy. I was surprised to find that he is even nicer more personable in real life. Seeing
how he dealt with customers and his policy against competing against his dealers and distributors gave me a whole new
level of respect for Angelo.)
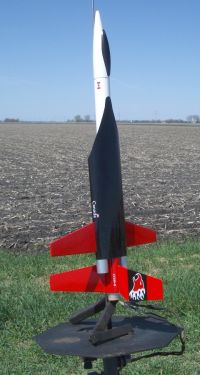
With the replacement shroud I decided to abandon the Snowbird color scheme and switch to a simple black shroud. I ran the sheet through my HP inkjet printer to put a light gray color on the inside of the shroud. After cutting it out and curling it to the proper shape, a single coat of Gloss Black was enough to cover the outside surface. Much better!
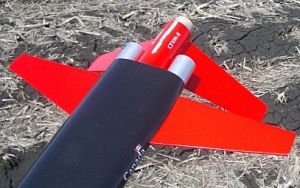
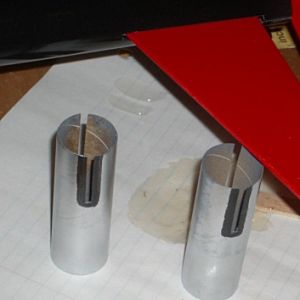
Rather than using the cardstock reinforcement band to stiffen the shroud, I decided to experiment with some fake jet engine exhausts. Two 2.75 inch BT-50 motor tubes were painted with Metallic Aluminum, then slotted to fit on the main wings. After the shroud was glued into place, the two exhaust tubes were glued to the inside of the shroud to help it maintain its curved shape. Later, the exhaust tubes were glued to the wings to keep the tubes in place.
Next, the motor mount was installed. Sunward provides the option to build with either an 18mm or 24mm mount. I chose the 24mm mount to take advantage of the higher takeoff thrust of the C11 motor compared to a C6 or B6. I can still use 18mm motors with an adapter if I choose to.
 Finally, the shock cord was installed and two launch lugs were glued to the belly.
Finishing:
As already explained, I did most of my painting as part of the build process. After completing assembly and painting,
I applied the decals. Many modelers do not like peel-and-stick decals, but these were pretty good. The most impressive
decals on the sheet are a pair of screaming phoenix heads that fit nicely on the vertical tail fin. Before applying the
decals, I painted a black stripe on the vertical fin so that the red and white phoenix heads would be more visible.
As a final step, I applied a coat of Future floor polish to seal the decals and give a clear protective finish.
I am very pleased with the finished appearance and have received unsolicited compliments from rocketeers and non-rocketeers.
Construction Rating: 3 out of 5
Flight and Recovery:
Sunward recommends B6-2, B6-4, C6-3, and C6-5 for the 18mm motor mount, and D12-3 or D12-5 when built with a 24mm
mount. For my flights I used a D12-5 once and the C11-5 twice. I intentionally chose the longer delays because I wanted
to see the "wild smoking nose dives" that Sunward advertises. These engines turned out to be good choices.
Flight preparation is fairly standard: insert wadding, fold parachute, and insert nose cone. The 24mm motor is held in place with a standard spring steel engine hook. (If built with the 18mm motor option, the motor is retained with the threaded L-hook used on other Sunward kits.)
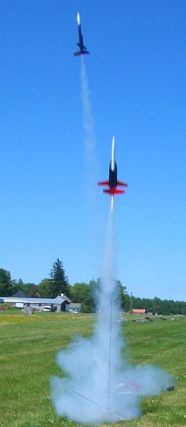
On its maiden flight with a D12-5, the Phoenix took off very quickly then left a long smoking trail that arced past apogee. Many in the crowd started murmuring, wondering when the ejection charge would fire. Finally, it popped and the 18" red and clear chute opened cleanly and lowered it to a fairly gentle landing in some tall weeds.
After landing, the wind caught the chute and dragged the rocket through the weeds. Somewhere in that process, the vertical tail fin broke off and was never found.
I used the laser-cut sheet as a template to build a new tail fin from some balsa stock. After painting the fin red and black, I applied the phoenix heads from the spare decal sheet that Angelo had given me. I attached the fin with epoxy and then used a black paint pen to cover the fillets and rough spots where the original fin had torn off.
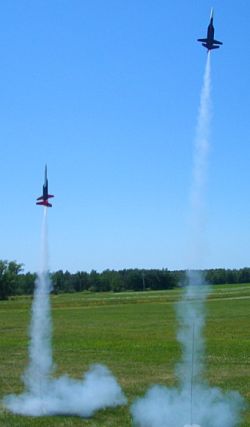
Flights #2 and #3 occurred several weeks later and were virtually identical to each other. In both cases I drag raced against a purple Phoenix that was built before Sunward offered the 24mm motor option. Mine flew with a C11-5 both times, while the other flew with a C6-5 and a C6-3. On both flights, the C6 took off a little sooner, but the C11 quickly accelerated past it. The long delay on the C11-5 created an arcing smoke trail past apogee followed by a clean deployment. On flight #2, one of the lower tail fins cracked loose. A dab of medium CA was all that was needed to prepare for flight #3, which incurred no damage.
I noticed something interesting about the stock built purple Phoenix that I raced against. Because it used the lighter 18mm motor and did not have the fake jet exhausts, its center of gravity was farther forward during descent. While mine descended with the body hanging vertically below the parachute, the purple Phoenix fell nearly horizontal, using the body drag to slow the descent. Despite using a streamer instead of a parachute, the purple one still landed gently enough to avoid any damage. The cardstock reinforcing tabs on the fin roots of the purple Phoenix did their job well.
Flight Rating: 4 out of 5
Summary:
This is a great looking kit that flies beautifully. The wraparound shroud gives the kit a unique look but is tricky
to get aligned and finished properly.
PROs: Great flights, with wild smoking dives. Great appearance.
CONS: Shroud assembly is tricky to align and finish properly.
Overall Rating: 4 out of 5
Other Reviews
- Sunward Aerospace Phoenix By Tim Burger
Brief: Futuristic, military interceptor styled rocket with an 18mm mount and rated for B6-2, C6-3, and C6-5 motors. Construction: This kit is manufactured by a Canadian company and is a little different than most of the kits that I've become familiar with. The motor hook is a complete departure from the long thin spring steel hooks we've been using for over thirty years, there ...
- Sunward Aerospace Phoenix By Nick Esselman
Sunward Aerospace is a Canadian company with a unique line of model rockets, most of which fall under their RocketFighters design. They put together a quality package, including colorful front card, parachute printed with their name and thorough instructions. Each of the their kits use their own canopy-type nose cone as well. I chose the Sunward Phoenix due to its sleek design. I also believe ...
 |
 |
Flights
|
|
|
|
B.F.B (August 17, 2005)