| Construction Rating: | starstarstarstarstar_border |
| Flight Rating: | starstarstarstarstar_border |
| Overall Rating: | starstarstarstarstar_border |
| Manufacturer: | Sunward Aerospace  |
Sunward Aerospace is a Canadian company with a unique line of model rockets, most of which fall under their RocketFighters design. They put together a quality package, including colorful front card, parachute printed with their name and thorough instructions. Each of the their kits use their own canopy-type nose cone as well.
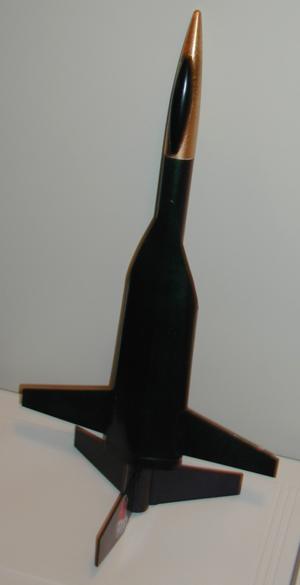
I chose the Sunward Phoenix due to its sleek design. I also believe the rudder fin design drew me to it, verses their other RocketFighters. The Phoenix is 24 1/2" long with a wingspan of 13 1/2". It weighs 4.2 ounces and flies on 18mm motors.
See my 18mm Futuristic Rocket Comparison Page
 The rocket kit includes an 18" main body tube. This tube is sturdy and is 1/32" thick. It also includes the 18mm motor mount that is made up of the motor tube, two large paper centering rings, a thrust ring and an L-screw motor retainer. The body is build up using laser-cut balsa fins, cardstock shrouds and a plastic nose cone. The recovery system includes an 18" parachute which needs assembly and 32" of ¼" flat-elastic shock cord. Lastly, along with instructions, there are some peel-n-stick decals.
CONSTRUCTION:
The instructions are printed on 11 pages of 8½ x 11" paper. They include illustrations for every step. They are written in English and French. They also include instructions to perform a swing-test and the Canada Model Rocket Safety Code. A Fin Marking Guide and the 3-Fold Paper Mount are built into the instruction pages, which are cut out when needed. I found the instructions to be thorough and easy to follow. There was nothing unclear.
The build of this rocket is a bit advanced and would probably fall into the Quest Skill Level 3 (like the M2Q2) or the Estes Skill Level 3 (like the Night Wing). But, again, the instructions are thorough.
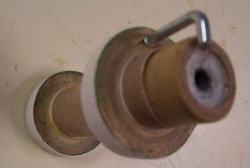 The first part of the build is the motor mount. It is made up of the 18mm motor tube and two very large paper centering rings. As opposed to Kelo's build of the Desert Storm (pictured to the right), Sunward now provides centering rings with pre-drilled holes for the L-screw. The fit was excellent. The motor mount also includes a thrust ring.
The next steps walk you through the attachment of the fins. First, the tube is marked using the fin marking guide and a straight edge (I use a door jam). Next, the fins are removed from the balsa. The laser cut is excellent and there were just a few tabs that needed a slice with the hobby knife to release them. Next, all the various fin tabs need to be cut out of the card stock. Yes, fin tabs! This is the first time I have come across these for a balsa finned rocket.
I followed the instructions exactly, but found that most of the fin tabs were too long when compared to the length of the fins. I didn't realize they would be exposed and require finishing until after a few more build steps, so I didn't cut them down until after the glue had dried. SO: Trim your fin tabs to ensure that they do not extend beyond each side of the fins! I think Sunward needs to do a slight size adjustment to avoid this problem.
Next the main body shroud is assembled. I followed the instructions exactly and didn't have any trouble installing the shroud. The shroud is cut out and pre-formed by wrapping it into shape. Then two slits are cut out to go over the main wings. It is glued on top and then again at the bottom where the two outer edges come together. 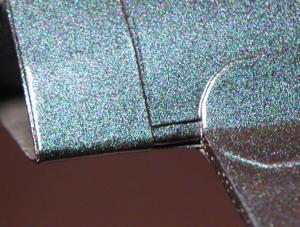 There is then a cover strip for the bottom and a reinforcing ring for the very rear of the shroud. It all went together well, until it came to the last of the fin tabs (again). These tabs, which cover the joint between the shroud and the main wings, were too long. I cut it to size, but that left about a 1/4" space behind the wing where the shroud is cut out to accommodate the wing. I used the scrap tab and glued it on the inside of the shroud to fill that area.
To finish up the rocket, the motor mount is installed and the launch lugs are attached.
I had made a decision this year to not purchase any addition paint, so I am using up what I have. In this case I prepared the rocket by sanding the nose cone and priming. Actually using my tractional method for finishing plastic nose cones. I didn't try to hide the fin tabs at all. In fact, this is where I began to see some potential for having fin tabs. If one were to take a pin and carefully make spaced holes on the outer edge, these would look liked riveted joints on the finished rocket. I didn't do this, but would next time.

I finished the rocket with DupliColor Mirage paint, the Purple/Green. I had just enough and the rocket was looking good. I decided to tape off and paint the canopy gold. I did this, but when I peeled off the tape it pulled some of the previous paint off, down to the plastic. Upon inspection, I did not sand the nose cone very well around the canopy. Please don't make the same mistake! Here is the word from Sunward: "It is particularly important that the nose cones be THOROUGHLY sanded with extra-fine grit sand paper before painting. The cones are made of High Density Polyethylene, which tends to be waxy. Sanding this off before painting assures that the paint doesn't peel." To recover, but really not the way I wanted, I painted the canopy black and the rest of the nose cone gold (since I was out of the Mirage paint).
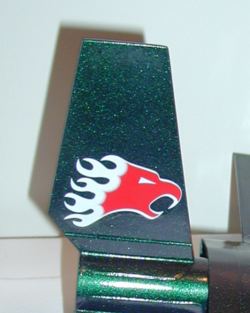 The decals are peel-n-stick and you cut them out. They are nice and include a set of eyes for the nose cone and a nice phoenix head for each side of the rudder fin. There is a Canadian flag and the words Phoenix to give the rocket a finished look.
Overall, for CONSTRUCTION I would rate this kit 4 points. The instructions are great. The components are quality and the laser-cut balsa is great. The issues come from the fin tabs not being the correct size and the straight elastic shock cord.
FLIGHT/RECOVERY:
Sunward recommends doing a swing test and gives you all the necessary instructions to do so, however, one would hope that a kit is already designed robust enough to ensure stability. I e-mailed Sunward to get the Center of Gravity location 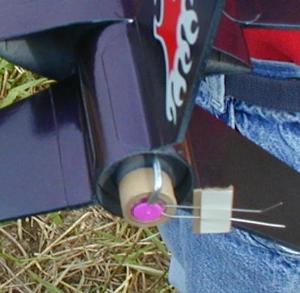 (CG) and here is the response: "The Phoenix's center of gravity is approximately 17" from the tip of the nosecone, depending on how the parachute is packed (or if you choose to use it- all our rockets land well without parachutes-on grass- that is!) and which engine is used- typically we fly them with a C6-5. While pre-flight testing is recommended in the instructions, our models' large wing spans usually make the plasticine nose weight unnecessary." My CG is 15 3/4" from the nose cone, without a motor and exactly 17" with a C6-5 installed. Sunward should add this to their instructions.
Sunward recommends the B6-2 (first flight), B6-4, C6-3 or the C6-5 for flying. My rocket weighed in at 4.2 ounces without a motor. To but this in perspective, an Estes Fat Boy weighs 3 ounces.
Lastly, Sunward indicates, "0-600 feet in 3.5 seconds" and that it will have "wild smoking nose-dives".
Flight preparation requires wadding and mine took 5 sheets of Estes wadding to feel comfortable with this tube diameter. After that a motor is installed and the L-screw is turned to hold the motor in place.
 My first flight was on an B6-2. It was a very good flight. Stable and straight even in the winds that we were having that day. In fact, prior to this launch I lost my Estes Night Wing because it was "moved" by the wind into the wrong skyward direction. The Phoenix seems less impacted by weathercocking, probably due to the the large tube-fins the shroud creates.
The B6-2 carried the rocket to approximately 50 feet and while the it still had a little upward movement the ejection popped the nose cone. Descent was fin and the rocket was recovered without issue.
The next flight, on the same day, was on a C6-3. I choose the 3 second delay due to the angle I put on the launch rod. I didn't want to lose the rocket while under 'chute. Again, another very stable flight. Slow, majestic lift-off. The 3 second delay was too short so it still had a pretty good head of steam when ejection occurred. Recovered fine with no damage.
 The Sunward parachute feels to be 2-3 times thicker than an Estes or Quest parachute. It has held up well for the 2 flights. Same is true for the elastic shock cord. The real test on these are flight 5+. Why 5? That is where I start to see Estes 3-fold/elastic start giving out and shroud lines showing stress. Maybe your experience is different.
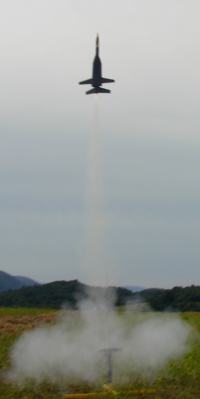
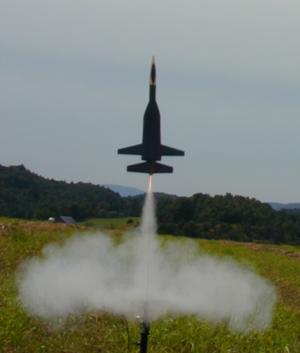
I was able to get out again and tried to achieve one of the "wild smoking nose-dives". Guess what? I did. With a C6-5. The lift-off was slow and straight. At Apogee the rocket slowly arced over, pointed it's nose cone down and started dropping (with delay smoke streaming out of the back). After a short dive, the ejection charge fired and the rocket was recovered.
The last flight for the day was on my last Apogee D10-7. No slow lift-off here. It was off and flying. It did a very large spiral on the way up and away from my pad. It arced over and I'm very glad that it dropped about 2 seconds (with black'ish smoke coming out the back) before ejection. Had it ejected at apogee I would have lost it out of the flying field.
For FLIGHT/RECOVERY, I would rate this rocket 4 points. The B6 motor makes it great for demo's. The slow lift-offs are nice. Recovery system is holding up well, despite my concerns over the elastic. This should be a 24mm kit with an 18mm adaptor. The L-screw is doing a great job.
I give the rocket an OVERALL rating of 4 points. It will give you a challenging build. It uses some interesting techniques that are different from standard modrocs. It gives some nice looking flights.
Other Reviews
- Sunward Aerospace Phoenix By Bob Cox (July 9, 2007)
Brief: The Phoenix, like many other kits from Sunward Aerospace, is a conventional single-stage rocket with parachute recovery and is styled to look like a fighter jet. Construction: Parts list: 1 PNC56 Plastic Nose Cone with Canopy 1 18" BT56 Tube 1 Laser-cut balsa fin sheet 1 18" plastic parachute, clear and red 1 18mm motor mount kit 1 ...
- Sunward Aerospace Phoenix By Tim Burger
Brief: Futuristic, military interceptor styled rocket with an 18mm mount and rated for B6-2, C6-3, and C6-5 motors. Construction: This kit is manufactured by a Canadian company and is a little different than most of the kits that I've become familiar with. The motor hook is a complete departure from the long thin spring steel hooks we've been using for over thirty years, there ...
 |
 |
Flights
|
|
|
|
B.F.B (August 17, 2005)