| Construction Rating: | starstarstarstarstar_border |
| Flight Rating: | starstarstarstarstar_border |
| Overall Rating: | starstarstarstarstar |
| Manufacturer: | Quest  |
| Style: | Futuristic/Exotic, Glider |
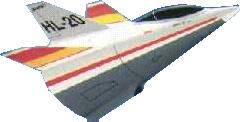
Packaging and quality average; not spectacular but not bad either. I would have to say 4 out of 5 though because the Aeroshroud looks really nice and saves a lot of finish work. The package came as a bag with cardboard picture. The aeroshroud, tube, nose cone, and centering rings were inside with the directions.
The directions were thorough and easy to follow (well written). The only part in construction that I expected difficulty was with the aeroshroud over the centering rings which where glued to the tube (motor mount) with nose cone on top. This actually proved to be easier than it looked with a simple shove to slip the shroud into place and "walla, done deal". I used CA glue to assemble the entire model and with my past experience I was done in 20 minutes.
The next portion of assembly is to glue the "fins" and scoop into place. A very nice feature design was that Quest had you glue the launch lug on the underbelly of the ship right where the scoop goes. This is nice so that you never really see the lug. The fins where made of the same cardboard as the shroud. The fins are hollow V-shaped and glued in places marked on shroud with glue tabs. The scoop attaches in the same manner as the fins/wings.
Adding balancing weight and streamer tube: next is a small tube covered on one end that you have to build and put aside. Next it calls for using an included tab-like thing to glue 2 pennies to the inside bottom of the craft to give it an orientation of up and down and balance the center of gravity properly.
This is one area the instructions are NOT clear, so I took a guess and got lucky. You have to glue the tabs with pennies inside on the bottom center-line, somewhere between the edges of the shroud and the joint of the rear most centering ring. But, the two different locations are far enough apart to have a large effect on performance, so I guessed at have it line up with the rear edge of the shroud and was right. I glued the streamer tube on to all of this with the opening to the rear of the ship!! not the front.
 Finishing:
This is what is so cool about the Quest Aeroshroud. You get awesome looking shrouds with no effort. You get a complete finish. But, a word of caution, CA glue will smear and ruin the Shroud finish if you get it on it and try to wipe it off . . . so be careful!
Trimming For Flight:
This was the fun part. No, really, you just need lots of patience and lots of practice. For although, this is not a record breaking glider, it is fun to watch, easy to prep and great for small fields. And dazzles the kids.
Hand tossing is difficult at best. Simply for its a very cumbersome, bulky design. You can not "hardball" it like a regular glider. You have to be very gentle. The idea is to see it glide just 5 feet, not 5 minutes (which you will never get). The idea is to see it glide just long enough to get an idea ofhow to trim it.
It will almost certainty need some up elevator to help pull the nose up and mine tended to turn left on the first flight.
Also, DO NOT install the streamer. Just forget it. Install the streamer tube. Install the streamer tube. Do everything you are supposed but when you prep the motor, simply forget to do the streamer portion. You will not regret it . . . I will explain later.
Construction is 4 out of 5. Very straight-forward. Not easy but clear assembly instructions and good engineering led to no difficulties. In fact, if you have built an Alpha, the one where you have to glue on the fins, I say you can do this kit. But, you may need help with the aeroshroud sticky tape. It is very effective and totally permanent (so far after 20 some flights) but very finicky on assembly.
Flights:
I have flown this bird many times and have now retired it and look forward to getting another to build very soon. Here is just some of my flight notes:
The first few flights were horrible! Just like people all over the net described. Nasty low boosts, short boring quasi-glides. It would boost to 50 feet (maybe a little higher), go into a power-glide and then eject and glide for about 3 seconds.
On the fourth flight I could not find the engine casing and streamer so I said, "skip it" and flew it with just an engine; C6-3 which was the same as first 3 flights (3 seconds or less delay ONLY !)
Wow, what a difference. It had a squirrelly wobbly boost, straight up, several hundred feet. Transitioned to glide and what can I say, it won't win any awards for time aloft, but I must say it was great. That little plane really flew nice.
I did it again and again and again that day until I was out of engines. I just love this little glider.
I flew it some more at a PARA launch and easily cleared 200 yards glided distance several times!
I launched it at NARAM-40 and got the expected, "Uh, Oh" type comments that turned into my expected, "hey, it really works and not all that bad either".
At NARAM it was nearing 20 some flights and was showing it's age after some harder than nice landings etc. . And some harsh beat it up in the back with the kids car trips etc. . .
I decided to go out with a bang and wanted to get some really cool glide times, but what engines would give me more altitude than a C6-3 in 18mm. Tim [from Apogee] says, "hey, a D3-3 might lift that. Its real draggy, but it might do it". I said, "what's so special about a D3?". He says, "a 6. 8 second burn time. "I said, "SOLD".
I launched, after 7, yes 7 failed launches (he said they were tough to light). I got it to light and WOW it went up and up and higher than a C6 and up and up and way higher than a C6. 3 seconds into flight 3. 8 seconds of burn left and up and up and over and down and down and down and down, mayday, mayday, SLAMMMMMM Crunch Six Million Dollar Man right in the middle of the field. As the thrust burnt out to lower regressive burns it was NOT enough to keep it pointed UP so it augured in while still thrusting.
But, almost no damage except a ripped nose cone. Easily glued to fix on the spot. WE Can REBUILD HIM Steve Austin must have been piloting that flight.
Now it is harder and harder to trim. It is getting old so I stop flying it (I fly my birds to their deaths).
Some notes for building future HL-20's
Have cleaning supplies and clean after every single flight. That ejection charge gets dirt and smut all over the inside of the tube. Centering rings and shroud will eventually effect the balance of the ship and make it harder and harder to fly . . . so, clean it up after each flight.
For flight points, I have to rate this awesome, fun-as-anything ship a 5 out of 5. Pure fun, once you get through the trimming nightmare.
Other Reviews
- Quest HL-20 Lifting Body By Dave Sutter
The Quest X-30 Aerospace plane caught my eye, and it was on sale at Magnum for $4. 50, but I was a little wary of the paper shroud construction. Well, the Quest HL-20 uses paper shroud construction, too, and it was also on sale, for $2. 50, and it's supposed to be easier. I figured I'd try the HL-20 as an introduction to paper shroud construction. (I got two of each just in case. ) ...
- Quest HL-20 Lifting Body By Alan Rognlie
I had a Centuri MF-24 Bug years ago and the Quest HL-20 reminded me a lot of that kit. This lifting-body boost glider is based on Aeroshroud technology. Translated, that's a printed paper wrapper. ;-) It looks to me like this model was strongly "inspired" by the old Centuri MF-24 Bug - with some "improvements". The only significant(?) differences I see between the two are: ...
- Quest HL-20 Lifting Body By Eric Miller
This rocket was a bargain. My wife got it for me on he clearance rack for $.99. I was disappointed, at first, since the entire rocket is made of painted construction paper except for the nose cone and engine mount. This kit included a paper shroud body, plastic nose cone and cockpit. Fins are paper also. There is a streamer include in kit and it is used to recover the ejecting engine. ...
 |
 |
Flights
|
|