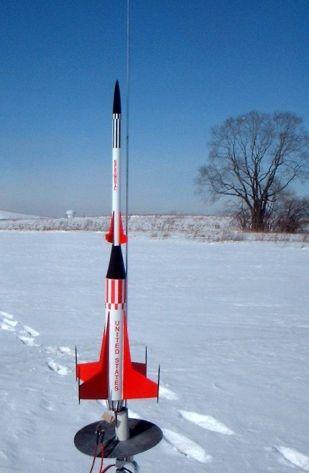
| Diameter: | 1.34 inches |
| Length: | 21.50 inches |
| Manufacturer: | Semroc  |
| Skill Level: | 2 |
| Style: | Futuristic/Exotic |

(Contributed - by Chan Stevens)
 Brief:
Semroc offers a fine line of "retro repro" kits, which introduce
modern improvements to classic Estes/Centuri designs. The Laser-X was
originally introduced in 1968 and has been faithfully reproduced by Semroc with
upgraded Kevlar shock cord and adhering to the original balsa nose cone and
tube sizes.
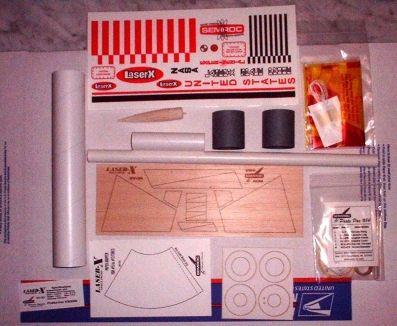
Construction:
The two body tubes are roughly BT-5 and BT-50 although they are actually the
Centuri originals. Fins are from laser cut balsa, which was excellent quality.
There are also cutout centering rings, a shroud/transition, and tube
coupler/motor mount assembly. Recovery is through a 12" plastic chute,
with Kevlar®/elastic
shock cord combination. Water-slide decals are included to complete the kit.
Construction begins with a fairly demanding fin assembly process. The upper and lower fins (each a set of 4) are two-piece construction, and must be carefully aligned and bonded flat. Personally, I enjoy the craftsmanship required by this approach and find it much more rewarding than the basic E2X plastic fin cans out there these days.
The motor mount assembly is built from a tube coupler and pair of centering rings. The Kevlar® is attached to one of the rings then the 18mm motor tube and engine hook are inserted inside and bonded in place. The tube coupler certainly adds strength although I would have "upgraded" this by using thick, wound centering rings and eliminated the coupler assembly altogether.
 The process is
repeated for another tube coupler for the transition. Once the assembly has
dried, the transition shroud is cut, formed, and bonded to the coupler along
with the upper body tube. The nose cone is then glued into place.
The process is
repeated for another tube coupler for the transition. Once the assembly has
dried, the transition shroud is cut, formed, and bonded to the coupler along
with the upper body tube. The nose cone is then glued into place.
Next up is bonding of the fins--two sets of four, followed by 12 tiny fins that go along the bottom of the motor mount assembly, giving this a Mars Snooper-like appearance. The main fins are trimmed with four toothpicks, which look great but are destined to break off either on landing or in storage.
Recovery installation is straightforward using the standard attaching the chute to the Kevlar®/elastic combination.
Finishing:
Lots of balsa to sand and seal with this rocket--the standard paint scheme is
also very challenging, with three colors and lots of masked areas, including
fin edges. I would rate this a solid skill level 3 just for the aspects of the
finishing. After painting, the water-slide decals are applied, and after
following the standard scheme, I still had a few decals leftover. Oh well,
they'll look good on my next scratch project
Construction Rating: 4 out of 5
Flight:
First flight was on a modest B6-4, which was a good choice as it was
surprisingly quick off the pad. Despite the fairly large fins, this little
rocket screams.
There was a slight spin on the way up, but it followed a straight overall path and deployed right at the top. The chute didn't unfurl (I had 3 of those today, probably due to the freezing temps), but the rocket back-slid and landed gently in a bank of snow undamaged.
Recovery:
I'll blame luck and the weather on the recovery problem as I think the
materials provided are fine.
Flight Rating: 4 out of 5
Summary:
I love the retro/classic design and look forward to more of their products
being offered in the months ahead.
Overall Rating: 4 out of 5
Other Reviews
- Semroc Laser-X By Larry Zeilmann
Brief: As described by Semroc owner Carl McLawhorn; "a retro reproduction of an out-of-production model rocket kit." Otherwise, A.K.A. Centuri's Laser-X. In simpler terms; this is a single stage 18mm futuristic clone of the often coveted Centuri Laser-X kit that recovers on a single 12" plastic chute. Whew! Construction: Carl at Semroc has made a truly impressive ...
 |
 |
Flights
|
|
|
|
G.M.K. (July 11, 2007)