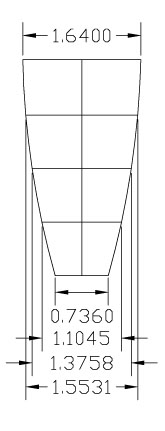
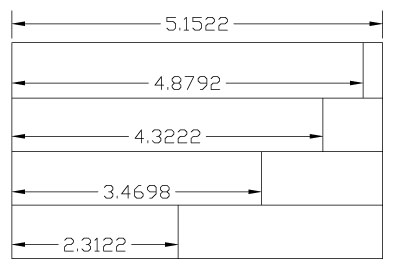
How to Make Curved Shrouds and TransitionsThe main disadvantage of shroud wraps is that they are limited to conical shapes. A couple of years ago, I ran across a report from US Rockets based on the work of Korey Kline that had a technique called the "Ace Fugue Shroud Method." Whereas this technique is not specifically designed to create curved shrouds, it is capable of creating them! The report is not the easiest bit of reading that I’ve ever done, so I thought I’d give you my version. This isn’t the easiest technique to figure out and it requires a good bit of arithmetic to pull off. The basic idea of the method is, instead of adding an extra paper wrap to the transition, to cut sections out of the larger size body tube and compress and bond the remaining sections of tube into the transition. First off, you need to figure out the size of your body tubes. Here is a link to a handy tube reference chart: http://www.ninfinger.org/~sven/rockets/body_tubes.html Also, having some CAD software is awfully handy to have. Here are a couple of links where you can get trial versions: http://usa.autodesk.com/adsk/servlet/mform?siteID=123112&id=8337786 It takes a bit to get used to using the software, but once you get the hang of it, it becomes nearly invaluable! Now that you have a couple of the basic tools, let’s go on to the process. For our example, we will make a fairly simple BT-60 to BT-20 3" long shroud. As you can see in the first diagram (see diagram 1), I have laid out the basic shape of the shroud, showing the front and back diameters. Additionally, I have divided the cone lengthwise into four sections. The more sections that are used, the more complex the computations required, but the more accurate the curves. Having CAD software is extremely useful here in that it can give you extremely accurate measurements. The software I use defaults to four decimal places! Once you have your diameters calculated, you need to determine the circumference. This is calculated by multiplying the diameters by pi (3.1415). The second diagram (see diagram 2), shows the diameters from our example relative to each other. The next step is to decide how many sections you want to divide your tube into. Again, the more sections, the smoother the possible shroud, but the more difficult it is to work with. For this example, I will be working with a fairly low count for simplicity. Four works fairly well, but I have worked with as many as eight.
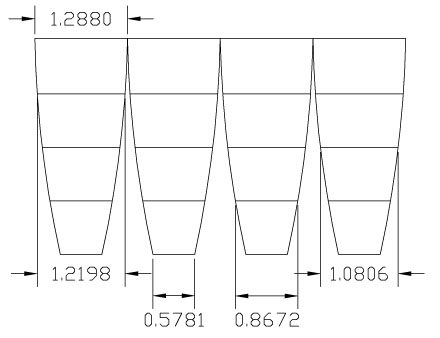
To determine the shape of the individual sections, you have to divide the circumferences we calculated earlier by the number of sections. These sections (quarters in this case) are then aligned along a central line. As you can see in the third diagram (see diagram 3), by joining the ends of the lines, a curve is created. After you have created the first panel, simply copy it as many times as you decided to make panels (in this case a total of four panels). See the fourth diagram (see diagram 4), to see our completed template. I usually allow a half an inch or so of an extra tab at the large end of the tube for ease of marking the tube. So, just to summarize the concept again, what you are doing here is cutting the larger tube into equal sections that are the same diameter as the smaller tube.
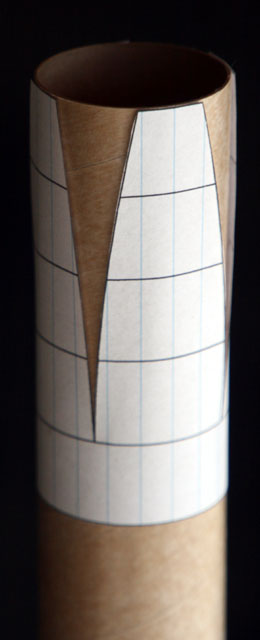
Okay, now it’s time to print out your pattern and walk away from the computer and get out to the workbench. Wrap the template around the tube (see photo 1). Be careful to get it as squarely taped in place as possible. Carefully trace the pattern onto the tube and remove the pattern. Next, as precisely as possible, cut off the extra sections between the tapered panels of the shroud. Whereas you can use your trusty ol’ x-acto here, as long as you are working on fairly thin wall tubing, it’s easier to use scissors. I know that sounds weird, but it seems to be the case to me as long as the cuts are being made along the length of the tube instead of around it (see photo 2).
Now that we have the triangular pieces cut from our large tube, take the smaller tube that you want to transition down to and put a centering ring on the end that will be inside the larger tube and glue this assembly inside just past the end of the cuts (see photo 3). After the glue has set, you want to make a small cut in the large tube just past the centering ring, on the transition side. This allows for a little flex in the tube as you form it into the smaller tube. Gently bend the larger tube into the smaller one. You may need to add a little extra curve to the outer tube to get it to properly match up. Depending on the length of your transition and the thickness of the tube, you may get some slight crimps. The only way I have found to avoid these is to use a much higher number of sections and working with thinner tubing. It’s okay if you get little crimps, they can always be sanded out later. I then use CA(superglue) to quickly bond the ends of the transition to the smaller diameter tube, working on opposite sides at the same time (see photo 4). Be careful here with the CA glue as it bonds skin even more readily than rocket parts! After the first sections have set, continue with the others until they have all been formed inwards (see photo 5). I like to bond the seams closed with CA. Not only does this cure quickly, but it also makes the tubing much more sandable… Which brings us to the last step in any rocketry project… Sand, fill, repeat. I find that with a coat or two of Elmer’s Fill-‘N-Finish, I can usually achieve a fairly smooth curve and surface on the transition (see photo 6).
Hopefully you will find this process a little less daunting than I did the first time I tried it. You can achieve great looking transitions with a lot of strength in a wide variety of shapes using this technique. Good luck! Contributed by Todd Mullin
What You Can Do |
|||||||||||||||||||||||
|
|